Defining an Attribute Template
Attribute templates are used to generate tables of specific attribute values for one or more objects in a network. These attribute tables are used when you:
-
Edit attribute values for multiple objects
For more information, see Using the Attribute Template Method.
-
Create custom reports of attribute values for screen or web viewing
For more information, see “User-Defined Reports” on page 855.
-
View a real-time table of selected attribute values
For more information, see “User-Defined Reports” on page 855.
An attribute template specifies the following information about an attribute table:
- Table category and name – Every attribute table belongs to a category, such as “IP” or “Application”, and has a name that identifies it.
- Object types to include – A table can include all network objects, a specific type of network object, or objects selected by custom criteria that you specify.
- Attributes to include – Each row of an attribute template specifies the title and contents of a column that will appear in the attribute table.
To define a new attribute template or edit an existing one, see the following procedure.
Procedure 178: Defining or Editing an Attribute Template
-
Choose Edit > Edit Attribute Template.
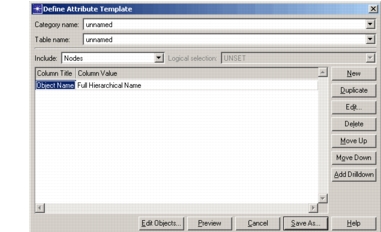
The Define Attribute Template dialog box appears. Each table row in this dialog box corresponds to an attribute column in tables generated from this template. At first, the only column defined is for an object name.
-
Choose whether to define a new template or edit an existing one:
- To define a new template, leave the category and table names set to “unnamed”. (You will specify these names when you save the template.)
- To edit an existing template, select its category and name from the pull-down menus.
-
Choose the object types to include in the table.
3.1 Select an object type from the Include pull-down menu.
3.2 If you selected “Objects in logical selection”, use the Logical selection pull-down menu to specify a selection criterion. You can use one of the predefined criteria or create your own (as described in “Select Objects…” on page 77).
Note: If you define a new selection criterion, you must close the Define Attribute Template dialog box and return to Step 1 to make your criterion appear in the Logical selection pull-down menu.
-
Choose the attributes to include in table columns.
-
To add a new undefined column, click New.
-
To add a new column based on an existing one, select the desired attribute row and click Duplicate.
-
To edit a column definition, select a row and click Edit. (Alternatively, you can double-click the Column Value field.) This opens a dialog box for specifying the contents and format of the table column; see Editing an Attribute Table Column for details.
-
To delete a column, select its row and click Delete.
-
To add a drilldown, select a row and click Add Drilldown.
A drilldown is a child table that you open by following a link in the parent table. Drilldowns are useful when you want to show a set of related attributes in a separate window. For example, you might want to create a drilldown table for IP port attributes on a router.
This operation creates a drilldown table definition, which is initially equivalent to the current table definition. To edit the drilldown table, select the row and click Edit.
You can also move attributes around to modify the appearance of tables generated from the template:
- To change the sequence of attributes, select an attribute row and click Move Up or Move Down (thus moving the resulting table column left or right, respectively).
- To see what the generated table will look like, click Preview.
-
-
Click Save As.
- If defining a new template, enter names for the category and table. The category can be one of the existing categories or a new one.
- If editing a template, you can either keep the original category and table names (to replace the original template) or change the table name (to create a new version of the original).
The template is saved with the extension
.urep.xml. New templates are saved in your default model directory; edited templates are saved in the same directory as the original template. -
Click Cancel to close the dialog box.
Editing an Attribute Table Column
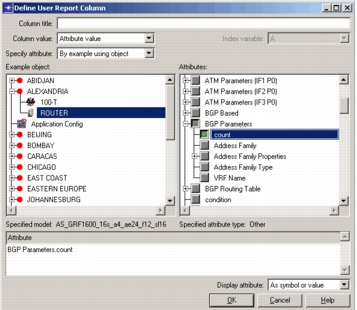
Use the User Report Column Definition dialog box (Figure 156) to specify the contents and appearance of a column in an attribute tables. The dialog box lets you pick an attribute from a list of available attributes. You can assign a column title and specify how the attribute value should be shown. Follow Procedure 179 to edit the definition of an attribute table column.
Figure 156: Define User Report Column Dialog Box
Procedure 179: Editing an Attribute Table Column Definition
-
Use the Specify attribute pull-down menu to specify how to view the available an attributes. The options are:
- By example using object – The Example treeview lists all objects in the current scenario.
- By example using model – The Example treeview lists all models in the model directories (specified by the “mod_dirs” preference).
-
In the Example treeview, select an object or model that contains the attributes you want to view.
The Attributes treeview displays a list of all attributes for the selected object or model.
-
Select an attribute in the Attributes treeview.
-
In the Column title field, enter a title for the table column. (Typically, the title is a version of the attribute name.)
-
Use the Column value pull-down menu to specify the contents of each table cell in the resulting column. The options are:
-
Full hierarchical name – The object name, including all parent objects (for example,
top.subnet_1.node_3).Note: Full hierarchical name applies only to an object, so attribute selection is disabled when you select this option.
-
Simple name – The object name (for example,
node_3).Note: Simple name applies only to an object, so attribute selection is disabled when you select this option.
-
Attribute value – The current value of the attribute.
-
Parallel attribute values – The current value of one or more similar attributes.
This option is useful when you want to show related attributes in the same column. For example, a router model might contain compound attributes for three types of interfaces (loopbacks, physical interfaces, and subinterfaces). Each interface attribute includes a sub-attribute that specifies the IP address. Using this option, you could create a column called “IP Address.” You could then select the IP address sub-attributes for the three compound attributes. In the resulting table, the “IP Address” column would show the addresses for loopbacks, physical interfaces, and subinterfaces.
If you select this option, you should next select some additional attributes in the Attributes treeview.
-
Index variable value – The index value of the attribute. This option is useful if a model can contain multiple instances of an attribute. If you select this option, you must also select something from the Index variable pull-down menu.
-
-
Use the Display attribute pull-down menu to specify how to show the attribute value. The options are:
- As symbol or value – If the model uses a symbol map for the attribute, the symbol is displayed when appropriate; otherwise, the attribute value is displayed.
- As actual value – The attribute value is always displayed.
-
Click OK to accept the column definition and return to the Define Attribute Template dialog box.