Using the Role Assignment Utility
Using the Role Assignment utility, you can:
- Filter the display of objects to assign roles
- View the current roles assigned to each object
- Identify the objects that do not have roles assigned
- Define new roles that you want to assign along with the existing roles
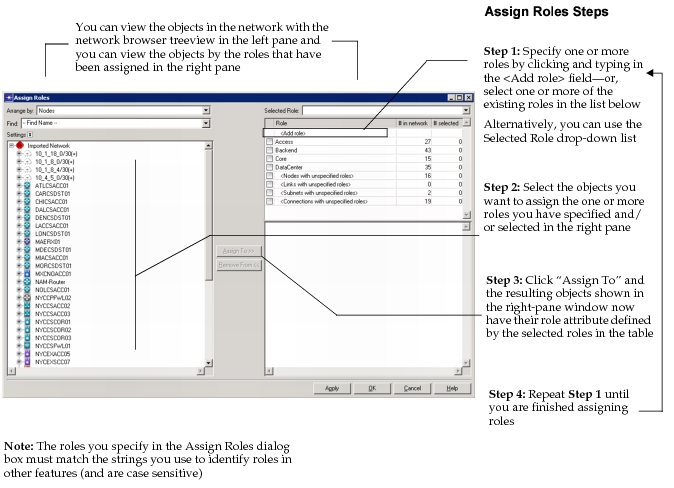
From the Topology menu, choose Role Assignment > Assign Roles to define roles and set the role attribute for multiple objects, as shown in the following figure.
Figure 41: Role Assignment Utility
Key Concept—Typically, when roles have already been assigned to objects in the network, you can use the Role Assignment utility to reuse the existing roles for new objects or to assign roles across network object types. For example, you can have a role defined for nodes that you also want to assign to the links associated with those nodes.
When Do I Need to Assign Roles?
You can use the role attribute to organize, analyze, and report on sets of objects in the network model. For example, when devices have a common role such as your core network devices, you can assign them a core role and then create groups based on the role attribute. The roles can then be used to arrange the display of objects or for analyzing and reporting on them as a group in other Riverbed features.
End Systems and Roles
End systems cannot be assigned roles in NetCollector. For information about role assignment and end systems, see End Systems and Roles.
Steps to Assign Roles
The main steps to assign roles include:
- Choose Topology > Role Assignment > Assign Roles to open the dialog box, as shown in the following figure.
- Specify the role names by entering the role names in the
<Add role>field. - Select devices from the left-pane treeview.
- Use “Assign To” button to assign one or more roles to one or more devices.
Note: You can assign more than one role to an object by entering a comma-separated list of role names. Each role can then be selected in the Role column to view the current set of objects with that role. Do not put spaces after the comma.
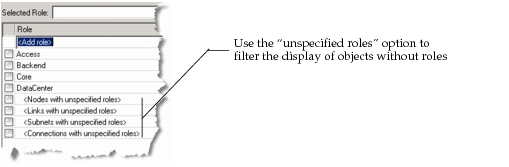
Using the “unspecified roles” option, in the Role table, you can view which objects have not yet been assigned roles—a quick way to assign roles to objects that might have been missed.
Figure 42: Special Role Filters
Note: The role assignment feature works for nodes, links, subnets, and paths such as traffic flows. In releases prior to NetPlanner 17.0.A, the role assignment was available for nodes only.
Removing Roles from Network Objects
You can remove roles by selecting the roles you want remove in the right pane and then selecting “Remove From” to move one or more of the objects with that role to the left pane. The specified role is then removed from the role attribute for the one or more objects that you selected.
Key Concept—The Role Assignment utility reflects the roles present in the current scenario. As long as at least one object has been assigned a specific role, that role is available as a role to select and assign to any object.
End Systems and Roles
When you import end systems from NetCollector, they do not have roles assigned. Instead, you must use this Role Assignment utility to view and assign roles to end systems.
Key Concept—The number of end systems in some networks can unnecessarily clutter a typical network view in the project editor. Use the network browser or role assignment utility to view the imported end systems in your current network model.
Saving End System Roles for Subsequent Import
After you assign roles for end systems using the Role Assignment utility, you can save the roles in a model assistant (.ma) file for future use.
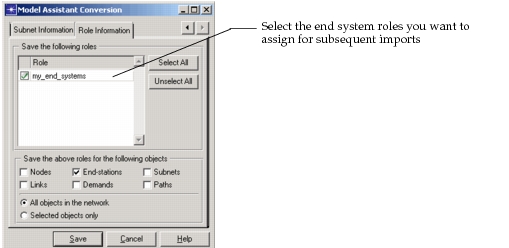
Choose Topology > Model Assistant > Save Current Topology to File. Scroll to the Role Information tab and make sure you have the end system roles you want selected, as shown in the following figure. Be sure to select the “End systems” checkbox in the “Save the above roles for the following objects” section of the dialog box.
Figure 43: Role Information Tab
Save this model assistant file to associate with subsequent imports of your topology. When you configure import from NetCollector or from device configuration import, make sure you select the option “Use the following model assistant file” and choose the model assistant file you saved with the end system roles.
Scanning and Selecting Sites with Roles
Using the Role Assignment menu, you can scan the network for existing roles and then select or unselect sites with specific roles.
-
Choose Topology > Role Assignment > Scan Network For Roles.
After you scan the network for existing roles, the available roles display in the options to select or unselect sites with specific roles.
-
Choose Topology > Role Assignment > Select Sites With Roles or Unselect Sites With Roles.
-
Select the role you want to select or unselect from the menu.
Note: You can also visualize roles by selecting “Show Role Balloons” from the Topology > Role Assignment menu.
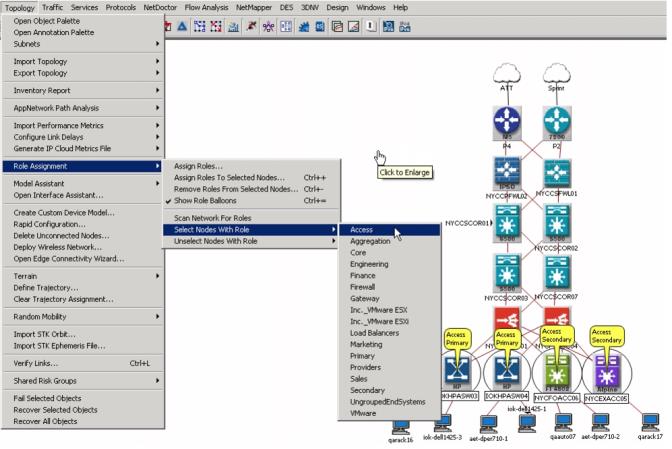
For example, You can quickly visualize the existing roles available for current objects in the network model. Choose Topology > Role Assignment > Scan Network For Roles and then Select Nodes With Role, as shown in the following figure.
Figure 44: Using the Role Assignment Menu
Managing Roles on Selected Objects
You can manage roles on selected objects using the Role Assignment menu. For example, select one or more objects in the network scenario and then choose Topology > Role Assignment > Assign Roles To Selected Nodes or Remove Roles From Selected Roles, as shown in the following figure.
Figure 45: Managing Roles from Selected Objects
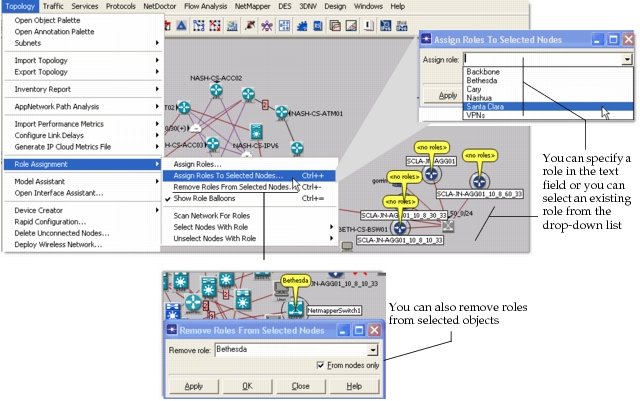
Note: You can view object roles in the project editor by selecting “Show Role Balloons” from the Topology > Role Assignment menu.