Importing Network Traffic
This section provides detailed instructions for importing traffic flows and loads from external sources and includes the following main topics:
- Preparing for Import
- Importing Traffic Flows
- Importing Baseline Traffic Loads
- Viewing and Managing Traffic Flows and Baseline Link Loads
Preparing for Import
This section describes some procedures you might need before you import traffic flows or link loads. Each section describes the circumstances in which you might want to do the corresponding procedure.
Table 1: Preparing for a Traffic Flow or Link-Load Import
| Task | Procedure |
|---|---|
| 1. Specify traffic file locations | Specifying Traffic File Locations |
| 2. Specify node/interface aliases | Working with Aliases |
| 3. Verify import setting for offnet traffic flow mapping | Mapping “Offnet” Traffic Flows |
Specifying Traffic File Locations
You must do this task if you are importing traffic flows and your traffic_archive_dir preference does not include the directories where the traffic data is located.
Setting the Traffic Archive Preference
During a traffic-flow import, the traffic_archive_dir preference is used to find your traffic data. If the traffic files reside on the same machine as NetPlanner, traffic_archive_dir can be specified from Edit > Preferences.
Procedure 1: Specifying Traffic Directories for a Local Computer
- Choose Edit > Preferences.
- Set the traffic_archive_dir preference to the directories where your traffic files are located.
Working with Aliases
During a traffic or baseline load import, objects referenced in the imported data are matched with the corresponding objects in your network. To make these matches, the node, link, or interface names used in the imported data must be known. Therefore, you might need to specify alternative names (called aliases) on individual nodes and link/LSP/PVC interfaces in your network model.
Note: If traffic or baseline load data cannot be matched with specific nodes or interfaces, then the data is unmapped.
You must specify aliases for every object that meets both the following conditions:
- Are referenced in the imported data (as traffic sources/destinations, or as objects with background loads), AND
- Were not imported from device configuration files or an external program such as NetCollector. (If a node or link was created as part of a topology import, the import process creates aliases automatically.)
Table 2: Imported Traffic Data and Alias Requirements
| Data Type | Alias Requirements | References |
|---|---|---|
| Traffic flows | - The source node must have a node alias that matches the traffic source specified in the imported data - The destination node must have a node alias that matches the traffic destination specified in the imported data |
Node Aliases |
| Link loads LSP loads PVC loads |
- Each link/LSP/PVC must have interface aliases that match the traffic source and destination specified in the imported data - Each connected node (that is, each node that is connected to a referenced interface) must have a a node alias that matches the node specified in the imported data. For example, <node_alias>.<interface_alias> |
Interface Aliases on Links, LSPs, and PVCs |
Alias Formats and Requirements
You can create aliases using any type of naming or addressing scheme: MAC addresses, IP addresses (including CIDR formats), network/mask combinations, domain names, etc. For the import engine to match an alias with an imported object, both the following conditions must be true:
- An alias must be unique within the scenario (that is, two nodes or interfaces cannot have the same alias).
- An alias must match exactly an object reference in the imported data.
Node Aliases
Node aliases are used to identify nodes in the network model and to map imported traffic and device-load data to the correct nodes.
Procedure 2: Assigning Node Aliases
-
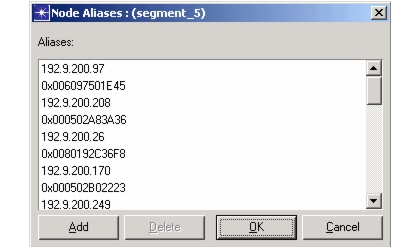
Right-click on the node and choose Edit Aliases from the pop-up menu.
Result: The Edit Aliases dialog box appears.
Figure 1: Edit Aliases Dialog Box
-
Click the Add button, enter the Alias used in the data file, and click OK to close the dialog box.
For more information, see Alias Formats and Requirements.
Editing Node Aliases
You can edit your aliases manually using a spreadsheet or text editor. You can also apply aliases from one scenario to another. These functions are especially useful if you have a large network with many nodes.
For more information, see Editing and Applying Node Aliases.
Interface Aliases on Links, LSPs, and PVCs
Interface aliases are used to identify specific interfaces in a network scenario; each interface is uniquely identified because it has two interfaces (one at each end). You must assign interface aliases to every interface that
- Was not imported from device configuration files or an external program like NetCollector
- Is referenced in the imported traffic or load data
Repeat the following procedure for every link of interest. You must enter two interface aliases to import all the traffic for a link; if you enter just one interface alias, you receive only the traffic related to that interface.
Procedure 3: Assigning Interface Aliases to a Link
-
Identify node A and node B on the link of interest. An easy way to do this is to right-click on a link and choose Edit Ports; the Select Port Assignment dialog box always shows node A first and node B second.
-
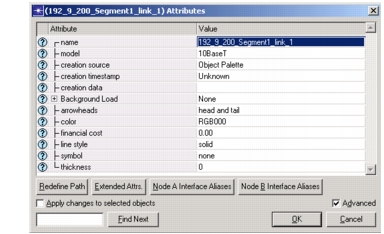
Right-click on the link and choose Advanced Edit Attributes from the pop-up menu.
Result: The Advanced Edit Attributes dialog box appears.
Figure 2: Advanced Edit Attributes Dialog Box
-
Click on the Node A Interface Aliases button.
Result: An Interface Aliases edit pad opens.
-
Enter the interface alias, as specified in the traffic or baseline load data, for the node A interface. For example,
<node_alias>.<interface_alias>. -
Click on the Node B Interface Aliases button.
Result: An Interface Aliases edit pad appears.
-
Enter the interface alias, as specified in the traffic or baseline load data, for the node B interface.
For more information, see Alias Formats and Requirements.
Editing and Applying Node Aliases
During an import, imported traffic is matched with source nodes in the network model using the node’s network alias. A node can have multiple aliases.
If the apply_all_aliases preference is TRUE (the default setting), aliases are persistent by default. If this preference is FALSE, aliases are persistent project-wide.
You can edit a scenario’s aliases manually, as described in the following procedure.
Procedure 4: Editing a Scenario’s Aliases
-
Choose Traffic > Export Node Aliases > To Text File to export all aliases to a tab-separated text file
-
Edit the aliases using a spreadsheet program like Excel.
-
Choose Traffic > Import Node Aliases > From Text File to import the aliases into a scenario. The text file has the following format:
<subnet name> <node 1 name> <alias 1> ... <alias n>
<subnet name> <node 1 name> <alias 6> ... <alias n>
<subnet name> <node 2 name> <alias 1> ... <alias n>
For more information, see: