Component File Archive
At times, you might need to collect all of the files used by a simulation and send them to a colleague or to Technical Support. Riverbed Modeler provides a means of doing this easily via a component file archive. This is a compressed package containing all of the files accessed during a simulation run. Optionally, you can exclude certain types of files from the archive. (For a similar operation, see “Create Project File Archive…” on page 48.)
Note: File types not directly accessed during a simulation are not included in the component file archive. Such file types include header (.h) files, terrain files, and any files accessed directly by a model (bypassing kernel APIs).
Procedure 189: Creating a Component File Archive
-
Prepare to run the simulation for which you want to create a component file archive (if necessary, see Configuring a Simulation).
-
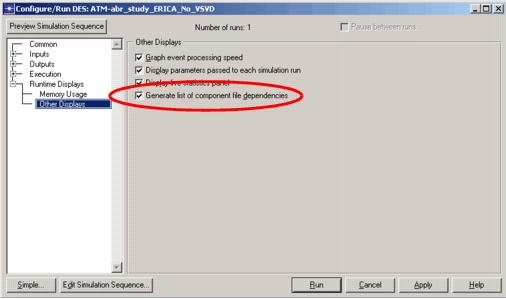
In the detailed Configure/Run DES dialog box, select Runtime Displays: Other Displays in the treeview.
-
Select the “Generate list of component file dependencies” checkbox.
-
Run the simulation.
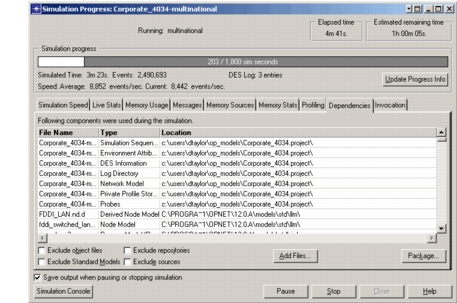
Result: During the simulation, a list of accessed files is displayed in the Dependencies page of the Simulation Progress dialog box.
-
When the simulation is complete, use the checkboxes on the Dependencies page to exclude any file types you don’t want in the component file archive:
- Exclude object files
- Exclude Standard Models (this option excludes only those models in the standard models directory:
<reldir>/models/std) - Exclude repositories
- Exclude sources
-
Click the Package… button to create an archive of the listed files.
Result: A file browser window opens, allowing you to specify the name and location for saving the file. A
.opcfaextension is added to the specified file name. -
After specifying the name and save location, click Save.
Result: The component file archive is saved.
Use the following procedure to expand the files from a file archive.
Procedure 190: Expanding Files from an Archive
-
Choose File > Manage Model Files > Expand Project File Archive.
-
Locate and select the project file archive, then click Select.
-
Locate the destination directory for the project files, then click Select.
Result: All files from the project file archive are unpacked to the specified directory.
Note: To use the project files in a simulation, make sure that the destination directory is listed in your “mod_dirs” preference. To avoid conflicts with existing files, make the destination directory the first directory listed.