Edit Attributes
This operation allows you to view and set attribute values through an object's Edit Attributes dialog box. For each attribute of an object, this dialog box displays the name, value, and units (if any).
For a detailed description of how to use attributes to characterize objects, and the different types of attributes available, see "Modeling Framework" on page 80.
Figure 140: Edit Attributes Dialog Box
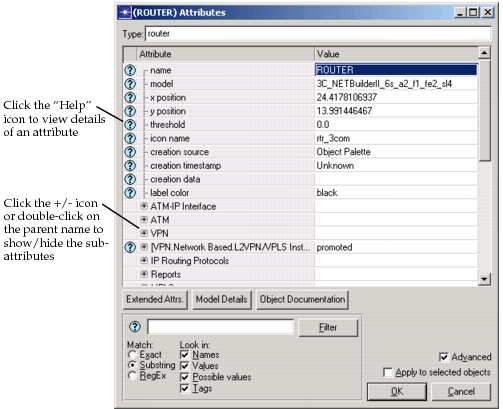
The Edit Attributes dialog box appears whenever you right-click on an object and choose Edit Attributes or Advanced Edit Attributes. This dialog box has the same general interface for nodes, links and configuration objects.
- To expand or collapse a compound or grouped attribute, double-click in the Attribute field.
- To edit or view a compound attribute in a new window:
- If the Value field contains an ellipsis ( … ), double-click in the Value field to edit it.
- Otherwise, click in the Value field and choose Edit… from the menu.
- To view the parents of a nested attribute, rest the cursor over the attribute's name (that is, in the Attribute column); the full attribute name appears in a tooltip.
- To view details of an attribute, click on the question mark icon in the leftmost column.
- To search for a particular attribute, enter a string in the Find field (lower-left corner) and click Filter. The matching attributes are displayed.
For module and link attributes whose value is a typed file (tfile) name, you can right-click on the attribute value and choose Open Associated Model from the pop-up menu. The module attributes that support this feature include those that specify pipeline stages, process models, modulation curves, and antenna patterns.
In addition to attribute names and values, the Edit Attributes dialog box also provides buttons for various operations such as viewing attribute properties. These operations vary depending on the type of object the dialog box supports. The following table lists the operations available in the Edit Attributes dialog box.
Table 64: Attributes Dialog Box Operations
| Operation | Access | Description |
|---|---|---|
| Apply Changes to Selected Objects | Checkbox | Applies changes to an object's attribute values to both the object and all selected objects in the workspace. For more information about the rules for applying these changes, see Using the "Apply Changes to Selected Objects" Method. |
| Filter | Edit field/button | Search for attributes with names or values that contain the specified criteria. |
| Filter Criteria | Checkboxes and Radio buttons | Specifies the filter criteria. In the Attributes dialog box, specify whether criteria is an exact match or string. In the advanced Attributes dialog box, specify whether criteria is an exact match or sting, or you can specify a regular expression. Additionally, you can specify the items to include in the filter: names, values, possible values, and tags. For more information, see Filtering Attributes. |
| Extended attrs. | Button | Displays the Extended Attributes dialog box, which allows you to create new attributes for the object. |
| Link Interfaces | Button | Displays interface and port information for nodes connected to the selected link. |
| Packet formats (selected links only) |
Button | Allows you to specify which packet formats are supported by a link. (This button is available only for links that permit you to set packet formats.) |
| Promote | Button | Promotes the attribute so that its value can be specified at a higher level in the network model or when the simulation is run. |
| Redefine path (links only) |
Button | Allows you to redefine a link's path by redrawing it in the workspace. |
| Advanced (subnets, nodes, and links only) |
Checkbox | When selected, displays all of the attributes (primary and advanced) associated with the object. By default, only primary attributes are displayed. |
| Details | Button | Displays the Attribute Properties dialog box, which shows detailed information about the selected attribute. |
There are three preferences (Edit > Preferences) you can set to highlight attributes that have changed and do not reflect the default settings in the underlying model. These preferences are:
- "mark_nondefault_attrs" – Enable/disable attribute highlighting.
- "mark_nondefault_attrs.intended_color" – This color indicates that you recently changed an attribute during the current session of editing attributes (that is, after you opened the Edit Attributes dialog box).
- "mark_nondefault_attrs.changed_color" – This color indicates an attribute that was changed (by a user, the program, or a simulation) before you opened the Edit Attributes dialog box. As a result, the attribute might not reflect the default value specified in the underlying model.
The Edit Attributes dialog box displays the device type and vendor/product information of the corresponding object. To see how you can customize this information, see Customizing Header Information.
Setting Distributions
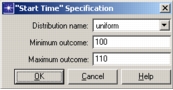
Some attributes take a distribution as a value. Distributions are used to generate a series of random numbers with specified characteristics (such as normal or constant). When you edit the value of a attribute that uses distributions, a dialog box opens that allows you to select the type of distribution to use and enter values for one or two parameters that define the shape of the distribution (see Figure 141 for an example). The predefined distributions supplied with Riverbed Modeler are described in "Distribution Package" on page 1.
Figure 141: Distribution Specification Dialog Box
Filtering Attributes
Use the filtering feature to easily locate attributes. The filtering feature includes different capabilities depending on whether you use the Attributes dialog box or the advanced Attributes dialog box.
Figure 142: Attributes Dialog Box—Filtering Options
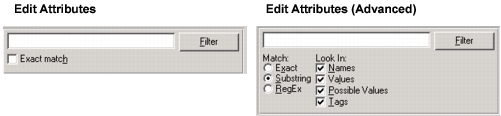
From the Edit Attributes dialog box, you can specify whether filter criteria is a substring or an exact match.
From the Edit Attributes (Advanced) dialog box, you can specify whether filter criteria is a substring, an exact match, or a regular expression. Additionally, you can filter more precisely by specifying the items to compare against the filter criteria. Choose from attribute name, value, possible value (a value that you can choose from a pull-down menu), or tag. (A tag is a keyword that is associated with a model attribute, such as an interface type, vendor, or CLI command.)
Note: For information about the syntax of regular expressions, see http://www.opengroup.org/onlinepubs/007908799/xbd/re.html.
If you specify multiple words (e.g., two or more groups of characters each separated by a space) when filtering by a string, the results will include attributes that contain all specified strings. However, if you specify multiple words within a single set of quotations, the results will include only that attributes that contain the specified string, including the space between words.
For best results, type in a host name, an interface name, or a value (such as an IP address or a MAC address).
The following table lists example filter criteria and the expected results.
Table 65: Example Attribute Filters: Filter Criteria and Expected Results
| Filter Criteria | Results include… |
|---|---|
| .0.2. | Attribute values containing the specified string, such as IP Address 192.0.2.2, 192.0.2.3, 193.0.2.1, 193.0.2.2, etc. |
| IPv6 | Attribute names containing "IPv6", such as IPv6 Parameters (including "Static Routing Table", "Interface Information", "Loopback interfaces", etc.) |
| OSPF | Attribute names containing "OSPF", such as "IP Routing Protocols > OSPF Parameters" and "Reports > OSPF Routing Table". |
| host | Attribute names containing "host", such as "hostname" and "Host Parameters". |
| "max packet count" | Attribute name containing "max packet count", such as "Max Packet Count". |
| isis retransmit-interval (CLI command) |
Attribute name "IS-IS Parameters > Interface Information > Retransmit Interval". |
| mpls traffic-eng area (CLI command) |
Compound attribute "MPLS Parameters > TE Flooding > OSPF". |
Riverbed Modeler includes preferences (Edit > Preferences) that you can set to color-code filter results. These preferences are:
- "mark_nonfiltered_attrs" – Specifies whether to color-code the filter results in the Attributes dialog box. Color coding the results makes it easier to identify matching filtered attributes.
- "mark_nonfiltered_attrs.builtins" – Specifies the color of "built-in" attributes. These attributes are not filtered and are always displayed.
- "mark_nonfiltered_attrs.match" – Specifies the color for matching filter results.
- "mark_nonfiltered_attrs.parent_of_match" – Specifies the color for parents of matching filter results. Parents are included in the filter results to maintain the attribute hierarchy.
- "mark_nonfiltered_attrs.prominent" – Specifies the color for associated attributes of matching filter results. Associated attributes are included in the filter results because they support the matching attribute.
- "mark_nonfiltered_attrs.symbol_match" – Specifies the color for matching filter results when the match is a value that can be selected for an attribute.
Attribute Types
Primary and Advanced Attributes
Every Edit Attributes dialog box has essentially the same structure, regardless of the type of object to which it applies. When you choose Edit Attributes from an object's pop-up menu, the dialog box displays all primary attributes associated with the object. Primary attributes are those you use most often to define an object. For example, primary attributes specify the object's name and its underlying (node or link) model.
Network objects (subnets, nodes, and links) also have advanced attributes, which specify parts of the object definition that you might set less frequently. Advanced attributes typically define information such as an object's appearance and location in the workspace. To view the advanced attributes of an object, choose Advanced Edit Attributes from the Object pop-up menu or set the Advanced checkbox in the Edit Attributes dialog box.
Note: Primary and advanced attributes exist only for network objects. For all other objects, this dialog box displays all of the object's attributes.
Compound and Grouped Attributes
Many objects have compound attributes. A compound attribute is an attribute that contains other attributes. In addition, model developers can organize attributes into groups like "ATM" or "IP Routing". The Edit Attributes dialog box uses a treeview structure to represent the parent/child relationships between attributes.
For a detailed description of these topics, see the section on attributes in "Modeling Framework" on page 80.
Setting Attributes
The Edit Attributes dialog box provides one way of setting an attribute value. For a description of all possible ways, see Setting Attribute Values.
Customizing Header Information
In the Project Editor, the Edit Attributes dialog box displays the device type and vendor/product information of the corresponding object. This section describes how you can customize the information that appears in this window.
Figure 143: Header Information in an Attributes Dialog Box
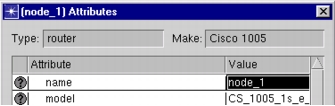
Data can be read from a node's attributes or its self-description, and displayed in an object's Edit Attributes dialog box. The "obj_dbox_headers" preference (Edit > Preferences) enables you to customize the information that appears.
Figure 144: Customizing Header Information in the obj_dbox_headers Preference
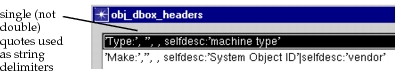
Figure 144 shows the obj_dbox_headers table with the default settings. Each line in this table defines a label/value pair: the first line specifies the node type, and the second line specifies the vendor type. (Both these values are specified in the node model's self-description).
Each line in this table specifies four pieces of information, separated by commas:
<label_text>– A label clearly indicating the value displayed, such as'Type: ','Vendor: ', or'Model: '<label_tooltip>– The text that appears in the tooltip when a user rests the cursor over the label<value_tooltip>– The text that appears in the tooltip when a user rests the cursor over the label<value_text>– The data that appears in the value field. You can specify data from the model's attribute list and self-description for this field.
Note that you can specify multiple display fields; the resulting dialog box displays a maximum of two label/value pairs per line.
The following sections contain notes about how to set these fields.
<label_text> Field
We recommend the following syntax:
<single_quote><label_text><colon><space_character><single_quote>
Example: 'Type:'
This ensures that a space appears between the label and the field. You must delineate this field using single (not double) quotes.
<label_tooltip> and <value_tooltip> Fields
The following conventions apply for these fields:
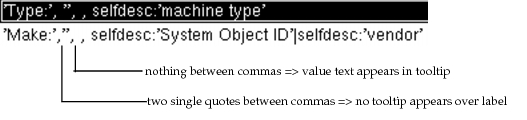
- To display the value/label text in a tooltip, specify an empty field—that is nothing between the delineating commas. The result is that the tooltip displays the corresponding
<label_text>or<value_text>. - To display no tooltip, include two single quotes with nothing between (
''). The result is that no tooltip appears when you rest the cursor over a label or value.
Figure 145: Tooltip fields
<value_text> Field
This field displays data from a model's attribute settings or its self-description. The syntax is:
selfdesc:<self_description_field>
attribute:<attribute_name>
You can use the plus sign (+) to show multiple values. For example, you could enter
selfdesc:machine type + ‘ ‘ + attribute:model
to display the object's machine type (router, switch, etc.) and model, separated by a space. Again, you must use single quotes to delineate characters or strings.
You can use a vertical bar (|) to create "back-up" values in the event that a particular self-description or attribute value isn't found. For example, you could enter
attribute:<attr1> | attribute:<attr2> | attribute: <attr3>
Given this string, the attributes window displays one of the three attributes:
- Riverbed Modeler looks for
<attr1>(attribute 1) in the object's attribute list. If the list contains<attr1>, the attribute window displays this attribute's value. - If the attribute list does not contain
<attr1>, Riverbed Modeler looks for<attr2>and displays it if possible. - If the attribute list does not contain
<attr1>or<attr2>, Riverbed Modeler looks for<attr3>and displays it if possible. - If none of the attributes are present in the list, the header does not appear at all.