Setting Attribute Values for Many Objects
You might need to set values for the same attributes on several objects in a network model. For a few attributes, you could make these changes individually using Procedure 173. However, individually changing the attributes can be tedious and error-prone for large numbers of objects. There are several alternate methods for quickly changing attributes on many objects.
- Using the “Apply Changes to Selected Objects” Method
- Using the “Edit Selected Objects” Method
- Using the “Edit Similar
<Nodes/Links>” Method - Using the Attribute Template Method
Using the “Apply Changes to Selected Objects” Method
With this method, you manually select every object to be changed, specify the changes for one object, and specify that the changes be applied to all selected objects. The changes are applied to the corresponding attributes of every selected object.
When applying attribute changes to several objects, Riverbed Modeler begins by noting every change to the one object whose attributes you are setting. It then tries to make corresponding changes to every selected object, one attribute at a time. In each case, the change is applied if all of the following criteria are met:
- The attributes being set must have the same name and type.
- The new attribute value must agree with the attribute properties of the attribute in the selected object. For example, the new value must be within the range of allowed values for the selected object’s attribute.
- The new attribute value must pass all rules governing attribute values, such as the requirement for unique node names within a subnet.
Note: If some of the attribute changes fail, Riverbed Modeler changes only those attributes that passed the preceding tests. There are no warning for any failed attribute value changes. If necessary, open the Attributes dialog box of a selected object to verify the changes.
Additional rules apply when extended attributes are involved:
- Any extended attribute deleted from the object being set is deleted from all selected objects.
- Any extended attribute appearing on the object being set, but not on a selected object, is added to the selected object.
- Any extended attribute appearing on both the object being set and a selected object is retained on both. If the properties of such an extended attribute are changed, the following additional rules apply:
- Any changes to the properties of an extended attribute in the object being set are also made to the selected object.
- If a property change causes a previously-set value to become invalid, that value is removed and either promoted or replaced with its default value, depending on the Auto. Assign Value setting of the extended attribute.
For more information on extended attributes, see "Extended Attributes" on page 103.
WARNING: If you change a sub-attribute of a compound attribute, the entire compound attribute value will replace the corresponding compound attributes on the selected objects. This can produce unwanted changes in other sub-attributes of the compound attribute. To edit only specific sub-attributes, see the procedure Using the Attribute Template Method.
Procedure 174: Setting Attribute Values for Many Objects
-
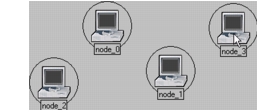
Select the objects whose attribute values will be set. You can select the objects manually or automatically, as described in "Select Objects…" on page 77.
Selection markers appear around the objects.
-
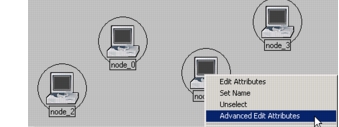
Open an object’s Attributes dialog box. This object does not have to be selected, because changes always apply to the object whose Attributes dialog box is open.
-
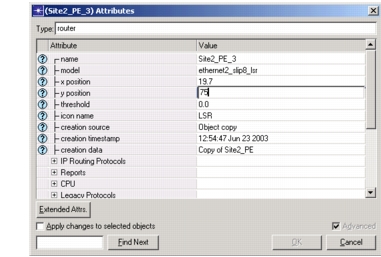
Set the desired attribute values.
-
Select the Apply Changes to Selected Objects checkbox, then click OK.

The Attributes dialog box closes and the attributes of the selected objects are updated.

Using the “Edit Selected Objects” Method
This method provides an alternate way to edit the attributes of several objects at one time. Riverbed Modeler identifies the attributes that the objects to be edited have in common and creates a table of the common attributes. You can then edit the attribute values as needed.
Procedure 175: Setting Attribute Values on Selected Objects
-
Select the objects whose attributes you want to change. They do not have to be the same type of objects.
-
Right-click in the workspace and choose Edit Selected Objects.
The Objects Attributes dialog box opens, displaying all the attributes that the selected objects have in common.
-
Change the attribute values in the Objects Attributes dialog box.
-
Click OK.
The object attributes are updated appropriately.
Using the “Edit Similar <Nodes/Links>” Method
This method is similar to the Edit Selected Objects method except that it automatically selects the set of objects to consider, based on the value of their “model” attribute.
Procedure 176: Setting Attribute Values on Similar Objects
-
Right-click on an object in the workspace and choose Edit Similar Nodes/Links from the Object pop-up menu.
The Attributes dialog box opens, displaying all the attributes of all the objects with the same “model” attribute as the selected object.
-
Change the attribute values as appropriate.
-
Click OK.
The object attributes are updated.
Using the Attribute Template Method
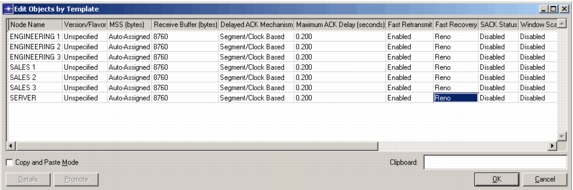
This method generates an editable table of attribute values based on a user-defined attribute template. (For an example, see the following figure.) Because the table is limited to a set of interesting attributes in the network, for all or only certain objects, you can change the attribute values quickly and easily.
Figure 155: Edit Objects by Template Dialog Box
Procedure 177: Setting Attribute Values by Template
-
Choose Edit > Edit Objects Using Template.
The Edit Attribute Template dialog box appears.
-
Select an attribute template from which to generate an attribute table.
If you want to define a custom template, click Close, define a template as described in Procedure 178, then begin this procedure again.
-
Set the “Include only selected objects in report” and “Ignore views” checkboxes to control which objects will be included in the attribute table. The default settings will include all objects in the network.
-
Click Generate.
The Edit Objects by Template dialog box appears.
-
Edit the attributes as needed. There are two editing modes:
Standard Mode
You can click on any attribute value and edit it as you would in the Attributes dialog box (see Procedure 173 Setting Attribute Values for One Object).
Copy and Paste Mode
You can copy an attribute value and paste it to one or more similar attributes. This mode disables the standard methods for changing attribute values (edit fields, pull-down lists, and so on).
5.1 Select the Copy and Paste Mode checkbox.
5.2 Select an attribute value and press Ctrl+C.
5.3 Select the attribute value or a range of contiguous values and press Ctrl+V. (You can paste only into the same attribute column that you copied from.)
-
When you are finished editing attribute values, click OK to make the changes.