Importing Topologies from Transaction Analyzer Files
You can create a network scenario quickly based on one or more Transaction Analyzer (*.atc.m) files. When you import an Transaction Analyzer file into Riverbed Modeler, the Model Wizard does the following:
-
A network topology is created.
You can control certain aspects of the topology during the import process (as described in Procedure 21) and can always reconfigure the topology after it is created. You will see the nodes and links that represent your topology in the workspace.
-
An application is created.
You can control certain aspects of the application during the import process (as described in Procedure 21) and can always reconfigure the application after it is created. When the import is complete, you will see the task, application, and profile definition objects in the workspace.
-
Statistics are chosen for collection.
Riverbed Modeler considers the topology and type of application, then chooses certain statistics for collection. You can always adjust the statistics chosen after import.
Procedure 21: Importing One or More AppTransaction Xpert Files into a Network Scenario
-
If necessary, create a project or scenario.
- If the Startup Wizard appears, choose Import from Transaction Analyzer in the Initial Topology window and click Next.
- If the Startup Wizard does not appear, choose Topology > Import Topology > From Transaction Analyzer in the Project Editor.
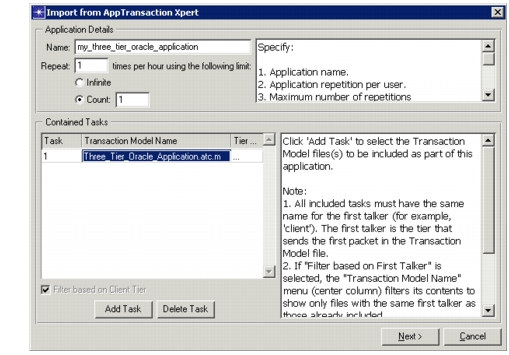
The Configure Transaction Analyzer Application dialog box appears.
Figure 361: Completed Configure Transaction Analyzer Application Dialog Box
-
Complete the Application Details section of the dialog box. This section includes the following components:
- Name – An application can be composed of a single task or multiple tasks. If the application is a single task, you can use the task name. If the application is multiple tasks, choose a descriptive name that is not the name of a single task. After your network is created, you will see this name as the Name attribute in the (Applications Definitions) table.
- Repeat Application – The number of times the application will repeat, per hour, per user. The value entered becomes the value of the Inter-repetition Time (seconds) attribute. To show the attribute, select Edit Attributes from the Profile Definition object, then select Profile Configuration > Applications > Repeatability. The attribute is the length of time that elapses between repetitions of the application, so if (for example) you specified that the application repeat just once per hour, the value shown will be 3,600 seconds.
- Using the following limit – This sets an limit on the number of times the application repeats. Infinite means that there is no limit. The value entered becomes the value of the Number of Repetitions attribute. To show the attribute, select Edit Attributes from the Profile Definition object, then select Profile Configuration > Applications > Repeatability.
-
Complete the Contained Tasks section of the dialog box as follows:
-
Click on the Add Task button.
A row is added to the Contained Tasks table.
-
Click on Specify… in the Transaction Analyzer Trace File column.
A pop-up box appears, listing all trace files included in any of your model directories.
-
Select the file that represents the first task in your application.
-
Click on the Add Task button again to add further tasks to your application.
The pop-up box now contains a shorter, filtered list of files. Only those files that are possible tasks in your application are listed. Riverbed Modeler determines which tasks are possible by determining the “first talker” (the tier that sent the first application message in the trace) of the first task, then presents only those trace files that have the same first talker.
-
Use the Delete Task button as needed to adjust the tasks in your application.
-
-
Click Next.
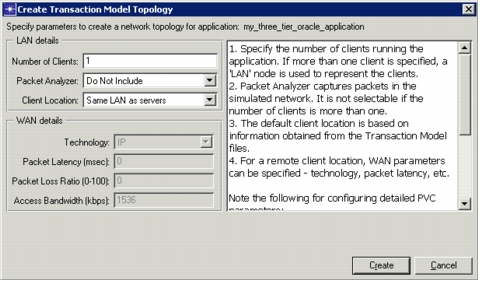
The Create Transaction Analyzer Topology dialog box appears.
Figure 362: Completed “Create Transaction Model Topology” Dialog Box
-
Complete the LAN Details section of the dialog box. This section includes the following components:
-
Number of Clients – Specify the number of clients running the application. If two or more clients are specified, they are represented by a LAN model and the number of clients you specify becomes the value for the Number of Workstations attribute.
-
Packet Analyzer – If you have only one client, you might want to include a packet analyzer. If you specify that an analyzer be included, you will not see it as a separate node, but one will be integrated with the switch in the local network and the attribute Packet Analyzer Configuration will be included on that switch.
Packet analyzers are useful because you can generate a capture file of the transaction as run in the simulation; then you can re-import the capture file into Transaction Analyzer and analyze the application performance in the “what-if” scenario.
For more information, see Analyzing Application Performance in Discrete Event Simulations.
-
Client Location – Specify the client location in relation to the application servers. If the client is remote, complete the WAN Details section.
-
-
If necessary, complete the WAN Details section of the dialog box. This section includes the following components:
- Technology – Choose the correct protocol. If you choose the ATM or Frame Relay protocols, a PVC configuration object with the default settings is included in the network. You might want to adjust the PVC configuration by editing the attributes of this object.
- Packet Latency (msec) – The value entered becomes the Packet Latency (secs) attribute of the cloud.
- Packet Loss Ratio (1-100) – The value entered becomes the Packet Discard Ratio attribute of the cloud.
- Access Bandwidth (Kbps) – The value entered becomes the data rate of both links connected to the cloud (you can adjust these values after the network is created).
-
Click Create.
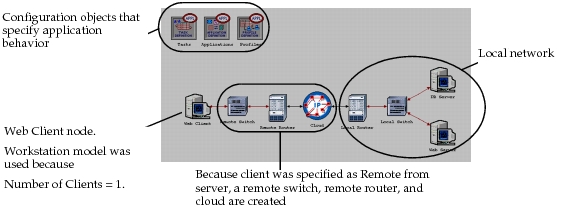
The network is created. The topology and applications reflect the specifications gleaned from the AppTransaction Xpert file and your input. Correct statistics have been selected.
Figure 363: Sample Generated Network Model
-
Review the following attributes, adjusting the configuration as necessary:
- Applications Definitions object: (Application Definitions) Table. Notice that the application name you created is shown as the Name.
- Profile Definitions object: (Profile Configuration) Table. Notice that a profile called Transaction Analyzer (<application name>) has been created. It includes the application you imported.
- Remote Router <--> Cloud and Cloud <--> Local Router links: data rate. The import process assigns the same rate to both links; you might need to adjust these rates.
-
Review the statistics chosen for collection, adjusting as necessary.
Analyzing Application Performance in Discrete Event Simulations
As mentioned in step 5 of Procedure 21, you can include a packet analyzer in a network scenario. Packet analyzers are useful because you can take the analyzer output generated during a simulation, then re-import it into Transaction Analyzer and thereby see how your “what-if” scenario affects the application’s performance.
When you run a simulation, the packet analyzer generates an output file in your default model directory during a discrete event simulation. (Your default model directory is the first directory listed in the table for the preference mod_dirs.) By default, this file has the name <project_name>-<scenario_name>-<hname>-pkt_trace.csv, where <hname> is the analyzer hierarchical name.
You can configure the packet analyzer using the “Packet Analyzer Configuration” attribute of the node that contains the analyzer. If desired, you can modify the output file name, specify capture filters (based on protocol, IP address, and port numbers), and set the start and end times of the capture.
After the simulation, you can import the capture file into Transaction Analyzer and thereby see how the network scenario affected the application performance. If desired, you can also open the output file in any spreadsheet editor such as Excel.
Adding a AppTransaction Xpert File to an Existing Scenario
You might already have a network model to which you’d like to add the traffic from a AppTransaction Xpert file. In this case, you should not use the Import Topology from Transaction Analyzer operation because this would overwrite your existing topology. Instead, you can
- Deploy the Transaction Analyzer task in the existing scenario. The Transaction Analyzer Model Wizard automates the standard procedure that you would use if you were to manually configure a custom application with an application task (AppTransaction Xpert) file. See "Deploying an Application from Transaction Analyzer Files (Manual Workflow)".
- Define a custom application that uses your AppTransaction Xpert files as tasks and configure this application in the network using the standard procedure for configuring applications and profiles. See "Custom Applications Workflow".