Running Inventory Reports
You can run an analysis on the network with rules that report on the following elements in your network:
- Hardware – Network Devices, Physical Links, Interfaces and Ports, and End Systems
- IP Addressing – IPv4 Addressing, Public and Private IPv4 IP Address Prefixes
- Protocols – Routing Protocols such as BGP, EIGRP, IGRP, IS-IS, OSPF, RIP
- Software – OS Versions and OS Types
Run an Inventory Report from the main Project Editor menu by choosing Topology > Inventory > Configure/Run Inventory Report or use the quick access toolbar icon, as shown below.
Figure 1: Configure/Run Inventory Report

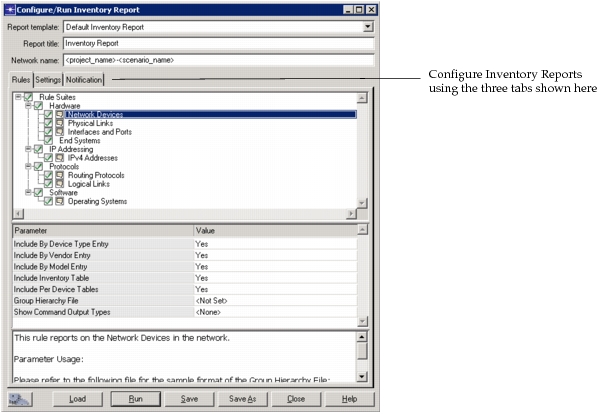
The following figure shows the Inventory Report configuration options.
Figure 2: Configure/Run Inventory Report
For a quick look at your network inventory, you can open a Basic Inventory report by choosing Topology > Inventory Reports > Basic Report. The following figure shows an example of a Basic Report.
Figure 3: Basic Report
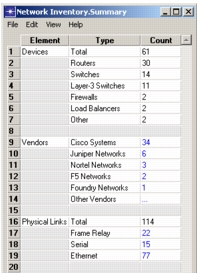
Key Concept—The Inventory Report described in this section of the User Guide provides a more comprehensive view of network inventory than the Basic Report shown in the previous figure.
Rules
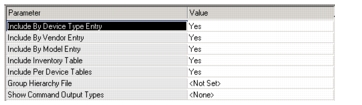
Select the rules that you would want to run using the Rules tab. Several rules include parameters to consider for your Inventory reporting needs. For example, the Network Devices rule includes the parameters shown in the following figure.
Figure 4: Inventory Rule Parameters—Network Devices Example
Note: The Routing Protocols rule requires that you specify the protocols that you want to report on.
Using the Group Hierarchy File Parameter
Most of the rules include a Group Hierarchy File parameter that you can use to specify reporting groups. For more information about how to use this file, see “Using the Group Hierarchy File“.
Private and Public IPv4 Address Prefixes Rules
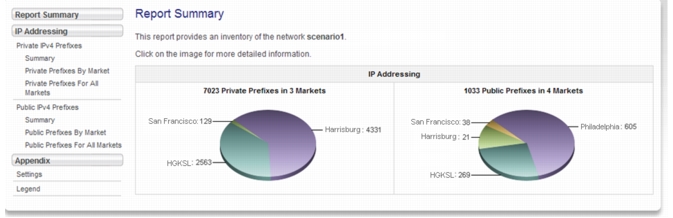
Inventory Reports can now provide the private and public IPv4 address prefixes for specific “Markets” in your network. The following example Inventory Report shows the Report Summary section for the output of the new private and public IPv4 address prefixes rules.
Figure 5: Public and Private IPv4 Prefixes in Example Inventory Report
Configuring the Public IPv4 Prefixes Rule
The following parameter must be defined for the "Public IPv4 Prefixes" rule:
- Market-to-Prefixes Mapping File
The Market-to-Prefixes Mapping File should include a row for each market in the network with the following entries:
- The market name
- The type of config file that contains the show command output listing public prefixes owned by that market
- The type of config file that contains show command output listing private prefixes owned by that market
Here are some example entries in the correct format for a Market-to-Prefixes Mapping File:
#Market Name, Public Prefix Config File Type, Private Prefix Config File Type
Philadelphia, public_prefixes_PHILA, ospf_phila
Harrisburg, public_prefixs_HARRIS, ospf_harris
Portsmith, public_prefixes_Portsmith, private_prefixes_portsmith
Entries should be comma-delimited. If a market does not have show command output of a particular type—that is, no public prefix information was collected for that market—then this field can be blank.
Note: Any market that is not listed in this file will not be included in the "Public IPv4 Prefixes" Inventory Report.
Configuring the Private IPv4 Prefixes Rule
The following parameters must be defined for the "Private IPv4 Prefixes" rule:
-
Group Hierarchy File – This is the standard group hierarchy file that is used for Inventory reports. (See “Using the Group Hierarchy File“ for more information.)
An example of this file can be found in your installation, in the models directory:
/models/module_ref/<ProductName>/grouping-example.xmlNote: One group must be defined for each market. Any markets that do not have a corresponding group defined will not be included in the “Private IPv4 Prefixes” Inventory Report.
-
Market-to-Prefixes Mapping File
The Market-to-Prefixes Mapping File should include a row for each market in the network with the following entries:
- The market name
- The type of config file that contains the show command output listing public prefixes owned by that market
- The type of config file that contains show command output listing private prefixes owned by that market
Here are some example entries in the correct format for a Market-to-Prefixes Mapping File:
#Market Name, Public Prefix Config File Type, Private Prefix Config File Type
Philadelphia, public_prefixes_PHILA, ospf_phila
Harrisburg, public_prefixs_HARRIS, ospf_harris
Portsmith, public_prefixes_Portsmith, private_prefixes_portsmith
Entries should be comma-delimited. If a market does not have show command output of a particular type—that is, no public prefix information was collected for that market—then this field can be blank.
Note: Any market not listed in this file will not be included in the "Private IPv4 Prefixes" Inventory Report.
Settings
Using the Settings tab, you can specify a set of selected objects to report on and specify reporting content and customizations.
Configuring Inventory Trending from the Settings Tab
Trend data for Inventory reports shows the trend of elements in your network at regular intervals—typically in an automation run. You can control whether you want to include trend charts and the option to display grid lines in them from the Settings tab.
Figure 6: Settings Tab—Inventory Reports
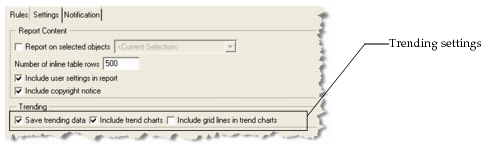
Key Concept—In some cases, you might want to just generate an “on demand” report but do not want to include that data in your trend data for future reports. You can use the option to clear “Save trending data,” and then click Run. The data from this run does not get saved and show up as a data point on a future report.
Managing Trending Data
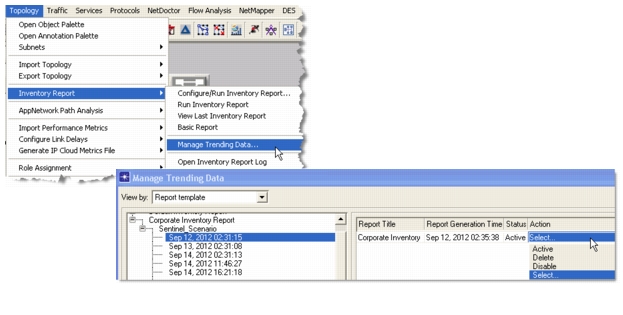
You can select inventory data points that you do not want to show in your trending graphs by choosing Topology > Inventory > Manage Trending Data, as shown in the following figure.
Figure 7: Settings Tab—Inventory Reports
Publishing Inventory Reports to Report Server
The Settings tab includes the “Send report to Report Server” option—typically selected when you run Inventory Reports as an automation step.
Notification
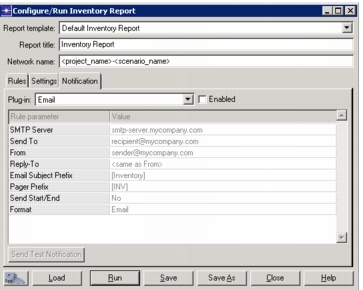
Using the Notification tab, you can configure sending an email message when a rule has been run. You can also control whether you receive a message at the start and end of a run, as shown in the following figure.
Figure 8: Notification Tab—Inventory Reports
Configuring Notification
The email plug-in requires that you specify the SMTP Server and email address of one or more recipients who receive the notification. When you check “Enabled,” you can configure the parameters and then click “Send Notification” to test your configuration settings.
For more information, see:
- Running Inventory Reports
- “Troubleshooting and Preferences“