Using Spreadsheets for Traffic Export/Import
The Export Traffic Flows to Spreadsheet and Import Traffic Flows from Spreadsheet operations enable you to edit your traffic quickly and easily. The typical workflow is:
-
Export existing traffic flows to a spreadsheet (described in Procedure 10)
-
Edit the data – You can edit a traffic spreadsheet file using any spreadsheet or ASCII text editor. A traffic spreadsheet includes a table that lists traffic data taken from the flow objects in the network. If you want more information about a field in this table, do the following:
- Open the Attributes dialog box for the relevant flow object (right-click on the object and choose Edit Attributes)
- Select the attribute that corresponds to the field in the spreadsheet file
- Click the Help ('?') button for the attribute
-
Re-import the spreadsheet file (described in Procedure 11)
Procedure 10: Exporting Traffic Flows to a Spreadsheet
-
Open the project and scenario containing the traffic that you want to export.
-
Choose Traffic > Export Traffic Flows > To Spreadsheet…
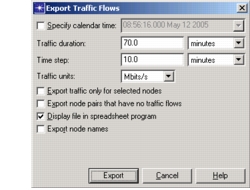
Result: The Export Traffic Flows dialog box appears.
Figure 19: Exporting Traffic Flows to a Spreadsheet
-
Set the options (listed in Table 4) and click Export.
Result: The spreadsheet file is saved with the name
<project_name>-<sencrio_name>.txtin directory<HOME>/op_admin/tmp.
End of Procedure 10
Table 4: Export Traffic Flows Dialog Box
| Item | Description |
|---|---|
| Display file in spreadsheet program | If this option is selected, the default spreadsheet program (specified by the spreadsheet_prog preferences) opens the exported traffic file automatically. |
| Export node names | When selected, full hierarchical node names are always exported with the traffic data. If unchecked, node names are only exported if IP address information is missing. Including the node names with the export data affects the import of the data. The import engine attempts to match the traffic flow to its endpoints based on node name first, if available. If that lookup fails, then the endpoint IP addresses are used for matching. |
| Export node pairs that have no traffic flows | If this option is selected, NetPlanner exports data for the entire matrix of node pairs, including node pairs that have no traffic. If this option is cleared, NetPlanner exports data only for node pairs that have traffic. |
| Export traffic only for selected nodes | If this option is selected, only traffic for selected nodes in the scenario is considered for export. When unselected traffic for all nodes is considered for export. This option is useful when you want to view and edit traffic for a few objects. |
| Specify calendar time | Sets the start time of the traffic that the file spans. The time steps reference this date and time in the file. The default is determined by the earliest time set in all existing traffic pairs, network base time, or current time. To specify a date and time other than the default, from the Specify Calendar Time pull-down menu, select "Choose date/time". The Set Date/Time… dialog box appears. Select a date and time and click OK. |
| Time Step | The bucket size of the exported traffic. NetPlanner calculates an initial value for this field dynamically. |
| Traffic Duration | The total amount of time the traffic file should span. This is determined by the length of the traffic specified by all demand objects in the scenario. NetPlanner calculates an initial value for this field dynamically. |
| Traffic Units | Lists the units of the exported traffic. This is specified in bits/sec, Kbits/sec, Mbits/sec, or Gbits/sec |
Procedure 11: Importing Traffic Flows from a Spreadsheet
-
Open the project and scenario containing the network to which you want to import traffic.
-
Choose Traffic > Import Traffic Flows > From Spreadsheet…
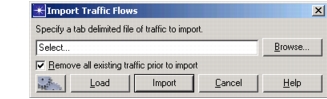
Result: The Import Traffic Flows dialog box appears.
-
Specify the requested information:
-
Specify a tab delimited file of traffic to import – Specify the full path of the traffic flow import file. Or, click the Browse button to navigate to the appropriate directory and select the traffic flow file.
If a traffic flow file was imported previously, the previously specified full path and file name appear as the default.
-
Replace all existing traffic prior to import – Select the checkbox to replace all the flows in the network with the traffic defined in the imported traffic flow file. Unselect the checkbox to replace only the traffic flows for the objects in the imported traffic flow file.
If a traffic flow was imported previously, this previously specified setting appears as the default.
-
-
Click the button for the appropriate operation:
-
Save Automation button – Saves the settings to an automation file that can be used to create automation tasks. This option is only available only with an Automation module license.
-
Load button – Loads a previously saved automation file. When this button is clicked, the “Load Import Flows from Spreadsheet Automation File” dialog box appears from which you can select an automation file.
-
Import button – Imports the specified spreadsheet.
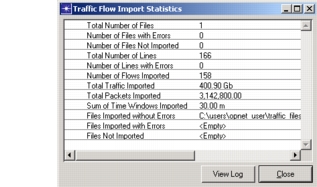
Result: The Traffic Flow Import Statistics window appears.
Figure 20: Traffic Flow Import Statistics Window
-
-
If the statistics indicate an error during the import, or if you want to see more information about the import operation, click View Log to see the import log.
Note: If the import engine cannot map any of the flows, this window includes a View/Map Unmapped Flows button. It is good practice to check whether any of the imported traffic was unmapped, and to map that traffic, if necessary. For more information, see “Unmapped Traffic“.
End of Procedure 11
Spreadsheet File Format
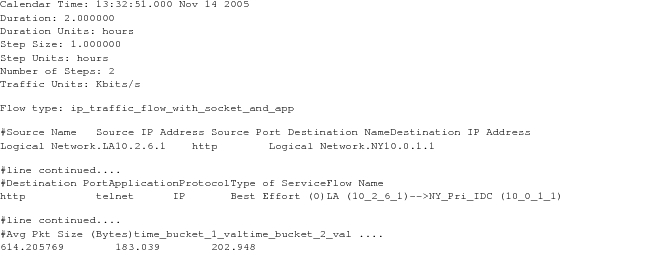
The following figure show the supported format for traffic spreadsheet files. Each spreadsheet file consists of a header section (Table 5) and a traffic section (Table 6).
Figure 21: Spreadsheet File Format
Header Section
The header section includes the fields listed in the following table.
Table 5: Spreadsheet Traffic File Format: Traffic Section
| Item | Description |
|---|---|
| Calendar Time (optional) |
Calendar start time of the traffic. If this field is not included, the traffic values are offsets of the calendar start time specified in the scenario. Note: If you plan to use “months” as the “Duration Units”, you must specify a valid date here. |
| Duration | Total traffic duration. If the traffic section defines traffic that is outside this time window, it will not be imported. |
| Duration Units | Acceptable values are “seconds”, “minutes”, “hours”, “days”, “weeks”, and “months”. |
| Step Size | Bucket size of the values specified in the traffic data. |
| Step Units | Acceptable values are “seconds”, “minutes”, “hours”, “days”, “weeks”, and “month”. |
| Number of Units | Number of traffic values specified in each line. If a line has more than this number of values, the extra values will not be imported. |
| Traffic Units | Acceptable values are “bits/s”, “Kbits/s”, “Mbits/s”, and “Gbits/s”. |
Traffic Section
The traffic section contains one or more lines that define the traffic to be imported. The section is divided into subsections based on the demand model used. Each subsection consists of a header line that starts with Flow type: and defines the demand model used (for example, Flow type: ip traffic flow). Each subsequent line in the subsection defines the traffic in one flow object.
Not all fields need to be set. If a field is marked as optional, you can enter the string “default” for that field.
Note: For more information about the fields in this subsection, see the corresponding attribute descriptions in the traffic-flow object: right-click on a flow object that uses the flow model you want to create (for example, ip_traffic_flow) and click Edit Attributes. In the Attributes dialog box, click the Help (“?”) button next to the attribute name to view a description.
Table 6: Spreadsheet Traffic File Format: Traffic Section
| Item | Description |
|---|---|
| Source Name | Hierarchical name of the source node in the scenario.This field is optional if the source IP address is specified. |
| Source IP Address | IP address of the source node. This field is required if the source name is not specified. Any traffic that cannot be matched to a node pair (based on name or IP address) will be imported but appear as unmapped traffic; for more information, see “Unmapped Traffic“. |
| Source Port (optional) |
Socket-level port number on the source node. This port number information is used for classification in QoS and matching within ACLs. |
| Destination Name | Hierarchical name of the destination node in the scenario. This field is optional if the destination IP address is specified. |
| Destination IP Address | IP address of the destination node. This field is required if the destination name is not specified. Any traffic that cannot be matched to a node pair (based on name or IP address) will be imported but appear as unmapped traffic; for more information, see “Unmapped Traffic“. |
| Destination Port (optional) |
Socket-level port number on the destination node. This port number information is used for classification in QoS and matching within ACLs. |
| Application (optional) |
Application name of traffic between source and destination node. |
| Protocol (optional) |
Socket/IP level protocol number or name |
| Type of Service (optional) |
Type of Service (ToS) and/or Differentiated Service Code Point (DSCP) assigned to background traffic sent from this node. |
| Flow Name (optional) |
Name of the traffic-flow object. If this field is not specified, the import engine will generate a name automatically. |
| Avg Pkt Size | The average packet size of the traffic, in bytes |
| [traffic data] | A tab-delineated vector of traffic values at the end of the line. Each value specifies the traffic intensity for one bucket interval (as specified by the Step Size, Step Units, and Traffic Units values in the header). |
| [new-line character] | Each line must end with a new-line (‘\n’) character. |
For more information, see: