Configuring Traffic Flow Import
The following sections provide descriptions of the configuration options for traffic flow import:
- Import Traffic Flows Dialog Box
- Merging Duplicate Data for a Tier Pair
- Multiple Archive Alignment
- Differentiating Traffic Flows
- Time Zone
- Traffic Selection
- Traffic Preprocessors
- Archive Information
Import Traffic Flows Dialog Box
For most traffic-flow formats, you import data using the Traffic Flows Import dialog box (Traffic > Import Traffic Flows > From <traffic_source>). The table that follows lists information and references about the available options.
Figure 3: Traffic Flows Import Dialog Box
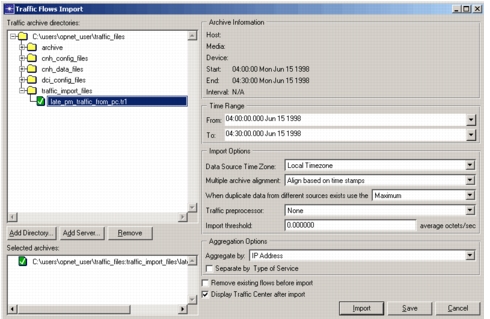
Table 4: Traffic Flows Import Dialog Box
| Item | Description |
|---|---|
| Traffic archive directories | Select the data files to import or the nGenius server from which you want to import data. This pane includes the following: - Treeview – The treeview shows traffic files of the desired type (such as NetFlow or .tr2) and NetScout servers. Use the Add Directory, Add Server, and Remove buttons to edit this treeview. - Add Directory – Click this button to add a directory that contains the traffic files you want to import. - Add Server – Click this button if you want to import from a NetScout nGenius server. Then specify the hostname, username, and Common Data Export (CDE) settings. - Remove – To remove a directory or server from the treeview, select it and click Remove. |
| Archive Information | Shows probe information contained in the selected archive file. For more information, see Archive Information. |
| Time Range | Shows the time range for the traffic file that is currently selected in the treeview. By default, the full time range (all traffic in the file) is included in the import. To import a specific time range from a file, open the “From” or “To” menus and select “Choose Date/Time.” |
| Traffic Options: | - Data Source Time Zone – Specifies the time zone in which the selected traffic files were captured. If the traffic was captured in a different time zone, the imported traffic is converted to local time. For more information, see Time Zone on page ITG-2-26. - Multiple archive alignment – Specifies whether to align or concatenate multiple archives from one traffic server. For more information, see Multiple Archive Alignment on page ITG-2-24. - When duplicate data from different sources exists use the... – Specifies how to merge multiple traffic archives for the same conversation pair. For more information, see Merging Duplicate Data for a Tier Pair. - Traffic preprocessor – Specifies a preprocessor script to convert unsupported ASCII formats. For more information, see Traffic Preprocessors. - Import Threshold – Specifies the minimum throughput (in octets, or 8-bit bytes, per second) at which traffic is imported into the scenario. To import all traffic data in a file, set this threshold to 0. |
| Aggregation Options | Specifies whether to import socket, transport-protocol, or TOS information with the traffic flows. For more information, see Differentiating Traffic Flows. |
| Remove existing flows before import | Select this option to replace all pre-existing flows with the imported flows. If this option is not selected, the scenario will contain both pre-existing and imported flows after the import. |
| Display Traffic Center after import | Opens the Traffic Center window automatically after the import. This option is on by default, because it is good practice to verify that the import produced the desired results. |
| Advanced | Opens the Advanced Flow Import Options dialog box to specify the way you want to represent source-only traffic flows.For more information, see Merging Duplicate Data for a Tier Pair. |
| Traffic Selection | Specifies the time window of the traffic to import. For more information, see Traffic Selection. |
Merging Duplicate Data for a Tier Pair
The “When duplicate data from different sources exists use <merging_option>” menu specifies how to merge multiple traffic archives for the same conversation pair. Merging is useful when you import multiple traffic files and merge the imported traffic with the existing traffic.
This setting is important when you have nodes in different segments and separate traffic probes in each segment. If nodes send and receive traffic across segments, multiple probes might capture the same traffic; thus the same traffic might be recorded in multiple archives.
This option specifies how to resolve conflicting traffic data for the same node pair over the same time window (either between multiple archives, or between imported archives and existing traffic values in the scenario). The available options are:
- Maximum – Use the highest traffic values for the time window. This is the most common option.
- Minimum – Use the lowest traffic values for the time window.
- Sum – Use the sum of the traffic values for the time window.
Multiple Archive Alignment
Note: This option is used only if the imported data uses relative times (as opposed to calendar/absolute times).
This option specifies whether to align or concatenate multiple archives from one traffic server. This menu has three options:
-
Align Start of Each Archive – With this option enabled, each archive is aligned so that all traffic starts simultaneously (at the network start time) and runs concurrently. This option is useful for archives from separate network probes that started simultaneously.
-
Align Archives Based on Time Stamps – With this option enabled, the time stamps in each archive is used to align the traffic to replicate its real-world behavior. This option is useful for archives (from separate probes) that have overlapping time frames but did not start simultaneously.
If the imported data uses calendar times, the import engine always aligns the traffic based on the imported time stamps.
-
Concatenate Archives – With this option enabled, the archives are ordered by start time so that traffic runs consecutively: the traffic for each subsequent archive follows the traffic in the preceding archive. This option is most useful if you made successive runs from one network probe.
The following example illustrates how these options work. Suppose you have two traffic archives: the first represents traffic collected from 9:00 to 9:30; the second represents traffic collected from 9:15 to 9:45. The results of the different settings are as follows:
- Concatenate Archives – Concatenated traffic over one hour of simulation time.
- Align Archives Based on Time Stamps – traffic over 45 minutes of simulation time, with overlapping traffic (that captured between 9:15 and 9:30) during fifteen minutes of simulation time.
- Align Start of Each Archive – The two archives’ traffic run concurrently over 30 minutes of simulation time.
Note: This feature does not concatenate traffic from multiple servers; NetPlanner concatenates the archives from each server but overlays the results from all servers.
Differentiating Traffic Flows
The differentiation options specify what kind of information is imported with the traffic flows. The organization of the traffic flows in the Traffic Center depend on what differentiation option you select. These options also define the number of flow objects that are created for each traffic flow.
Note: This option is not supported for all traffic-flow formats. To determine if this option is supported for the format you want to import, go to http://support.riverbed.com and search for S21587.
The differentiation options (from least detailed to most detailed) are:
- IP Address – One flow object is created for each pair of IP addresses that exchange traffic in the imported data.
- IP Address and Transport Protocol – A separate flow object is created for each transport protocol seen between two IP addresses that exchange traffic. Additionally, the transport-protocol attributes are set on the flow object.
- IP Address and Socket Information – A separate flow object is created for each socket connection seen between two IP addresses that exchange traffic. Additionally, the socket attributes are set on the flow object.
- IP Address and Well Known Port – A separate flow object is created for each well known port seen between two IP addresses that exchange traffic. Additionally, the port attributes are set on the flow object.
Key Concept—If you select the “IP Address and Well Known Port” option and traffic might originate from three distinct unknown ports to a well known port such as port 80, the destination port attribute is set to HTTP (port 80) and the source port attribute is unset. The Traffic Center displays one flow object to represent the traffic based on the HTTP (port 80) differentiation.
If “Separate by Type of Service” is enabled, the differentiate traffic flows are further divided into separate flow objects for each type of service.
If unable to parse specific socket, protocol, TOS, or port data in a traffic file, data is differentiated at the most detailed level possible. Therefore, the actual number of flows created during an import might be less than the theoretical maximum. The following equations define the maximum number of flow objects that can be created between each pair of IP addresses. (If “Separate by Type of Service” is not selected, <number_of_TOS> = 1.)
- (IP Address)
<max_flows_per_IP_address_pair>=<number_of_TOS>* 2 - (IP Address and Transport Protocol)
<max_flows_per_IP_address_pair>=<number_of_transport_protocols_used>*<number_of_TOS>* 2 - (IP Address and Socket Information)
<max_flows_per_IP_address_pair>=<number_of_sockets_used>*<number_of_TOS>* 2 - (IP Address and Well Known Ports)
<max_flows_per_IP_address_pair>=<number_of_ports_used>*<number_of_TOS>* 2
Time Zone
The Time Zone option is relevant for data formats (such as Netflow and .tr1/.tr2) that do not include information about the time zone in which the data was captured.
This option specifies the time zone in which the selected traffic files were captured. “Local time zone” is the default choice. If a specific time zone is selected in this menu, and that zone is different from the global “timezone” preference, the import engine converts the time data so that the imported traffic reflects the local time.
Note: You can specify one time zone only per traffic import. If you want to import traffic from files that were captured in different time zones, you should perform a separate import for each time zone.
Traffic Selection
The Traffic Selection fields specify the time interval of the traffic to import:
- From – Start time of the traffic interval to import. This window can be a subset of the capture time, but the From field cannot be earlier than the collection start time (the default setting).
- To – End time of the traffic interval to import. This window can be a subset of the capture time, but the End field cannot be later than the capture end time (the default setting).
Traffic Preprocessors
The Traffic Preprocessor menu specifies a preprocessor script to convert unsupported ASCII formats. You can create preprocessor scripts (either shell scripts or executable files) that convert a traffic file to a supported format that can be imported. By selecting an archive and then choosing a preprocessing script in this menu, you can automatically convert the archive to Flexible CSV (.tr2) format prior to the import. Note that you cannot assign a script to multiple archives—you must assign a script to each archive individually. The initial setting for all archives is None. This indicates to import the files “as is,” and is the correct setting for CSV and Sniffer files.
For more information about using preprocessing scripts, see section “Importing IP, Ethernet, and VoIP Traffic Flows—ASCII Text Format”.
Archive Information
The Probe information that appears with each traffic archive file provides identifying information about the file:
- Host – IP address of the probe.
- Device – The name of the probe.
- Start – The start time of the traffic capture period.
- End – The end time of the traffic capture period.
- Interval – The amount of time between traffic collection.
For more information, see: