Configuring Baseline Load Import
The following sections provide descriptions of the configuration options for baseline load import:
- Import Baseline Loads Dialog Box
- Specifying Data Sources (Data Directories and Servers)
- Merging Duplicate Data for a Link
- Login and Data Sources for Direct CA eHealth-Network Imports
- Login Settings
- Data Source Settings
Import Baseline Loads Dialog Box
Table 2-6 shows the Import Baseline Loads dialog box, which appears when you choose Traffic > Import Baseline Loads > From <data_source>. The controls in this dialog box are described in Table 2-6.
Figure 21: Import Baseline Loads Dialog Box
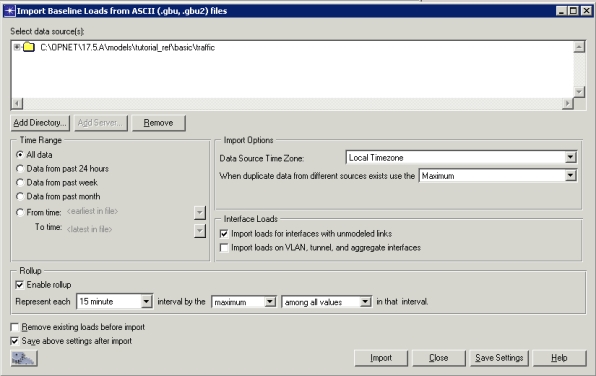
Table 6: Import Link Baseline Loads Dialog Box
| Item | Description |
|---|---|
| Select data source(s) | Choose the data files to import or the server from which you want to import data. The treeview shows the following: - Data file directories – Click Add Directory and select a directory that contains the link-load data files you want to import. The treeview shows only files the type you are importing (ASCII, MRTG, and so on). - Data servers – If you want to import from a CA eHealth server, click Add Server and specify the hostname, username, password, login settings, and data-source settings. For more information, see Login and Data Sources for Direct CA eHealth-Network Imports. Note: If an MRTG configuration file specifies any log file locations, selecting the configuration file will import the log files. (In this case, “specifying log file locations” means that the configuration file's WorkDir or LogDir attribute points to the directory where the log files reside.) If a configuration file does not specify any log file locations, you must select both the configuration file and the log files in this window. |
| Time Range | Specifies the time window of the data to import. If you want to enter a specific time range (“From time” and “To time” fields), you should know the recorded times in your file(s). If you specify times outside the capture window (start times before, or end times after, a file's recorded time), then “empty” entries (zero utilization or throughput) might be inserted in the attribute tables of some links or nodes. “ <earliest in file>” and “<latest in file>” are the default settings. |
| Import Options | - Data Source Time Zone – Specifies the time zone in which the selected traffic files were captured. If the traffic was captured in a different time zone, the imported traffic is converted to local time. For more information, see Data Time Zone. - When duplicate data from different sources exists use the <merging_option> – Specifies how to merge multiple data for the same link over the same time window. For more information, see Merging Duplicate Data for a Tier Pair. |
| Import aliases from eHealth-Network file | If you are importing from eHealth–Network for the first time, you must check the Import Aliases checkbox and then specify the eHealth–Network object (.dco) file created from doing Procedure 9-9 on page XDI-9-15. |
| Remove existing loads before import | With this option selected, the original contents of an object's “background load” or “background utilization” attribute is overwritten and replaced with the imported data. With this option cleared, the imported data is merged with the current utilization/load data of each object. If imported and existing data both specify an object's utilization/throughput over the same time period, the data merges according to the “Sampling” settings: - Average – calculates an average value for that period - Maximum – selects the maximum value for that period |
| Rollup | If the Enable Rollup option is selected, a value for each interval in the total time window is calculated, as specified by the menu options specified. If the Enable Rollup option is not selected, all values in each data source are imported. |
| Save Settings | This action saves your current import settings immediately, not when you click Import. The settings are loaded the next time you open this dialog box. To use this option, you should leave the “Save settings on import” option disabled. This is useful if you want to use a certain “template” of settings that loads every time you import. Thus you can automatically load this template and change only some settings (rather than all settings) in the dialog box. |
| Save above settings after import | With this option selected, NetPlanner saves your settings when you click Import, then loads these settings the next time you open the Import Loads dialog box. Thus your import settings remain persistent from one import to the next. This option is useful if you want to do consecutive imports using the same (or similar) settings. For example, you might have a report file that is periodically updated by InfoVista. If you select this option, you can do repeated imports of the “same” file, using the same settings, quickly and easily. |
 |
Save Settings for Automation button. Clicking this button lets you save the settings into an automation task for use in automated workflows later. For more information about automation, see “Automation Workflow“ on page 2 and “Creating and Scheduling an Automated Task“ on page 5. |
Specifying Data Sources (Data Directories and Servers)
You can edit the “Select data source(s)” treeview to specify the external programs and files that contain the data you want to import:
- To import data directly from an external program (such as CA eHealth), click Add Server and specify the login and other information for that server. For more information, see Login and Data Sources for Direct CA eHealth-Network Imports.
- To import from data files, click Add Directory and specify the directory where the data files reside. Then expand the tree to select the data files you want to import.
Data Time Zone
The Data Time Zone option is relevant for data formats (such as eHealth, InfoVista, and Performance Insight) that do not include information about the time zone in which the data was captured.
This option specifies the time zone in which the selected traffic files were captured. “Local timezone” is the default choice. If a specific time zone is selected in this menu, and that zone is different from the global “timezone” preference, the import engine converts the time data so that the imported loads reflect the local time.
Note: You can specify one time zone only per import. If you want to import baseline loads that were captured in different time zones, you must perform a separate import for each time zone.
Merging Duplicate Data for a Link
The “When duplicate data from different sources exists use <merging_option>” menu specifies how NetPlanner merges multiple traffic archives for the same link. Merging is useful when you import multiple files and merge the imported loads with the existing loads.
This option specifies how to resolve conflicting load data for the same link over the same time window (either between multiple data files, or between imported data files and existing loads in the scenario). The available options are:
- Maximum – Use the highest load values for the time window. This is the most common option.
- Minimum – Use the lowest load values for the time window.
- Sum – Use the sum of the load values for the time window.
Login and Data Sources for Direct CA eHealth-Network Imports
You can import directly from CA eHealth-Network. You must specify two types of information to import from the external program:
- Login settings, which specify the information needed to log on to the server (username, password, and so on)
- Data source settings, which specify the text commands that generate the data files to be imported into NetPlanner
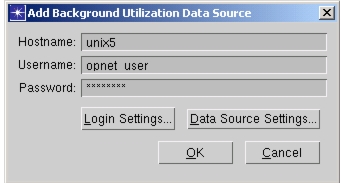
You can specify the server settings in the Add Background Utilization Data Source dialog box (Figure 2-18). This dialog box appears when you click Add Server and when you right-click on a server in the "Select data source(s)" treeview and choose Edit Server Settings. You can use this dialog box to edit the login settings and the data source settings (described in Login Settings and Data Source Settings, respectively).
Figure 22: Add Background Utilization Data Source
Login Settings
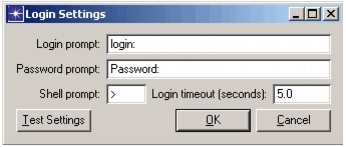
The Login Settings dialog box (Figure 2-19) specifies the information that NetPlanner needs to log on the remote server where the external program is running. The "Shell prompt" field specifies the text prompt generated by the server.
Figure 23: Login Settings Dialog Box
Data Source Settings
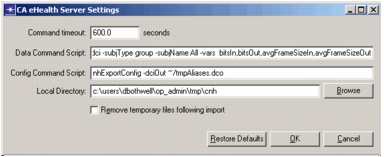
The Data Source Settings dialog box (Figure 2-20) specifies the text commands and data directories that NetPlanner uses to generate and retrieve the data files during an import. You can edit the default commands in this dialog box. To revert to the default settings, click Restore Defaults.
Note: The import engine expects the load data files to be in a specific format. Take care if you change the default commands used to generate the data files; otherwise, the data will not be imported.
Figure 24: Data Source Settings Dialog Box
For more information, see: