Specifying Baseline Loads Manually
To specify baseline loads manually, you must configure the attributes of individual objects.
Procedure 8: Creating Link Loads Manually
-
Right-click on a link and choose Edit Attributes.
The Attributes dialog box opens.
-
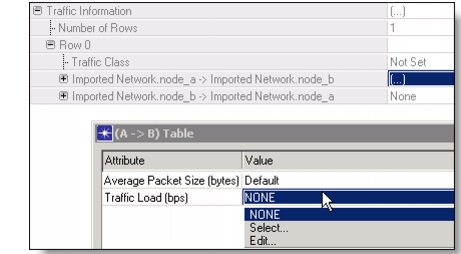
Expand the tree for the “Traffic Information” attribute. The “Traffic Information” is a compound attribute that defines two unidirectional loads (“Node A > Node B” and “Node B < Node A”).
For each load, do the following steps.
2.1 To specify a unidirectional traffic level, click in the Value field of the “Traffic Load” attribute and click one of the following:
- Edit (to specify the traffic manually)
- Select (to use a profile from an existing library).
Figure 17: Profile for a Link Load
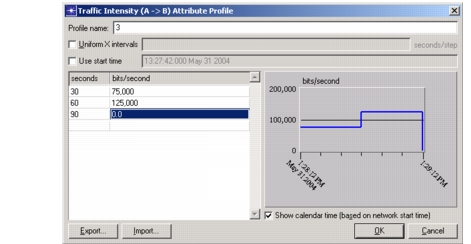
2.2 If you want the profile to start at a calendar time that is different from the network start time, select the “Use start time” option and specify a start time.
A profile contains time values (the “seconds” column) that are offsets from a calendar start time (that is, an absolute date/time value). If this option is not selected, all profile values are considered offsets from the network start time.
In Figure 17 the profile specifies the following (unidirectional) traffic levels on the link:
- 0 to 30 seconds: 0 bits/second
- 30 to 60 seconds: 75,000 bits/second
- 60 to 90 seconds: 125,000 bits/second
- 90 seconds to end of simulation: 0 bits/second
- 120 seconds to end of simulation: 0%
See Traffic Profiles for more information about profile attributes.
2.3 Configure any additional attributes that define the unidirectional load.
Repeat the same steps for the opposite unidirectional load.
To create device loads manually, use the following procedure.
Procedure 9: Creating Device Loads Manually
-
Right-click on a device (for example, a workstation) and choose Edit Attributes.
The Attributes dialog box opens.
-
Click on the Value field of the attribute that specifies background utilization for that device; then choose Enter from the pull-down menu. The exact name of this attribute depends on the type of object. For example, a LAN node might have a “LAN Background Utilization” attribute, and a server might have a “CPU Background Utilization” attribute.
The background utilization attribute table appears with the default background values.
-
In the Rows field, enter the number of utilization periods you want to use.
The specified number of rows appears in the table.
-
In each row, specify the start time of each utilization period in seconds, the utilization percentage, and the direction in which the utilization applies.
Figure 18: Node Background Utilization (Example)
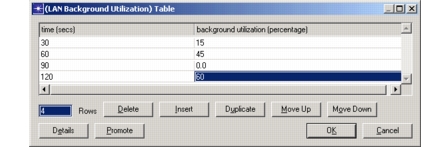
In Figure 18 the table specifies the following utilization levels on the LAN:
- 0 to 30 seconds: 0%
- 30 to 60 seconds: 15%
- 60 to 90 seconds: 45%
- 90 to 120 seconds: 60%
- 120 seconds to end of simulation: 0%