Group Nodes into Subnets
The Group Nodes into Subnets operation allows you to reorganize nodes into subnets. Depending on the complexity of the reorganization, you can use one of two available operations:
- Grouping Nodes into Subnets (Standard) allows you to group one or more specified nodes from the current subnet into a child subnet.
- Grouping Nodes into Subnets (Advanced) allows you to group specified nodes from the network into multi-level subnet hierarchies. Before using the advanced grouping operation, review the following sections for a complete understanding of the advanced capabilities:
The following table lists and compares the features between the Grouping Nodes into Subnets operation and the advanced operation.
Table 46: Grouping Nodes into Subnets Feature Comparison: Standard vs. Advanced
| Feature | Standard | Advanced |
|---|---|---|
| Perform operation on nodes in: | - current subnet - selected nodes of current subnet |
- current subnet - or below the current subnet - all nodes in network - selected nodes of network |
| Arrange nodes in: | - single child subnet | - multi-level subnet hierarchies |
| Note: If used recursively, the standard operation can be used to reorganize nodes into multi-level subnet hierarchies. However, the advanced operation can provide the same results in a single operation. | ||
| Group nodes by: | - name, first <n> characters- name, regular expression - name, string containing - selected nodes For more information, see Standard Grouping Operations. |
- AS numbers - OSPF areas - name, using regular expression - name, using string matching - inferred clouds - moving nodes to a specified subnet For more information, see Advanced Grouping Operations. |
| Specify layout: | - balanced - retain layout from parent subnet |
- simple - balanced - retain layout from parent subnet |
| Specify aspect ratio: | - Use screen’s aspect ratio (assumed) | - Use screen’s aspect ratio - Use square aspect ratio - Fit exactly (dependent on location of nodes) Note: You can also specify the zoom level to show all nodes and subnets. |
| Preview grouping before applying to scenario: | No | Yes |
| Note: Grouping operation cannot be undone. | ||
| Save grouping settings for future use: | not applicable | Save to a (.grf) file and later load the file for re-use in the Group Nodes Into Subnets (Advanced) operation. |
| Save a model assistant (.ma) file to apply saved grouping settings to a network: | not applicable | Use the .ma file to easily overlay the subnet group changes in a scenario using the Model Assistant operation. This capability is especially useful when a re-imported network includes new nodes. For more information, see “Model Assistant”. |
Understanding Advanced Grouping: Levels, Operations, and Parameters
The Group Nodes into Subnets (Advanced) operation uses the following terms:
-
Level – Refers to the hierarchy of subnets. For example, Level 1 is the top-most subnet; Level 2 is a child subnet of Level 1; and Level 3 is a child subnet of Level 2. There is no limit to the number of levels that can be defined. However, you must define at least one level. A level definition includes one or more operations.
-
Operation – Specifies the set of nodes to be included in the level. Remember the following when defining operations:
- The operation(s) for Level 1 must define all nodes to be included in the entire hierarchy.
- The operation(s) for subsequent levels define nodes to be included in that level from the nodes in the previous level. Only nodes included in current level can be included in the next lower level. (Nodes are filtered through the hierarchy to the appropriate level.)
You must define one or more operations for a level. Each operation defines the nodes to be included in a subnet. Additionally, the sequence of the operations affects the outcome. For example, you can specify to move all inferred nodes to subnet
abc, and then all other nodes to subnetxyz. However, if you reverse the sequence, all nodes (including inferred nodes) are moved to subnetxyzand no nodes are moved to subnet abc. -
Parameter – Defines the selected operation. Not all operations require a parameter.
Table 48 lists the available advanced operations and their parameters.
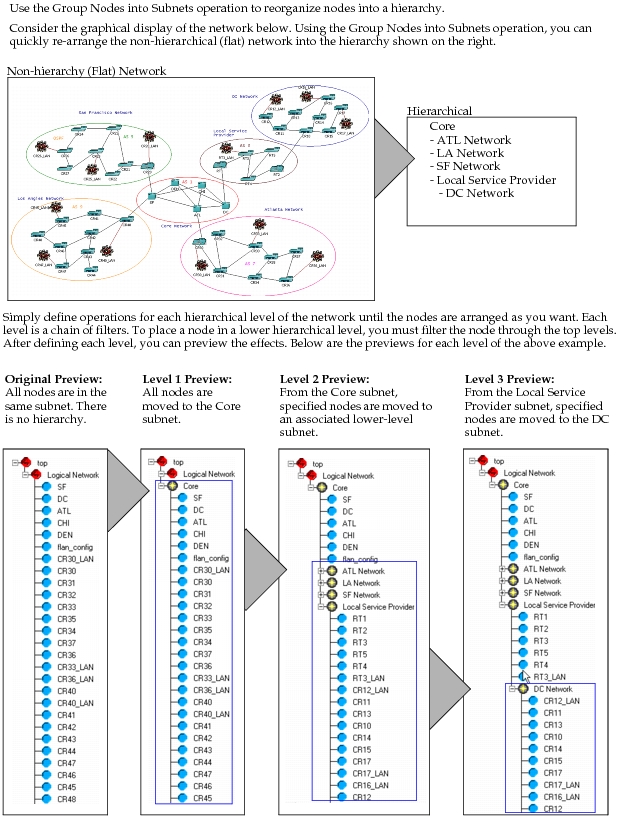
The following figure provides an overview of the Group Nodes into Subnets (Advanced) operation by showing how levels, operations, and parameters are specified to define the new subnet hierarchy.
Figure 75: Overview of Group Nodes into Subnets (Advanced) Operation
Considerations for Grouping Nodes into Subnets (Advanced)
Before using the Group Nodes into Subnets (Advanced) operation, you should carefully consider the following items. Considering the following items will help you define grouping operations and determine the best view from which to run the operation.
-
Identify the nodes to reorganize.
Consider the set of nodes that you want to include in the reorganization:
- All nodes in network
- All nodes in or below a specific subnet
- All nodes in a specific subnet
- A set of selected nodes
-
Determine the new hierarchy of the nodes.
Consider how you want the new hierarchy of nodes organized. Additionally, consider how you can define levels and operations to define the hierarchy. Nodes can be defined and grouped by
- AS number
- OSPF area
- name (using regular expressions or sub-strings)
Additionally, you can explicitly keep or move specified nodes (including inferred nodes) at a specified level.
-
Identify the placement of the new subnet hierarchy within the project.
Consider where the first level of the new subnet hierarchy should be placed:
- Top subnet
- A subnet within the existing hierarchy
-
Determine whether this reorganization is a one-time event or if the organization will be repeated multiple times.
If planning to repeat the same organization multiple times, you can save the grouping settings to a file. The file can be used to quickly load grouping settings. Additionally, when creating the grouping settings file, you can create a corresponding modeling assistant file. You can use the model assistant file to automatically apply grouping specifications to a scenario using the Model Assistant operation.
Grouping Nodes into Subnets
Use the Group Nodes into Subnets operation to perform standard grouping operations. The standard grouping operations allow you to group nodes from the current subnet into child subnet(s). For a list of the standard grouping operations, see Standard Grouping Operations.
Note: Use Grouping Nodes into Subnets (Advanced) to group nodes throughout the network into multi-level subnet hierarchies. For a comparison between the standard and advanced grouping operations, see Table 46 Grouping Nodes into Subnets Feature Comparison: Standard vs. Advanced.
Procedure 105: Grouping Nodes into Subnets
- Go to the subnet containing the node(s) that you want to move to a child subnet.
- If you want to perform this operation on a set of selected nodes, select the nodes.
- Choose Topology > Subnets > Group Nodes into Subnets…
-
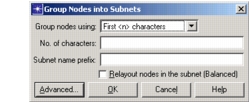
The Group Nodes into Subnets dialog box appears.
Figure 76: Group Nodes into Subnets Dialog Box
-
- From the “Group nodes using” pull-down list, select the grouping operation. Table 47 lists the available operations and associated parameters.
- If the selected operation includes parameters, specify the requested information.
- To layout the nodes in the new child subnet with a balanced layout, click the “Relayout nodes in the subnet (Balanced)” checkbox. If the checkbox is not selected, the layout from the parent subnet is retained.
- Choose OK.
- The Group Nodes into Subnets dialog box closes and the specified nodes are moved to the new child subnet(s).
Note: This operation cannot be undone.
Standard Grouping Operations
The following table lists the standard grouping operations.
Table 47: Standard Grouping Operations
| Operation | Description |
|---|---|
First <n> characters |
Groups nodes by name, using the beginning characters of the name. Parameters: - No. of characters: Specifies the character positions of the name. Enter “1” or greater. A value is required. For example, if you specify “2”, nodes are grouped into child subnets based on the first 2 characters of their names. Each child subnet is given the name of the first 2 characters. - Subnet name prefix: Specifies a prefix for subnet names. A prefix is optional. |
| Regular expression | Groups nodes by name, based on a regular expression. Parameters: - Regular expression: Specifies the regular expression for grouping nodes. For example, if you specify “CR*”, then all nodes with names starting with “CR” are moved to a single child subnet. - Subnet name: Specifies the child subnet name. If no subnet name is specified, then the subnet is given a default name (e.g., “subnet_1”). |
| Selected nodes | Moves selected nodes into a child subnet. Parameter: - Subnet name: Specifies the name of the child subnet to which the selected nodes are moved. For example, if you select all routers and specify “Routers” in the Subnet name field, then all selected nodes are moved to a child subnet named “Routers”. |
| String containing | Groups nodes by name using a matching string. Parameters: - All containing: Specifies a string. For example, if you specify “R1”, then all nodes with names containing “CR” (e.g., CR12 and TR14) are moved to a single child subnet. - Subnet name: Specifies the child subnet name. If no subnet name is specified, then the subnet is given a default name (e.g., “subnet_1”). |
Grouping Nodes into Subnets (Advanced)
Before running the Group Nodes into Subnets (Advanced) operation described in Procedure 106, review the following:
- Table 46 Grouping Nodes into Subnets Feature Comparison: Standard vs. Advanced
- Understanding Advanced Grouping: Levels, Operations, and Parameters
- Considerations for Grouping Nodes into Subnets (Advanced)
Additionally, it is a good idea to first perform the operation on a duplicate of the scenario that you want to change.
Procedure 106: Grouping Nodes into Subnets (Advanced)
-
Go to the best view for running this operation (depending on the included nodes and the placement of the first level subnet).
-
If you want to perform this operation on a set of selected nodes, select the nodes.
-
Choose Topology > Subnets > Group Nodes into Subnets…
- The Group Nodes into Subnets dialog box appears, shown in Figure 76.
-
Select the Advanced button.
-
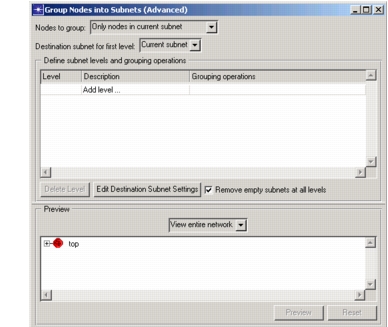
The Group Nodes into Subnets (Advanced) dialog box appears, shown in the following figure.
Figure 77: Group Nodes Into Subnets (Advanced) Dialog Box
-
-
Specify the nodes to group and the placement of the new subnets.
-
From the “Nodes to group” pull-down list, choose the set of nodes to include in the new hierarchy:
- Only nodes in current subnet
- All nodes in or below current subnet
- All nodes in network
- Selected nodes
Note: If “Selected nodes” is chosen, you cannot create a model assistant (.ma) when saving the grouping operations.
-
From the “Destination subnet for first level” pull-down list, choose the placement of the first level in the subnet hierarchy:
- Top subnet – Specifies that Level 1 of the new subnet hierarchy is placed in the top level of the scenario.
- Current subnet – Specifies that Level 1 of the new subnet hierarchy is placed in the current subnet.
-
-
Specify the new subnet hierarchy and the placement of nodes within the hierarchy.
The new subnet hierarchy can be specified using one of the following methods:
-
Load a grouping settings file (.grf) with levels, operations, and parameters already defined.
To load a .grf file, click the Load button. From the Load Grouping Settings File dialog box, select the file to load and click OK. The level and operation parameters are loaded.
-
Define levels (step 6.1-step 6.3), and operations for the levels (step 7).
-
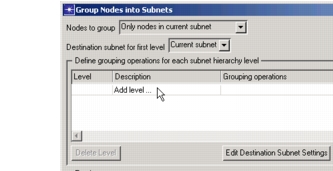
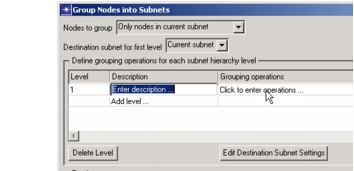
To create a level, click “Add level…”, as shown in the following figure.
-
Level “1” appears, as shown in the following figure.
-
-
Click “Enter description…” and specify a free-from text description of the level.
-
Repeat the above steps for each level that you want to create.
-
-
Create an operation for a level.
-
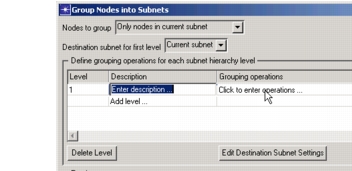
To create an operation, click “Click to enter operations…”
-
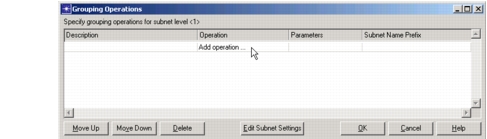
The Grouping Operations dialog box appears, as shown in the following figure.
Figure 78: Group Nodes Into Subnets Dialog Box
-
-
Click “Add operation…” and select an operation from the pull-down menu, as shown in the following figure.
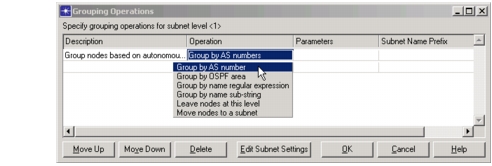
Table 48 lists the available operations and associated parameters.
-
If the selected operation includes a parameter, the parameter dialog box appears to request the parameter information. Enter the information and click OK.
-
Optionally, you can enter a Subnet Name Prefix. The specified prefix is added to the beginning of the subnet name. Since each operation defines the nodes to be included in a subnet, each subnet can be specified with a different prefix.
-
Repeat the above sub-steps for each operation that you want to define.
-
Manage operations in the same level, select an operation and choose one of the following buttons:
- Move Up button – Moves the selected operation one row up.
- Move Down button – Moves the selected operation one row down.
- Delete button – Deletes the selected operation.
-
Define subnet settings for all operations in the same level. Subnets settings specify characteristics of the subnets defined by the operations, including layout and zoom level.
Click the Edit Subnet Settings button, specify the settings, and click OK.
-
After defining all operations and subnet settings, click OK.
-
-
Continue to define another level and/or operations for a level.
-
Preview the new subnet hierarchy and the placement of nodes in the hierarchy, as follows:
- From the pull-down menu, select the preview view option. Choose from
- View current subnet – Displays the current level as the top-most level in the preview. Typically, use this option if you selected “Current subnet” for the first level destination subnet in step 5.
- View entire network – Displays the entire network in the preview. Typically, use this option if you selected “Top Subnet” for the first level destination subnet in step 5.
- Click the Preview button.
- The grouping preview information appears. This information includes the number of nodes moved to new subnets and the number of subnets created.
- In the preview, click on the subnet icons to expand/contract the tree to view the placement of subnets and nodes.
- From the pull-down menu, select the preview view option. Choose from
-
Fine-tune the subnet hierarchy and placement of nodes.
If necessary, continue to specify the new subnet hierarchy and placement of nodes by defining levels, operations, and parameters, described in step 6.
To preview the changes, click the Reset button and then click the Preview button.
-
Define destination subnet settings. Destination subnet settings specify characteristics of the destination subnet, including layout and zoom level.
Click the Edit Destination Subnet Settings button, specify the settings, and click OK.
-
Indicate whether to remove empty subnets at all levels.
To remove empty subnets from the new subnet hierarchy, click the “Remove empty subnets at all levels” checkbox.
-
Optionally, save the subnet level and operation parameters to a file (.grf) to load and use in the future (as described in step 6). You can also save a model assistant file (.ma) that calls the .grf file. You can use this .ma file with the Model Assistant operation to overlay the additional grouping settings into subnets to provide a mix of rules-based node grouping and explicit node grouping. For more information, see “Model Assistant” on page 282.
- Click the Save As button.
- In the Save As dialog box, specify a file name for the .grf file and click Save.
- The Model Assistant File message box appears asking if you want to save a corresponding model assistant file.
- Click Yes.
- In the Save As dialog box, specify a file name for the .ma file and click Save.
-
Create subnets.
Note: If you want to save the grouping settings to a .grf file, be sure to click the Save As button before you click the Create subnets button. After the Group Nodes Into Subnets dialog box closes, you cannot save the grouping settings.
Click the Create Subnets button. The nodes are moved into the new subnet hierarchy.
Note: This operation cannot be undone.
The Group Nodes Into Subnets dialog box closes.
Grouping Operations (Advanced)
The following table lists the advanced grouping operations.
Table 48: Advanced Grouping Operations
| Operation | Description |
|---|---|
| Group by AS numbers | Groups nodes by AS number. The AS number of a node is defined by the Autonomous System Number attribute.- Parameters: None - Subnet Name Prefix: Optional |
| Group by OSPF areas | Groups nodes by OSPF area. The OSPF area of a node is defined by the Area ID attribute.- Parameters: None - Subnet Name Prefix: Optional |
| Group by name using regular expression | Groups nodes by name using a regular expression. Specify a name by a regular expression using Posix Extended Regular Expression syntax. For more information about the syntax of Posix regular expressions, see http://www.opengroup.org/onlinepubs/007908799/xbd/re.html. - Parameters: Specify a regular expression. The nodes are grouped based on the parts of their names matching the regular expression. If the regular expression contains “subexpressions” (the portion of the regular expression inside parentheses), there can be multiple matching portions of a node name, with each matching portion corresponding to a subexpression. The matching portions of a node name are concated to form a new subnet name and all nodes with the same matching portion of names go into the same subnet. If the regular expression contains no subexpressions, there can be only one matching portion of a node name. The matching portion of the node name is used as the subnet name. All nodes with the same matching portion of name go into the same subnet. For example, the regular expression ^([a-zA-Z])+[0-9] groups nodes that start with one or more letters followed by a digit into subnets such that all nodes that have the same first few letters up to the digit are grouped into one subnet. - Subnet Name Prefix: Optional |
| Group by name using string matching | Groups nodes by name using a matching string. The name of a node is defined by the name attribute. Specify a string position or range. Nodes with matching positions are grouped into one subnet. - Parameters: Specify a character position or a range of character positions, starting with “0”. Enter a comma (,) if specifying multiple positions and/or ranges. For example: If you specify the parameter “0”, nodes with names starting with the same first character are grouped into the same subnet. If you specify the parameter “0-2”, nodes with names starting with the first three characters are grouped into the same subnet. If you specify the parameter “0-2,4,6-7”, node names with matching characters in the first through third positions, the fifth position, and the seventh through eighth positions are grouped in the same subnet. - Subnet Name Prefix: Optional |
| Group inferred clouds | Groups inferred clouds into a subnet, with the name “Network Cloud”. - Parameters: None. - Subnet Name Prefix: Optional |
| Keep nodes at this level | Retains specified node(s) in the current subnet level. Specified nodes are retained at the current level even if they fall within the parameters of an operation in the next level. - Parameters: Choose “All nodes”, “All inferred nodes”, or “Nodes with names that match regular expression”. If “Nodes with names that match regular expression” is chosen, specify a regular expression. - Subnet Name Prefix: Optional |
| Move nodes to a subnet | Moves specified node(s) into a subnet. Specify nodes by selecting one of the following: - Parameters: Choose “All nodes”, “All inferred nodes”, or “Nodes with names that match regular expression”. If “Nodes with names that match regular expression” is chosen, specify a regular expression. Additionally, specify a new or existing subnet to which the node(s) are moved. - Subnet Name Prefix: Optional |
Subnet Settings
The following table lists the settings that specify characteristics of new and updated subnets, including layout and zoom level. Settings can be defined for the top-level destination subnet and for each subsequent level of subnets.
| Option | Description |
|---|---|
| Lay out change subnets | |
| Do not change position of existing nodes and subnets | Retains the layout of existing nodes and subnets within changed subnets. |
| Use simple layout method | Specifies layout method: - If checked, “simple” layout is used. For more information about “simple” layout, see “Lay Out Nodes (Simple)”. - If unchecked, balanced layout is used. For more information about “balanced” layout, see “Lay Out Nodes (Balanced)”. |
| Fit subnet around location of nodes and subnets | |
| Use screen’s aspect ratio Use square aspect ratio Fit exactly |
Specifies the aspect ratio of subnet range. Select one of the following: - Use screen’s aspect ratio – Specifies an aspect ratio of 1.333. - Use square aspect ratio – Specifies an aspect ratio of 1:1. - Fix exactly – Specifies that the aspect ratio is dependent on the location of the nodes. |
| Set (destination subnet) zoom level to show all nodes and subnets | Specifies whether to set the zoom to make all nodes and subnets visible. |