Creating and Populating Geographic Subnets
The “Create and Populate Geographic Subnets” feature allows you to quickly create and populate subnets at specific geographic locations. This feature uses the latitude/longitude information stored in the default maps to create a tree of geographic regions (i.e., continents, countries, states/provinces, and cities).
The “Create and Populate Geographic Subnets” feature is especially useful when you want to organize a large set of imported nodes into a geographic subnet hierarchy. After creating and populating the geographic subnets, you can save the subnet hierarchy to a model assistant file that can be re-applied the next time the nodes are imported.
Important—Because the “Create and Populate Geographic Subnets” feature dynamically alters your network model, it is good practice to duplicate the scenario before making any changes.
Procedure 98: Creating and Populating Geographic Subnets
- Choose Topology > Subnets > Create And Populate Geographic Subnets…
-
The “Create And Populate Geographic Subnets” dialog box displays.
On the default tab (Create Geographic Subnets), subnets are shown in the subnet hierarchy (in the right pane) under the world-level “top” subnet.
Subnets with names that match a region are automatically associated with the region. The association is indicated in the Region treeview (in the left pane) as follows:
- A dot next to a region name indicates that one or more sub-region names matches a subnet in the hierarchy, but the region itself does not match a subnet.
- A checkmark next to the region name indicates that the region is associated with a subnet in the subnet hierarchy. (One or more sub-regions may match also.)

Note: The automated process matches subnet names to the first matching region name that is found. For example, the automatic process cannot distinguish between Rome, Italy and Rome, Georgia. The associated subnet may not match the region’s location information. In fact, the association may be incorrect. However, since they do not affect the network’s definition in any way, false associations are kept and tolerated in this treeview.
-
- Select the appropriate tab(s) to define and populate the geographic subnets:
- Create Geographic Subnets Tab – defines a subnet hierarchy based on geographic regions (i.e., continents, countries, states/provinces, and cities).
- Populate Subnets Tab – moves nodes into the actual subnet hierarchy.
- Position Nodes And Subnets Tab – applies a region’s name and location to a subnet/node in the hierarchy. Additionally, you can modify any of these subnet properties manually, perhaps with information not related to any supplied region data.
- Click Close.
- The Create And Populate Geographic Subnets dialog box closes.
Note: Your new subnet hierarchy can be saved to a model assistant file and re-applied the next time the nodes are imported.
Create Geographic Subnets Tab
Select the “Create Geographic Subnets” tab on the “Create And Populate Geographic Subnets” dialog box to define a subnet hierarchy based on geographic regions (i.e., continents, countries, states/provinces, and cities).
Figure 72: Create And Populate Geographic Subnets – Create Geographic Subnets Tab
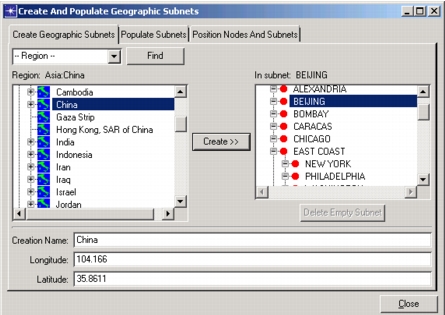
On the “Create Geographic Subnets” tab, you can perform the following procedures:
- Creating a Subnet in the Geographic Subnet Hierarchy
- Deleting a Subnet from the Geographic Subnet Hierarchy
Procedure 99: Creating a Subnet in the Geographic Subnet Hierarchy
-
Select a region (in the left pane).
Note:
- Use the Find feature to search for a specific region.
- Only one region can be selected at a time.
- The selected region’s name and location are displayed at the bottom of the tab.
- A checkmark next to the region name indicates a subnet in the network has a name that equals or begins with the region’s name.
- A dot next to a region name indicates that one or more sub-region names matches a subnet in the hierarchy.
-
Select the parent of the subnet that you want to create (in the right pane).
Note: Networks always have a root subnet named “top” that corresponds to the entire world. All other subnets are contained within the root subnet.
-
Optionally, edit the name and longitude/latitude that came from the region’s information.
Note: The value of these fields specify the initial attributes of the subnet that you will create. Therefore, the fields must have valid attribute values. For instance, the name must not have invalid characters (such as “.”).
-
Select the “Create>>” button.
-
The subnet is created in the subnet hierarchy with the specified name and location.
A checkmark appears next to the region name indicating that the region has been used. This happens even if you specify a different name. However, if you re-open this dialog box, the association is not automatically inferred.
-
Procedure 100: Deleting a Subnet from the Geographic Subnet Hierarchy
-
Select the subnet to delete (in the right pane).
Note: A subnet can be deleted only if it is empty. The subnet cannot contain subnets or nodes. To remove a subnet that is not empty, you can select and cut the subnet in the Project Editor.
-
Select the “Delete Empty Subnet” button.
- The selected subnet is removed from the subnet hierarchy.
Populate Subnets Tab
Select the “Populate Subnets” tab on the “Create And Populate Geographic Subnets” dialog box to move nodes into the defined subnet hierarchy. You can move nodes (and subnets) into any existing subnet and not just into newly created subnets.
Figure 73: Create And Populate Geographic Subnets – Populate Subnets Tab
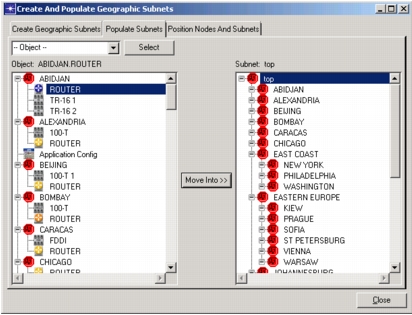
On the “Populate Subnets” tab, you can perform the following procedure:
Procedure 101: Moving Nodes into the Subnet Hierarchy
-
Select the node(s) to move (in the left pane).
Note: Use the Select feature to search for and select one or more nodes whose name contains a substring or matches a regular expression.
-
Select the subnet into which you want to move the selected node(s) (in the right pane).
-
Select the “Move Into>>” button.
Note: Alternatively, you can drag nodes (from the left pane) to the subnet (in the right pane). In this case, you do not need to select the target subnet first.
- The selected nodes are moved into the selected subnet. The nodes are displayed under the selected subnet (in the left pane).
Related Topics:
- Creating and Populating Geographic Subnets
- Create Geographic Subnets Tab
- Position Nodes And Subnets Tab
Position Nodes And Subnets Tab
Select the “Position Nodes And Subnets” tab on the “Create And Populate Geographic Subnets” dialog box to apply a region’s location and/or name to a subnet in the hierarchy.
Figure 74: Create and Populate Geographic Subnets – Position Nodes And Subnets Tab
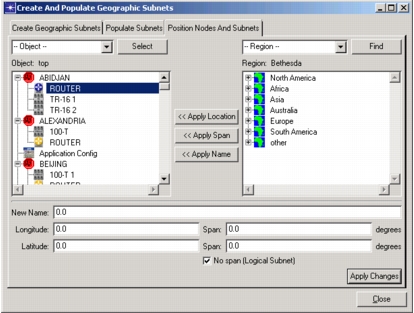
On the “Position Nodes And Subnets” tab, you can perform the following procedures:
- Applying a Region’s Location Information to a Subnet or Node in the Hierarchy
- Applying a Region’s Name to a Subnet in the Hierarchy
- Overriding the Name, Location, and Subnet Type of a Subnet or Node in the Hierarchy
Procedure 102: Applying a Region’s Location Information to a Subnet or Node in the Hierarchy
-
Select the subnet(s) and/or node(s) in the subnet hierarchy (in the left pane).
Note: Use the Select feature to search for and select one or more objects.
-
Select the region (in the right pane) corresponding to the location to which you want to move the selected subnet(s)/node(s).
Note: Use the Find feature to search for and select a region.
-
Select the “<<Apply Location” button.
- The location of the selected subnet(s)/node(s) changes to the selected region.
Note: The change is not accepted if the region’s location is outside of the parent subnet.
Procedure 103: Applying a Region’s Name to a Subnet in the Hierarchy
-
Select a subnet or node in the subnet hierarchy (in the left pane).
Note: Use the Select feature to search for and select one or more subnets.
-
Select the region (in the right pane) corresponding to the name that you want to apply to the selected subnet/node.
Note: Use the Find feature to search for and select a region.
-
Select the “<<Apply Name” button.
- The selected subnet/node name is changed to the selected region’s name.
Note: If the region name is applied to more than one subnet, the subnet name is appended with a number to differentiate the subnets. Each subnet must have a unique name.
Procedure 104: Overriding the Name, Location, and Subnet Type of a Subnet or Node in the Hierarchy
-
Select a single subnet or node in the subnet hierarchy (in the left pane).
Note: Use the Select feature to search for and select a network object.
-
Specify the information that you want to change:
- New Name – Specifies the name of the network object.
- Longitude/Latitude – Specifies the location of the network object.
-
Select the Apply Changes button.
- The specified changes are applied to the selected network object.