Color Chooser
The program’s Color Chooser is used when you are running Linux. If you are on a Windows platform, the Windows color chooser is used instead. This section applies only to the program’s Color Chooser. For help on the Windows color chooser, see the Windows documentation.
When you specify a color for a particular object, you select the color from the Color Chooser. The Color Chooser opens if you do one of the following:
- click on the Set Color button in a dialog box
- click on the “color” attribute of an object
- modify the value of a color-related preference, such as "ui_colors.tool_back"
You can select a default color or create and save a custom color. If you plan to apply the same color to different objects or attributes, save the color. You can then select the color from the Saved colors palette and do not have to reselect it from the spectrum display each time.
Procedure 20: Selecting a Default or Saved Color
-
Perform an operation that requires a color selection.
Result: The Color Chooser opens.
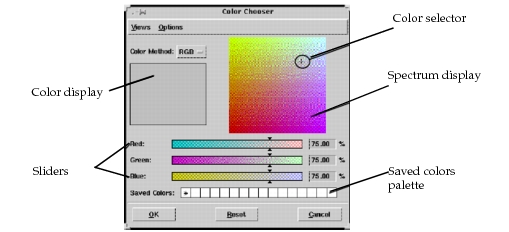
Figure 12: Color Chooser Dialog Box
-
If you want the spectrum display to be a list of named colors instead of a color wheel or plane (a color plane is shown above), choose Named Colors from the Views menu. The Color Wheel/Plane option is the default.
Result: If you chose Named Colors, the spectrum display changes to a list of colors, in alphabetical order. You can rearrange the list by choosing Sort by Hue from the Options menu.
-
Select the desired color method (HLS, RGB, CMY, or Gray) from the pull-down menu.
Result: If you chose the Named Colors option, the spectrum display does not change. If you chose the Color Wheel/Plane option, the spectrum display may change to either a wheel (HLS or Gray color method) or plane (RGB or CMY color method).
-
If you are using the RGB or CMY color method, you may want to limit the spectrum display to the gamut of colors possible when only two (rather than all three) base colors are mixed. For example, if you are using the CMY color method, you may want to select either the Cyan-Magenta, Cyan-Yellow, or Magenta-Yellow gamut from the Options menu. When you select the Cyan-Magenta gamut, the spectrum display is limited to the colors possible when only those two base colors are mixed. To limit the spectrum display, follow these steps:
-
Choose Reform Slider Images from the Options menu.
-
Choose the desired display range.
-
-
Select the desired color:
-
To select a color from the spectrum display, left-click on it.
-
To select a saved color, double-click on it.
Result: The lower half of the color display changes to reflect your choice.
-
-
Click OK to close the Color Chooser.
Procedure 21: Creating and Saving a Custom Color
-
Follow the instructions in Selecting a Default or Saved Color to configure the spectrum display.
-
Select the color from the spectrum display that is closest to your desired color.
Result: The selected color displays in the lower half of the color display.
-
Adjust the color as desired by moving the indicators on the color sliders or by entering the desired percentage of the parameter. The parameters vary depending on the color method selected.
Table 5: Color Slider Parameters by Color Method
Color method Adjustable parameters HLS hue, light, saturation RGB relative amounts of red, green, and blue CMY relative amounts of cyan, magenta, and yellow Gray relative amount of black and white Result: The lower half of the color display reflects the adjustments you made.
-
Optionally, adjust the dither method.
-
Choose Options > Default Color Tolerances and select a dither method. The following table lists the color tolerances.
Table 6: Color Tolerances
Menu Selection Dither Area (pixels) Large Dither 8 x 8 Small Dither 2 x 2 Solid No Dithering. On most displays, selecting too many colors that are not dithered limits the number of colors available for other uses. Precise Large Dither 16 x 16 Precise Small Dither 4 x 4 Precise Solid No Dithering. On most displays, selecting too many colors that are not dithered limits the number of colors available for other uses. -
To control dithering even more precisely, choose Views > Color Tolerances, then specify a delta value that represents how close a color must match before dithering approximates the color.
-
-
Save the custom color.
-
Specify the cell that will store the custom color. Click on an empty (white) cell or click on an in-use cell to replace the current saved color with the new color.
Result: The asterisk appears in the cell that will store the custom color.
-
Choose Options > Add Saved Color.
Result: The color in the lower half of the color display appears in the cell.
-
-
Click OK to close the Color Chooser.
Procedure 22: Reverting to the Previous Color
-
The color display shows the current color in the bottom half and the previous color in the upper half. To revert to the previous color, click in the upper half of the color display.
Figure 13: Color Chooser Dialog Box
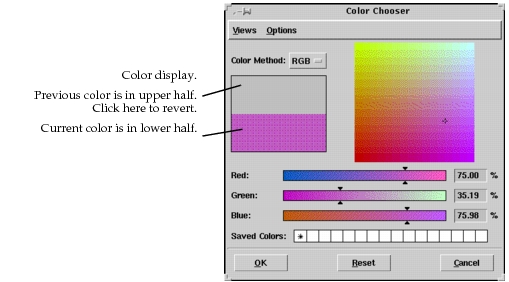
Result: The color display shows only one color, the previous color.