Configuring the Toolbar
Editor window toolbars are configurable. You can customize the toolbar with the menu operations that you commonly use. Additionally, you can specify the icon used to represent an operation and the order of the operations on the toolbar.
Note: The Configure Toolbar menu operation is available only when the "ui_toolbar.dockable" preference is set to TRUE. Additionally, when this preference is set to TRUE, the toolbar floats above the editor window and can be dragged anywhere on the desktop.
Procedure 6: Configuring the Toolbar
-
Choose Windows > Configure Toolbar.
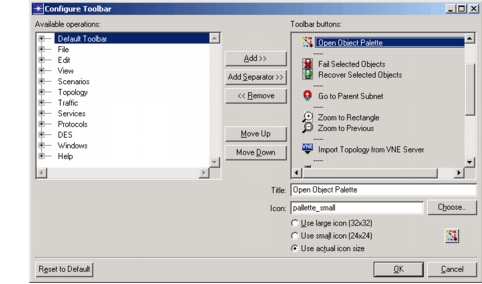
Result: The Configure Toolbar dialog box appears.
Figure 2: Configure Toolbar Dialog Box
-
Configure the toolbar:
- To add an operation to the toolbar: Select the operation from the Available operations pane and click the Add >> button. The operation is added below the selected item in the Toolbar buttons pane.
- To add a separator to the toolbar: Click the Add Separator >> button. The separator is added below the selected item in the Toolbar buttons pane.
- To move an operation (or separator) in the toolbar: Select the operation (or separator) that you want to move and click the Move Up or Move Down button.
- To specify or change the icon displayed for an operation: Select the operation, click the Choose… button to select an icon, and select the icon size option (Use large icon (32x32), Use small icon (24x24), or Use actual icon size).
- To remove an operation (or separator) from the toolbar: Select the operation (or separator) from the Toolbar buttons pane and click the << Remove button.
- To reset the toolbar to the default configuration: Select the Reset to Default button.
-
Click OK.
For more information, see "Windows Menu" on page 35.