Creating Application Demands
Application demands are created in the Project Editor using the same drag-and-drop procedure used to create links. You can also create multiple, identical application demands in one operation: as a full mesh between all nodes in the network, from one node to all of the other nodes in the network, or from all of the nodes in a network to one node.
Procedure 1: Creating an Application Demand
-
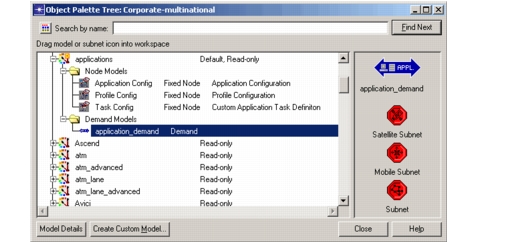
Open the object palette and display the “applications” palette.
-
Click on the application_demand object (as shown in ) and move the cursor to the Project Editor workspace.
The cursor changes appearance to indicate that you are in flow-creation mode.

-
Click on the source node of the application traffic. This is the workstation, server, or LAN node that will send out the requests.
-
Click on the destination node of the application traffic. This is workstation, server, or LAN node that sends out the responses.
A new application demand appears in the workspace. By default, a bi-directional blue dotted arrow is used to represent the application demand.
Note: The arrow created in the workspace does not indicate the direction of the requests (source to destination). Instead, the direction is included in the demand’s name. You can view the name by looking at the demand’s tooltip or attributes.
-
Repeat step 3 and step 4 to create other application demands. When you are done, exit flow-definition mode (right-click and choose Abort Flow Definition from the pop-up menu).
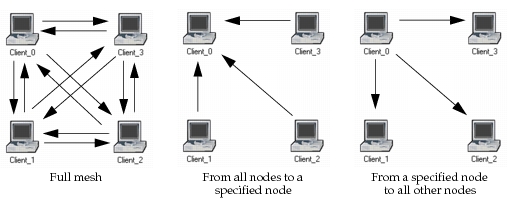
You can also create and configure multiple, identically-configured application demands in one operation. The resulting demands can be:
- a full-mesh between all workstation, LAN, and server nodes in the network
- from all workstation, LAN, and server nodes in the network to a specified node
- from a specified node in the network to all workstation, LAN, and server nodes
Figure 1: Configurations For Creating Multiple Application Demands
Procedure 2: Creating Multiple Application Demands at the Same Time
-
Choose Protocols > Applications > Deploy DES Application Demands.
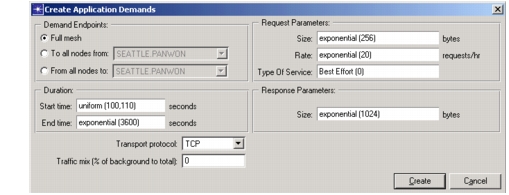
The Create Application Demands dialog box appears.
Figure 2: The Create Application Demands Dialog Box
-
Specify the characteristics of the application demands in the dialog box.
Table 3: Application Demand Parameters
Parameter Description Demand endpoints Specifies the end nodes and the direction of the application demands. The available configurations—Full Mesh, From <node>to All, or From All to<node>—are shown in Figure 1.Duration > Start Time Specifies when the first request is sent. The recommended value for this parameter is 100 seconds or greater, which gives the routing protocols enough time to converge. Duration > End Time Specifies the time after which no more requests are sent. Request parameters > Size Specifies the size of requests sent from the source node to the destination node. Request parameters > Rate Specifies the number of requests sent per hour. Request parameters > Type of Service Specifies the Type of Service (ToS) or Differentiated Service Code Point (DSCP) that is assigned to requests and responses generated by the application demand. Response parameters > Size Specifies the size of the responses sent from the destination node to the source node. Transport protocol Specifies the transport protocol used when transmitting the traffic generated by the application demand. Traffic mix (% of background to total) Specifies the percentage of traffic generated by the application demand that is modeled as background traffic.
• To model all traffic explicitly, set this parameter to “0”.
• To model all traffic as background traffic, set this parameter to “100”. -
Click OK to create the application demands in the workspace.
Note: If you selected “Full Mesh” for the Demand End Points parameter, two application demands (one in each direction) are created for each pair of end nodes. These demands appear superimposed on each other: right-clicking on the demand produces a pop-up menu that includes both demands.