Specifying Traffic for a Flow
You specify traffic levels for a traffic flow by editing the traffic attributes of the associated traffic flow object (see Creating Traffic Flows and Profiles for more information). There are several methods available to do this:
- Specify traffic levels manually – You can enter data manually into the traffic attributes of the flow (see Manually Specifying Traffic)
- Assign an existing traffic profile – You can assign an existing traffic profile to a flow (see Assigning a Traffic Profile)
- Import data from an external file – You can import traffic data from an external text (.txt) or comma-separated-vector (.csv) file directly into a profile (see Importing Traffic Data Into a Profile)
Manually Specifying Traffic
Procedure 4: Specifying Traffic Levels on a Flow Object
-
Right-click on the flow and choose Edit Attributes to open the Attributes dialog box for the flow object.
-
Click in the Value field of the appropriate traffic attribute and choose Edit from the pull-down menu.
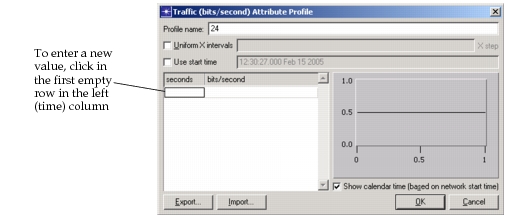
The Attribute Profile dialog box appears.
-
Specify a name for the profile, if desired, in the Name field.
-
A profile contains time values (the “seconds” column) that are offsets from a calendar start time (that is, an absolute date/time value). If this option is not selected, all profile values are considered offsets from the network start time.
If you want the profile to start at a calendar time that is different from the network start time, select the “Use start time” option and specify a start time.
-
Specify a uniform time step for the x axis (simulation time), if desired. The Uniform X Intervals checkbox and Time Step field allow you to specify uniform time intervals for the profile.
-
Enter the x/y value pairs by clicking in the x-value (left) and y-value (right) columns, respectively.
The graph on the right automatically updates to reflect the value pairs you enter.
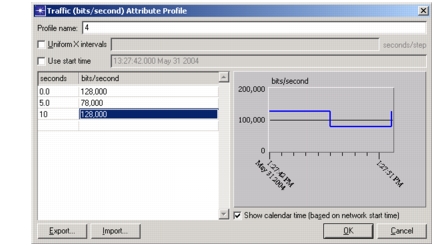
If you specified a uniform time step (that is, if the Uniform X Intervals checkbox is enabled), you can enter only x values that are multiples of the time step. To specify a value that is not a multiple of the time step, disable the Uniform X Intervals checkbox.
-
Click OK to close the Profile dialog box, then OK to close the Edit Attributes dialog box.
Assigning a Traffic Profile
Procedure 5: Assigning an Existing Traffic Profile to a Flow
-
Right-click on the flow and choose Edit Attributes to open the Attributes dialog box.
-
Click in the Value field of the traffic attribute you want to edit and choose Select from the pull-down menu.
The Attribute Profile dialog box appears.
-
Choose the library that contains the profile you want to use in its Profile Library list.
The traffic profiles contained in the selected library appear in the Profile list.
Note: If the profile library you want to use is not in the list, the most likely reason is that the file’s directory is not listed in your model directories. Choose File > Add Model Directory and specify the directory as a Source Directory.
-
Choose a profile from the Profile list and click OK; then click OK to close the Edit Attributes dialog box.
Importing Traffic Data Into a Profile
You can import traffic data into a profile from either a text (.txt) or a comma-separated-vector (.csv) file.
You can import multiple flows into a network scenario from external files and programs; see “Importing Traffic Flows“.
Import Requirements
A data file for a traffic profile should describe one traffic flow only. You should ensure that the traffic data measured fits the attribute. For example, if you are importing into an attribute called “Flow Intensity (bits/second)”, make sure that the data you want to import describes traffic in bits per second, not packets per second or some other measure.
The following diagram shows the required file format for your traffic data. The x and y header fields must match the headers of the target profile.
Figure 11: Required Data File Format

Procedure 6: Importing Traffic Data into a Profile
-
To open the Edit Attributes dialog box for a flow, right-click on the flow and choose Edit Attributes.
-
Click in the Value field of the traffic attribute you want to import and choose Select from the pull-down menu.
The Attribute Profile dialog box appears.
-
Click the Import button and choose the data file you want to import.
-
Click OK to close the Profile dialog box, then OK to close the Edit Attributes dialog box.
Interface Load on Unmodeled Links
In most cases, network traffic collected by NetCollector or a third-party traffic collection tool includes interface load traffic data from all interfaces available on a per-device basis. Your traffic analysis might require all or part of this collected traffic in NetPlanner.
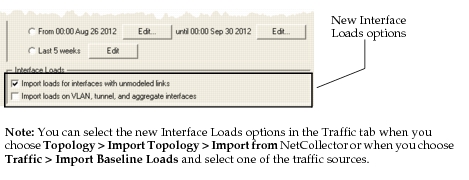
You can import interface load traffic based on the following options, as shown in the following figure.
- Import loads for interfaces with unmodeled links
- Import loads on VLAN, tunnel, and aggregate interfaces
Figure 12: Interface Load Import Options
What do each of the Interface Loads options mean?
When you select “Import loads for interfaces with unmodeled links,”
- NetPlanner or one of Importing Baseline Loads options imports all available interface traffic data collected from the devices in your network whether or not you have modeled the actual links associated with the interface loads. (default)
- Otherwise, only the interface traffic for the links modeled in your network scenario gets imported.
When you select “Import loads on VLAN, tunnel, and aggregate interfaces,”
- NetPlanner or one of Importing Baseline Loads imports all available VLAN, tunnel, and aggregate traffic data collected from the devices in your network whether or not you have modeled them in them in your imported network. Selecting this option imports traffic loads from logical interfaces.
- Otherwise, this traffic data does not get included in your network model.
Key Concept—LSP traffic data collected always gets imported with interface link load traffic data regardless of the options selected for Interface Loads.
How do I decide on which link load traffic option to use?
Most traffic analysis works best by importing only the traffic necessary for your network planning goal.
Collected traffic from a device can be seen as “in” or “out” traffic from any of its interfaces regardless of its source or destination—or whether you choose to model all the network connectivity in your network model or not.
Case 1—Capacity Management
In some cases, all collected traffic available is required for your planning studies. For example, you might need to generate a Network Capacity Report for trending analysis or capacity management. Having all of this traffic in your network model as a current snapshot of the operational traffic in your network makes the most sense.
In this case, make sure you select the option “Import loads for interfaces with unmodeled links” when importing link loads.
Note: Traffic loads for interfaces with unmodeled links are currently used only for generating Network Capacity Reports.
Case 2—Routing Analysis and Survivability
In this case, you might want to only include traffic collected from the interfaces that are connected to the links present in your network model. For example, you might want to convert some specific link load data to flow data for route analysis and survivability studies. In this case, it only makes sense to import the traffic from specific interfaces associated only with the modeled links in your network.
Make sure you clear the option to “Import loads for interfaces with unmodeled links” when importing link loads in this case.
Case 3—VLAN, Tunnel, and Aggregate Interface Traffic
You might want to generate Network Capacity reports using traffic loads on logical (sub-interfaces, VLANs, tunnels, or aggregate interfaces).
In this case, you can select “Import loads on VLAN, tunnel, and aggregate interfaces.”
Note: Traffic loads for interfaces with unmodeled links are currently used only for generating Network Capacity Reports.
Using the Endpoints of Existing Flows for Loads to Flows
In some cases when you convert loads to flows, using one or more flows of interest that already exist in your network as endpoints provides a more effective way to model traffic in your network.
You can now use existing flows in the project editor to define the endpoints of your “Loads to Flow” conversion when you choose Traffic > Convert Link Loads To Flows > Configure/Convert, click Advanced Options, and then select the “Computed flows will have endpoints restricted by exiting flows” option, as shown in the following figure.
Figure 13: Flows with Endpoints Restricted by Existing Flows
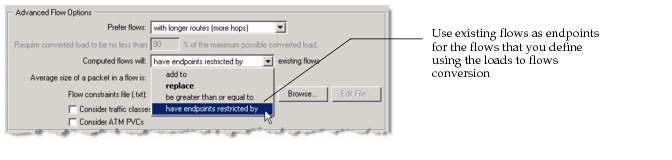
Key Concept—Using the endpoints of existing flows helps you efficiently model the imported operational traffic load data with one or more specific flows of interest in your network.
Traffic Flow Import from AppResponse Xpert
Traffic import from AppResponse Xpert supports Type of Service (ToS).