Authenticating to NetCollector
This section describes the setup and usage of authentication between NetPlanner and NetCollector. Two different methods of authentication may be used:
- Simple Authentication – Single-factor authentication with a username and password combination
- Two-Factor Authentication – Authentication with a software, hardware, or USB security token
Note: For more details about how to configure secure communication between the NetCollector and NetPlanner, see “Configuring Secure Communication With NetCollector“ on page 245.
Simple Authentication
If you want to use simple authentication to connect to the NetCollector, follow the steps in the following procedure.
Procedure 1: Login to NetCollector Using Simple Authentication
-
Open an existing project in NetPlanner.
Note: For the purposes of this procedure, we are using the example of importing network data into an existing project. You could also create a new project, using the Startup Wizard.
-
Select Topology > Import Topology > From NetCollector.
-
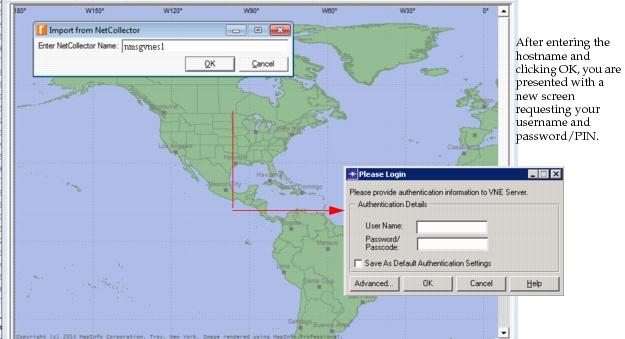
In the dialog box shown in the following figure, enter the hostname of NetCollector.
Figure 2: Login to NetCollector
-
When prompted with the “Please Login” dialog box, shown in the figure above, enter your username and password as provided by your system administrator.
-
(Optional) Select the “Save As Default Authentication Settings” checkbox to retain login information.
Two-Factor Authentication
This section describes the configuration and usage of two-factor authentication with NetCollector
Note: Two-factor authentication is only supported for use with RSA servers.
(Optional) Set the Security Preference in NetPlanner
If you plan to use two-factor authentication and the RSA SoftID security token, you must first configure a preference to point to the installation directory of your Soft ID dll.
Note: If you are not using the RSA SoftID security token, you may skip this step and go directly to Logging on with Two-Factor Authentication.
To set the preference, select Edit > Preferences and set the RSA Two-Factor Authentication Libraries Directory preference (under Import > Topology > From NetCollector > Security in the Preference treeview). Typically, this directory is
c:\Program Files\RSA SecurID Token Common
Logging on with Two-Factor Authentication
When you have two-factor authentication configured and enabled on the NetCollector, you can connect to the NetCollector from NetPlanner to import network data or to access the NetCollector Web Console. You will notice the change during the connection process, as described in the following procedure. For assistance with configuring two-factor authentication on the NetCollector, refer to the NetCollector documentation.
Note: Two-factor authentication is supported for both full and incremental import.
Procedure 2: Login to NetCollector Using Two-Factor Authentication
-
Open an existing project in NetPlanner.
Note: For the purposes of this procedure, we are using the example of importing network data into an existing project. You could also create a new project, using the Startup Wizard to import data.
-
Select Topology > Import Topology > From NetCollector.
-
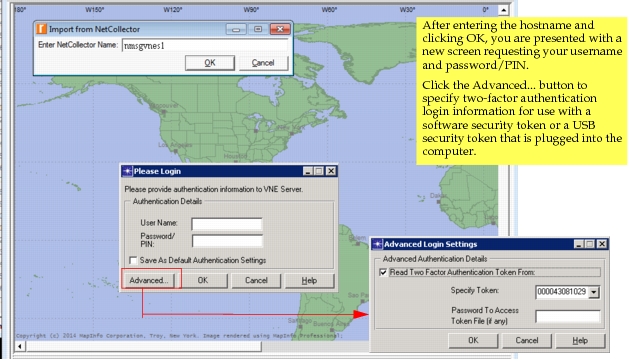
In the dialog box, shown in the following figure, enter the hostname of the NetCollector.
Figure 3: Login to NetCollector
-
When prompted with the “Please Login” dialog box, shown in the figure above, enter your username and password as provided by your system administrator.
- (Option 1) If you have a hardware security token, enter your password plus the number displayed on your security token in the Password/PIN field. For example, if the password is “1234” and the token code currently displayed in the security token is “56789”, then type in “123456789”.
- (Option 2) If you have a software token enabled or a USB security token plugged into your system, click on the “Advanced...” button to launch the Advanced Login Settings dialog box. Select the “Read Two Factor Authentication Token From” checkbox, and choose the token identifier from the drop-down list, shown. If applicable, enter the password for the token in the space provided.
-
If you want to save these settings to expedite future logins, select the “Save As Default Authentication Settings” checkbox and click OK to authenticate.
Note: Be aware that if you do not have a USB security token plugged into your computer, authentication may prompt you for any missing information. You may also encounter a challenge question/response dialog box if the server requires more information. See your system administrator for more information.
Result: Once authentication has completed successfully, the Import from NetCollector dialog box appears.
Note: After you have successfully authenticated to the NetCollector, the session inactivity timeout begins. The default timeout is 5 minutes and begins whenever communication ceases to occur between the NetCollector and analysis software. If a timeout occurs, you must authenticate yourself to the NetCollector again.
-
Continue with import as usual.
Automating Two-Factor Authentication with NetCollector
If you have an Automation license, you can schedule an automated import from NetCollector using two-factor authentication. However, if you have a software token enabled or a USB security token plugged into your system and automation login settings are not specified, your automation task may fail. You can specify the automation login settings when you click the "Login Settings" button in the "Automation > Configure/Run Automation" dialog box. Save these settings for system use during automated tasks. For more information about configuring an automation task, see “Defining and Scheduling Automation Tasks“.
The following section details the options available for import from NetCollector.