Chains
A chain is a series of controls connected to each other and to opposite sides of a container wall. Chains allow you to connect multiple controls so that they act together in response to re-size events.
You can use chains in different ways:
- You can create a “strut chain” across a row of buttons so that they remain consistently spaced, even after a window re-size. You can also create a second chain that is connected to the first.
Creating Chains
You can chain controls by attaching connections between them or by selecting them and choosing Connection > Chain > <connection_type>.
Each chain must have at least one strut. If not, it is over-constrained because it cannot re-size itself when the dialog box itself is re-sized. When this occurs:
- all connections in the chain are drawn in red
- a chain that is connected to the error chain is also drawn in red
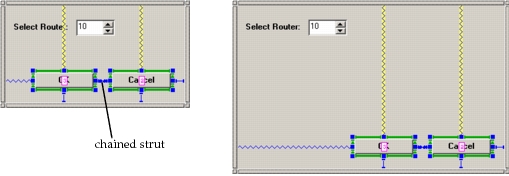
In the following example, the Cancel and OK buttons are chained together using the Lefts to Rights connection. We can see that they are chained because both top connections are highlighted when we select either one. We can also move them around as if they were a single control—the connecting strut ensures that the OK button stays a constant distance to the right of the Cancel button. They move as one control when the dialog box is re-sized.
Figure 22: Chained Controls
Debugging Chains
Try these techniques when creating and debugging chains. If you have both a main chain and a dependent chain, and both are in red because of an error state, it can be difficult to determine which one is the dependent chain, and which connection is the problem.
- Fix error states as soon as they appear, undoing multiple times if necessary.
- When the distance between two edges is too small, zero, or negative, the connection is still drawn, but a thin yellow detour line is drawn from the floating end of the drawing to the edge where the connection is actually attached.
- If you have too many chains, springs, and struts, and cannot see individual controls clearly, open the connection window to see the name and edge of the control to which the selected connection is attached.
- Identify and set the longest chain in both the vertical and horizontal dimensions.
- Select all of the controls in the longest chain and use Chain > Bottom To Tops or Chain > Lefts to Rights. This will leave the top and bottom (or left and right) connection of each control selected, so that if you use Connection > Natural Length, everything will get spaced out “naturally”. However, this probably will lead to an error state, so decide where the spring or springs should go and then unselect all and select only the control and connection and set it to either natural + spring, fixed + spring, or spring, as appropriate.
- When identifying the longest vertical path, prefer the right-most controls in each row. However, taller controls (buttons, pop-ups, spinners, edit fields, edit areas, tables, treeviews) should be preferred over labels and checkboxes.
- After setting up the longest vertical chain, attach labels and buttons to the control in the same row on the longest chain, with springs on the top and bottom or a zero-length strut on the top and a spring on the bottom. Do not set up parallel trans-row chains.
- To test behavior, use Dialog > Try Dialog in the Dialog Editor instead of the one in the Container Editor. Make sure the dialog looks reasonable at various sizes.
- If a dialog was unresizable and you want to make it re-sizeable, you might need to close it first after setting the Resizable attribute (on the Window page), so the minimum/maximum sizes are reset.