Structure of Customizations
Building a Code Library
To build a library of event handlers, you can use either the Riverbed utilities op_mko and op_mkso or the facilities in Microsoft Visual C++ (MSVC).
Riverbed Utilities Method
First, use “op_mko“ to create one or more object files containing the event handlers for your application.
op_mko -m <source file> -type ets -<bitness> -gui
where:
<source file>is the source code file for an event handler, with a name of the form<event handler file>.ets.c.<bitness>is eitherm32orm64, depending on whether you want to create 32-bit or 64-bit object code.
When all object files have been built, use “op_mkso“ to build a library containing them.
op_mkso -type ets -f <object_files> -m <library_name>.<environment>.<arch_suffix>.ets.<type>
where:
<object_files>are the files containing code to be used in the library, with their file name extensions.<library_name>is the name of the library that will be generated byop_mkso. This name must match the library name specified in ETS scripts.<environment>is the environment suffix for your platform (gui32orgui64).<arch_suffix>is the architecture suffix for your platform (i0for Windows;i1for Linux).<type>is the file type suffix for your platform (dllfor Windows;sofor Linux).
Microsoft Visual C++ Method
The event handler consists of one or more Win32 DLLs that provide custom functionality. Compiling the event handler consists of five tasks:
- Creating a new project in MSVC.
- Specifying the common project settings for both the debug and release builds of the project.
- Specifying project settings for the debug build of the project.
- Specifying project settings for the release build of the project.
- Adding files to the project.
The following procedures explain these five tasks.
Procedure 3: Creating a new project in Microsoft Visual C++
-
Open MSVC.
-
Choose File > New…
-
Click the Project tab.
-
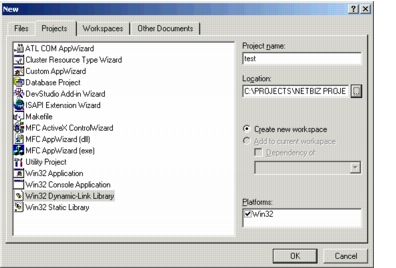
From the project list, select “Win32 Dynamic-Link Library”.
-
Type a name for the new project in the Project name field and specify the save location.
At this point, the dialog box should look similar to this:
-
Click OK.
-
Select the “An empty DLL project” radio button and click the Finish button.
Result: The New Project Information dialog box appears.
-
Verify the specifications and click OK.
Procedure 4: Configuring the Common Project Settings for the Debug and Release Builds
-
Choose Project > Settings.
Result: The Project Settings dialog box appears.
-
Click the C/C++ tab.
-
In the “Settings For” drop-down list, select All Configurations.
-
In the “Category” drop-down list, select Preprocessor.
-
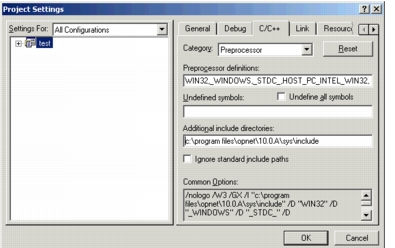
Remove the existing definitions from the Preprocessor Definitions field and replace them with the following ones:
WIN32,_WINDOWS,__STDC__,HOST_PC_INTEL_WIN32,_CTYPE_DISABLE_MACROS,_X86_ -
Include the standard ODK header files by adding the path name to the directories in the Additional include directories field. This example shows the full path name. The only ODK header file required is
netbiz.h.c:\Riverbed\<release>\sys\includeAt this point, the dialog box should look similar to this:
-
Click the Link tab.
-
In the “Category” drop-down list, select Input.
-
In the “Additional library path” field, add the path name to your ODK libraries. This example shows the full path name.
c:\Riverbed\<release>\sys\pc_intel_win32\lib -
In the “Ignore libraries” field, add the following text:
libc.lib,libcmt.lib,libcd.lib,libcmtd.lib -
In the “Category” drop-down list, select General.
-
Specify that binary output be sent to your
<project name>\bindirectory by adding the path name to the “Output file name” field. This example shows the full path name.Note: The
<project name>\bindirectory must be listed in your “mod_dirs“ preference.c:\Riverbed\<release>\sys\pc_intel_win32\bin\<project_name>.gui32.i0.ets.dll
Procedure 5: Specifying Project Settings for the Debug Build
-
In the “Settings For” drop-down list, select “Win32 Debug”.
-
Click the C/C++ tab.
-
In the “Category” drop-down list, select “Code Generation”.
-
In the “Use run-time library” drop-down list, select “Debug Multithreaded DLL”.
-
Add the libraries that will be used in the debug build:
5.1 Click the Link tab. 5.2 Remove the existing entries in the “Object/library modules” field. 5.3 Add the following entries to the “Object/library modules” field.
```text
msvcrtd.lib opvos.lib opprg.lib opatc.lib opmmi.lib opet.lib opema.lib opoma.lib opedets.lib opovisets.lib opservices.lib opodan.lib
```
Procedure 6: Specifying Project Settings for the Release Build
-
In the “Settings For” drop-down list, select “Win32 Release”.
-
Click the C/C++ tab.
-
In the “Category” drop-down list, select “Code Generation”.
-
In the “Use run-time library” drop-down list, select “Multithreaded DLL”.
-
Add the libraries that will be used in the release build:
5.1 Click the Link tab. 5.2 Remove the existing entries in the “Object/library modules” field. 5.3 Add the following entries to the “Object/library modules” field. These libraries are the same ones you specified for the debug build, with one exception: the debug build uses
msvcrtd.lib, whereas the release build usesmsvcrt.lib.```text msvcrt.lib opvos.lib opprg.lib opatc.lib opmmi.lib opet.lib opema.lib opoma.lib opedets.lib opovisets.lib opservices.lib opodan.lib ``` -
Click OK to close the Project Settings dialog box.
Procedure 7: Adding Files to the Project
-
Choose View > Workspace.
Result: The workspace tree view appears in the left-hand side of the workspace.
-
Right-click on the
<project_name>icon in the tree view and select “Add Files to Project” from the pop-up menu.Result: The Insert Files into Project dialog box appears.
-
Select the files to be included, using the
<Control>or<Shift>key to select multiple files. To verify that the files have been added, expand the tree to display the file names. -
Click OK to close the dialog box.
At this point, continue with the usual Visual C++ procedure to build your project. When it is successfully built, the event handler binary will appear in your <project name>/bin/ directory.
Note: When you deploy the source files produced to other systems, these systems must also have ODK installed.