Assign Nodes Dialog Box
The Assign Nodes dialog box appears after you specify the AppTransaction Xpert tasks to import. You can do the following tasks in this dialog box:
- Specify traffic sources and destinations (required): To do this, you select nodes in the Project Editor window and then assign the selected nodes to specific AppTransaction Xpert tiers. The import engine creates traffic flows between these nodes that reflect traffic levels between the corresponding AppTransaction Xpert tiers.
- Save tier/node assignments to a spreadsheet (optional): You might want to save your assignments to a comma separated value (.csv) file. You can edit your assignments and quickly load them when you do future imports. See Saving, Editing and Reusing Tier Assignments for more information.
- Customize initiating nodes (optional): You can customize the traffic duration, traffic levels and demand models for any nodes that you assign to the initiating tier. See Configure Initiating Node Dialog Box for more information.
Table 9: Assign Nodes Dialog Box
| Item | Description |
|---|---|
| Assign Selected Nodes | Assigns all selected nodes in the Project Editor to the current tier. |
| Create variable traffic flow | If this option is enabled, the import engine calculates variable traffic intensities using the trace arrival rate, which is calculated using a Poisson distribution. If this option is not enabled, the import engine calculates a uniform traffic intensity for each flow object. For more information, see Figure 32 and Figure 31. |
| Current Tier | Select a tier to assign |
| Deploy Tier to Selected Nodes | Assigns the selected tier to all selected nodes in the Project Editor |
| Load | Loads tier/node assignments from an ASCII file (see Saving, Editing and Reusing Tier Assignments for more information) |
| Node Assignments by Tier | Treeview shows the current nodes assignments. You cannot import traffic until all tiers have at least one node assigned. |
| Save | Export current tier/node assignments to an ASCII file (see Saving, Editing and Reusing Tier Assignments for more information) |
Saving, Editing and Reusing Tier Assignments
The Assign Nodes dialog box includes two buttons (Save and Load) that enable you to save, edit, and reuse your node assignments. This feature is especially useful for imports that involve a large number of node assignments. For example, you might want to import a client-server application, and assign 100 nodes to the client tier.
You might find it most efficient to create "assignment templates" that require a minimal number of changes after you import their contents into the Assign AppTransaction Xpert Tiers dialog box.
Note: You can import assignment settings from a spreadsheet only if the spreadsheet and the Assign AppTransaction Xpert Tiers dialog box contain the same set of tier names.
Treeview Pop-Up Menu Operations
To edit an existing node assignment, right-click on a node in the Node Assignments treeview, as shown in the following diagram.
Figure 38: Treeview Pop-Up Menu in Assign Nodes Dialog Box
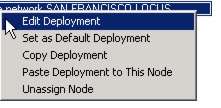
Table 10: Assign Nodes Pop-Up Menu Operations
| Item | Description |
|---|---|
| Edit Deployment | Opens the Configure Traffic Load dialog box; see Configure Initiating Node Dialog Box for more information (initiating node only) |
| Set as Default Deployment | Apply configuration settings for the selected tier to all future initiating tiers (initiating node only) |
| Copy Deployment | Copy configuration settings of the current node (initiating node only) |
| Paste Deployment | Paste the copied configuration settings to the selected node (initiating node only) |
| Unassign Node | Unassign the selected tier from the selected node; removes this node from the tree |