Overview
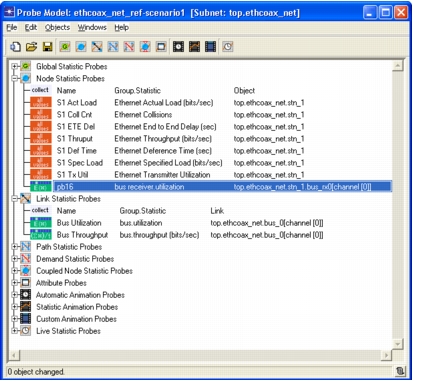
The Probe Editor consists of a treeview style browser that lists probes by type and displays certain attributes. For instructions on how to create a new probe model, see Probe Editor Pop-Up Menu. For instructions on how to adapt an existing probe model to a different network model, see Set Network Model.
Use the Probe Editor to set probes of the appropriate type on particular subnets, nodes, links, paths and modules. Each probe is defined by a list of attributes. You can specify values for the most commonly-used attributes in the treeview itself or select Edit Attributes from the Probe Editor pop-up menu for access to all attributes.
Figure 235: Probe Editor
Procedure 220: Creating a New Probe Model
-
If necessary, open the Probe Editor for the current scenario (choose DES > Choose Statistics (Advanced)).
-
Create a probe of the desired type by choosing the appropriate command from the Objects menu or by clicking on the corresponding toolbar button.
Result: The appropriate branch of the treeview expands, a headings line is created and a probe of the specified type is created in the list.
-
Right-click in the area next to the probe name (
pb1, for example).Result: The Probe Editor pop-up menu appears.
-
Set the probe as appropriate.
| For instructions on setting… | See… |
|---|---|
| Global statistic probes | Create Global Statistic Probe |
| Node statistic probes | Create Node Statistic Probe |
| Link statistic probes | Create Link Statistic Probe |
| Path statistic probes | Create Path Statistic Probe |
| Demand statistic probes | Create Demand Statistic Probe |
| Simulation attribute probes | Create Simulation Attribute Probe |
| Automatic animation probes | Create Automatic Animation Probe |
| Statistic animation probes | Create Statistic Animation Probe |
| Custom animation probes | Create Custom Animation Probe |
| Live statistic probes | Create Live Statistics Probe |
-
Display the Probe Editor pop-up menu again.
-
Select the desired collection mode.
Result: The icon next to the probe name changes to reflect the mode.
-
Save the probe model.
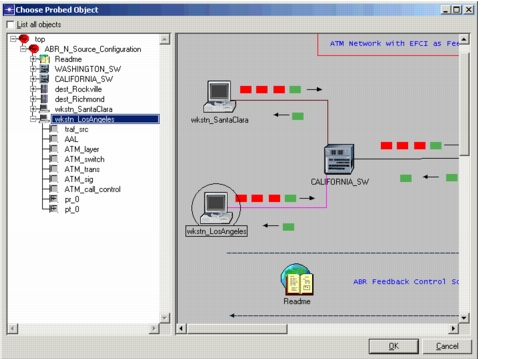
As you consider which probes to set, you might want to study your model. The Network Browser, which opens when you select Choose Probed Object from the Probe Editor pop-up menu, presents your model in two different ways:
- As a treeview style text listing, which can be collapsed or expanded. This view shows each subnet, node, link, and module of your network.
- As a graphic representation. Both the network and node models that compose your network are shown.
The two views are coordinated: if you select a particular node in the treeview, that node is selected and displayed in the graphical representation. Similarly, selecting a node or module in the graphical representation selects the item in the treeview.
Figure 236: Network Browser
For more information about probe attributes, see Chapter 4 “Probe Reference” on page 107.