Transparencies and Masks
To understand the role of transparencies, consider these facts:
- An icon displays against the background of the object palette or editor.
- The icon consists of the figure you designed, overlaid on a black rectangle.
The transparency is a black and white copy of your icon that sits in a separate layer underneath the icon. It controls what parts of the background are visible and which are hidden. White areas of the transparency allow the background to display. Black areas prevent the background from displaying, making your icon the visible layer.
One common use of a transparency is to mask the icon’s black rectangle, as shown in the following figure.
Figure 243: Using Transparencies
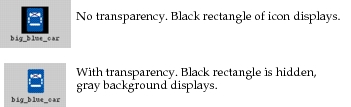
The Mask Selection operation on the Edit menu creates an effective transparency.
Procedure 237: Creating a Transparency
-
Open the icon in the Image Editor.
Result: The image displays in one pane of the Image Editor.
-
Choose Options > Create Transparency.
Result: A second pane (the transparency pane) appears to the right of the first pane.
-
Use the selection tool to demarcate the area you wish to mask.
-
Choose Edit > Mask Selection.
Result: A mask of the selection appears in the transparency pane.
-
Choose File > Close.
Result: The Image Editor closes and the newly-masked icon appears in the Icon Database Editor.
-
Choose Save from the Icon Database Editor’s File menu to save the changed icon.