Configuring Demand Sequencing
Using the SPVX Demand Sequencing attribute you can sequence demands based on various criteria such as service category, amount of bandwidth reserved, type of connection, or administrative weight. Procedure 18 describes how to configure demand sequencing.
Procedure 18: Configure Demand Sequencing
-
Double-click on the (S)PVx Configuration object to edit attributes.
-
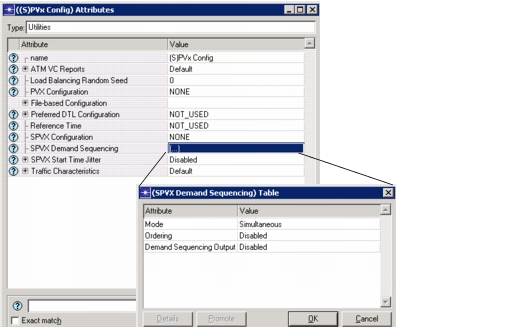
Open the SPVx Demand Sequencing table.
Figure 93: SPVx Demand Sequencing Table
-
Set the value for the Mode attribute to one of the two possible choices:
- Simultaneous Mode—This mode sets up all connections that originate from a node at the same time. If the start times of the connections are the same, the demands are sequenced in the order specified in the Ordering attribute.
- Sequential Mode—This mode sets up the connections that originate from a node in a sequential manner, that is, the next connection setup is sent out once the first connection setup is complete.
-
Set the value for the Ordering attribute, shown in Figure 94. After you specify the order for the QoS criteria, Reserved Bandwidth Criteria, and SPVX Criteria, set the final ranking of the various criteria in the Criteria Ranking table.
Figure 94: Setting the Ordering Attribute
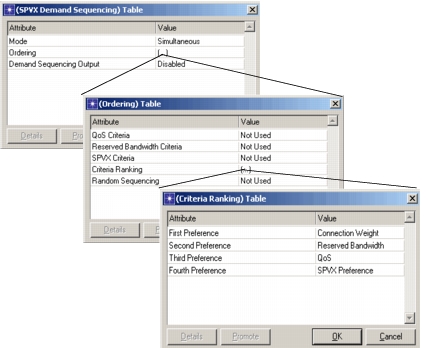
For example, in the above figure, the connection weight gets precedence over reserved bandwidth, which gets precedence over QoS, and so on. If one or more of the criteria is not a basis of differentiation, they can be left as Not Used and thereby not specified in the criteria ranking table. The connection weight (which is an integer weight) can be specified in the SPVX Configuration table. A connection with a higher weight will be set up before a connection with a lower one.
-
(optional) Set the Demand Sequencing Output attribute to Enabled, if you want to export the sequence of setup of the various SPVX connections to a log message at the end of simulation.
-
Click OK in each dialog box to save the settings and close the dialog boxes.
End of Procedure 18