Rendezvous Point (RP) Selection
A rendezvous point is a meeting point for the senders and receivers. Receivers send join messages for a session to the rendezvous point and the sender sends traffic towards the rendezvous point.
Note: Rendezvous points do not apply to SSM configurations. See Source Specific Multicast.
Rendezvous point must be
- defined on all routers routing multicast traffic
- reachable by all sources and destinations
- placed at an optimal point in the network (This might not be crucial if the switch to the shortest path tree (SPT) occurs after the first packet for a session has been received, as happens by default.)
For multicasting to work, all multicast routers in the network must know how to map group addresses to rendezvous points. There are three ways to configure group-to-RP mapping:
- Static—The configured information is local to the router and there is no protocol that propagates this information to the network.
- Auto-RP—In this Cisco proprietary protocol, candidate RPs are configured on several routers and the information is propagated to the network.
- Bootstrap—Similar to Auto-RP, candidate RPs are configured and the information is propagated to the network.
The network can contain routers that use any combination of the above protocols to populate their RP information.
Because RP information is (for the most part) local to each router, misconfiguration might cause routers to have different group-to-RP mapping tables. This can lead to unexpected results, such as traffic being dropped because the source and subscriber are using different RPs.
Configuration
The import from NetCollector and DCI features both support import of attributes related to RP configuration. If your network is imported based on configuration files and you do not wish to make any changes, you can skip this section. Otherwise, use the following procedures to employ Static RP, Auto-RP, or Bootstrap configuration.
For Static RP configuration, you need to specify the rendezvous point on each router that will handle multicast traffic.
Procedure 46: Specifying a Rendezvous Point for Static RP Configuration
-
Select the routers that will handle multicast traffic for a group. If all routers need to be configured, you can omit making a selection.
-
Choose Protocols > IP > Multicast > Configure Rendezvous Point Using Static RP Configuration...
-
In the Rendezvous Point dialog box, enter the address of the IP multicast group and of the rendezvous point.
-
Specify if the configuration should be applied to all or selected routers.
-
Click OK.
Result: The specified routers are configured with the rendezvous point information you provided.
End of Procedure 46
The procedure for setting up a rendezvous point differs for Auto-RP and Bootstrap configuration. Unlike static configuration, where all routers needed to be configured with information about the rendezvous point, only certain routers need to be configured with this information to use Auto-RP and Bootstrap configuration. The information is propagated to the other routers in the network.
The Auto-RP group-to-RP mapping is configured on several routers. There are one or several mapping agents that compile the information and distribute it to all routers in the network.
Procedure 47: Specifying a Rendezvous Point for Auto-RP Configuration
-
Open the Attributes dialog box of any router that supports Auto-RP.
-
Open the IP Multicasting > PIM Parameters > Auto-RP Configuration > Candidate RP Configuration attribute.
-
In the Candidate RP Configuration table, add a row and configure the address of the rendezvous point in the Address/Interface column.
-
Double-click in the Group Filter Configuration column.
Figure 217: Group Filter Configuration Dialog Box
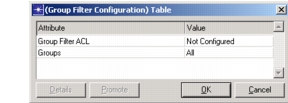
Result: The Group Filter Configuration Table appears. This table lets you specify the multicast group using an access control list (ACL) (typical in Cisco configurations) or the group address (typical in Juniper configurations). If both are specified, the ACL is used.
-
Specify the Group Filter Configuration. You can use the Group Filter ACL attribute or the Groups attribute.
- For Group Filter ACL, select the name of the ACL from the pull-down menu. Make sure that you have previously defined the ACL in the IP > IP Routing Parameters > Standard/Extended ACL Configuration attribute.
- For Groups, specify the address of the multicast group.
-
Click OK in the open Attribute dialog boxes.
-
Choose Protocols > IP > Multicast > Enable Auto-RP on Selected Routers. (You can omit this step for Cisco routers because Auto-RP is automatically enabled.)
-
On the mapping agent, set the PIM Parameters > Auto-RP Configuration > Map Configuration > Status attribute to Enabled. There must be at least one mapping agent in the network for Auto-RP to exchange candidate RP information.
End of Procedure 47
In a Bootstrap configuration, an election process is used to select one of the candidate bootstrap routers in the network as the bootstrap router. This bootstrap router receives candidate RP announcements and sends them to the multicast routers.
Procedure 48: Specifying a Rendezvous Point for Bootstrap Configuration
-
Open the Attributes dialog box of any router.
-
Open the IP Multicasting > PIM Parameters > Bootstrap Configuration > Candidate RP Configuration attribute.
-
In the Candidate RP Configuration table, add a row and configure the address of the rendezvous point in the Address/Interface column.
-
Double-click in the Group Filter Configuration column.
Result: The Group Filter Configuration Table appears. This table lets you specify the multicast group using an access control list (ACL) (typical in Cisco configurations) or the group address (typical in Juniper configurations). If both are specified, the ACL is used.
-
Specify the Group Filter Configuration. You can use the Group Filter ACL attribute or the Groups attribute.
- For Group Filter ACL, select the name of the ACL from the pull-down menu. Make sure that you have previously defined the ACL in the IP > IP Routing Parameters > Standard/Extended ACL Configuration attribute.
- For Groups, specify the address of the multicast group.
-
Click OK in the open Attribute dialog boxes.
-
Set PIM Parameters > Bootstrap Configuration > Candidate BSR Configuration > Local Interface to Auto Assign or set the IP address for the interface. When Auto Assign is used, the highest IP address of all loopback interfaces is used.
-
On the same router as step 7, configure at least one bootstrap router. This is accomplished by setting the bootstrap candidacy priority to a value other than zero or by setting the interface address.
End of Procedure 48