Adding Props to a Terrain
Props are objects like buildings, lampposts, or trees that exist independently of the underlying terrain elevation data. You can extract props from a terrain patch or add them from a feature layer. You can view a list of the props in the terrain, specify their opacity, and enable or disable their visibility. You can change a prop’s type and you can change the model definition used to render it. You can also create new prop types to meet your simulation needs.
Extracting Props from a Terrain Patch
When you extract props from a terrain patch, you have to tell 3D Network Visualizer where to find prop data, what type of prop use, and what model definitions to map the props to, as follows:
- Where to search: A terrain patch, such as an OpenFlight terrain, often references multiple files that define models that are incorporated into the geometry of the terrain. 3D Network Visualizer lets you specify the external files from which to extract props or you can specify a search expression that looks in all referenced files. If you select a referenced file, the process is quicker because 3D Network Visualizer searches for props only in the specified file.
- What prop type to use: You can select a prop type from a list, specify a type of your choice, or let 3D Network Visualizer auto-generate prop types. If you choose Auto Generate, 3D Network Visualizer makes the prop type match the name of the referenced file. For example, a prop extracted from the
Bridge_Arch_Stone.fltfile would be given the prop typeBridge_Arch_Stone.medf. - Model definition to use: You can select a model definition from a list, or choose Use Extracted Geometry. If you accept the default value, Use Extracted Geometry, 3D Network Visualizer creates props using the geometry in the terrain patch. For example, if you chose
Trees.fltas the referenced file, 3D Network Visualizer creates props using the tree geometry in that file.
3D Network Visualizer extracts props only from the selected terrain patch. If your terrain has multiple terrain patches, you must repeat the procedure for each terrain patch from which you want to extract props.
For an example of how to extract props from a terrain patch, please see “Extracting Props from a Terrain“ on page 500.
Procedure 39: Extracting Props from a Terrain
-
Choose Settings > Terrain. The Terrain Settings dialog box opens.
-
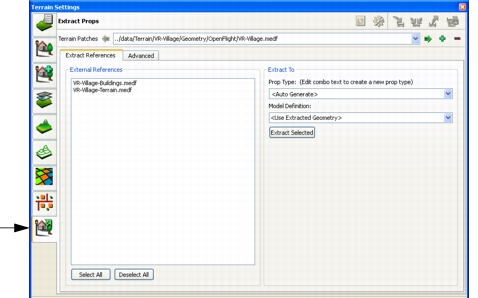
Select the Extract Props page (Figure 66).
Figure 66: Extract Props page
-
In the Terrain Patches box, select the terrain patch from which you want to extract props.
-
To extract props by specifying external files, select the Extract References tab. To extract props using a search expression, select the Advanced tab.
-
If you chose the Extract References tab, in the External References list, select the files from which you want to extract props.
If you chose the Advanced tab, type the search expression in the Search Expression box. Select the Regular Expression checkbox if you are using a regular expression.
Note: 3D Network Visualizer uses perl regular expression syntax.
-
Optionally, in the Prop Type box, select the type that you want to assign to the extracted props or type a prop type.
-
Optionally, in the Model Definition box, select the model definition that you want to apply to the extracted props.
-
If you are using the Advanced tab, click Extract. If you are using the Extract References tab, click Extract Selected. 3D Network Visualizer extracts the props, if any. You can view the list of props in the Terrain Contents dialog box.
Adding Props from a Feature Layer
A feature layer source file contains information about point, line, or areal features. Feature information is stored in a table in which each row is a feature and each feature is defined by the values in an arbitrary number of columns. To add a prop from a feature layer, you must build a rule that specifies the column headings and values for the feature you want to import. Then you must associate a prop type and model definition with the prop. You also must specify whether or not to ground clamp the prop.
Please see “Composing a Terrain“ on page 486 for an example of adding props from a feature layer.
Procedure 40: Adding a Prop from a Feature Layer
-
Choose Settings > Terrain. The Terrain Settings dialog box opens.
-
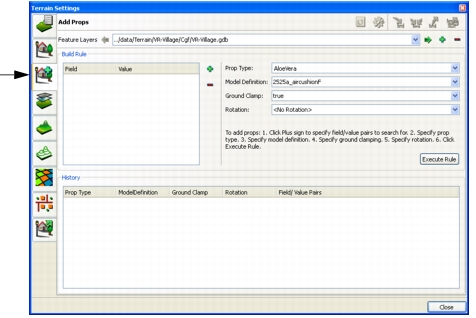
Select the Add Props page (Figure 67).
Figure 67: Terrain Settings, Add Props page
-
In the Feature Layers list, select the feature layer from which you want to import the props.
-
Click the Add icon (
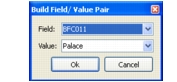
 ) to the right of the Field/Value window (Figure 67). The Build Field/Value Pair dialog box opens (Figure 68).
Figure 68: Build Field/Value Pair dialog box
-
In the Field drop-down list, select a field. Fields are the column headings in the feature definition.
-
In the Value drop-down list, select a value. Values are one or more values from the definition table that are available for the column heading.
Note: It is your responsibility to understand the feature definitions for the features that you want to import as props.
-
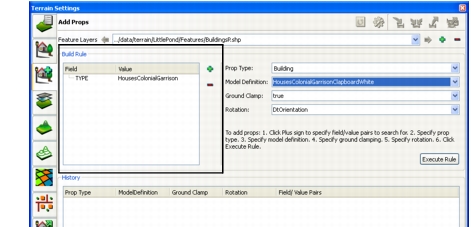
Click OK. The Field/Value pair is added to the window (Figure 69).
Figure 69: New Field/Value pair
-
Add additional Field/Value pairs as needed to define the prop that you want to add.
-
In the Prop Type drop-down list, select the prop type to assign to the prop you want to add.
-
In the Model Definition drop-down list, select the model definition you want to use for this prop.
-
In the Ground Clamp box, specify whether or not to ground clamp this prop.
-
Optionally, set the rotation.
-
Click Execute Rule. The prop is extracted from the feature layer and is listed in the History window.
Viewing a List of Props
Procedure 41: Viewing a List of Props in the Terrain
-
Choose Settings > Terrain. The Terrain Settings dialog box opens.
-
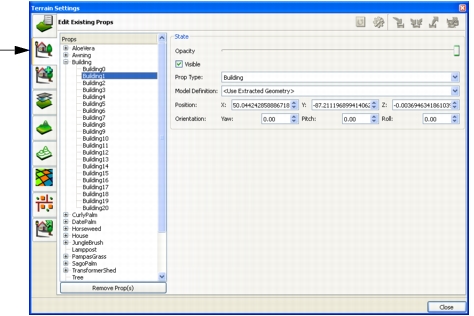
Select the Edit Existing Props page (Figure 70).
Figure 70: Edit Existing Props page
-
Expand the list to view the entries under a particular type of prop.
Selecting Props
To select a prop, click it in the window or in the Objects List Panel, or select it in the list of props on the Terrain Settings dialog box, Edit Existing Props page.
Press Ctrl+click to select multiple props.
Setting the Opacity of Props
Procedure 42: Setting the Opacity of a Prop
- Choose Settings > Terrain. The Terrain Settings dialog box opens.
- Select the Edit Existing Props page (Figure 70).
- In the list of props select the props whose opacity you want to change, or select a prop in the window. The Opacity slider is enabled.
- Slide the Opacity slider to the right to increase opacity. Slide it to the left to decrease opacity.
Making a Prop Fully Transparent or Opaque
You can quickly set a prop to be fully transparent or opaque.
- To make a prop fully transparent, right-click the prop and on the pop-up menu, choose Make Transparent.
- To make a transparent prop fully opaque, right-click the prop and on the pop-up menu, choose Make Opaque.
Changing a Prop’s Type
Every prop has a type. Props are organized by type in the list on the Edit Existing Props page.
Procedure 43: Changing the Type of a Prop
- Choose Settings > Terrain. The Terrain Settings dialog box opens.
- Select the Edit Existing Props page (Figure 70).
- In the list of props, select the props whose type you want to change.
- Select a prop type from the Prop Type drop-down list, or type a new type name. The selected props are moved to the new prop type in the Props window.
Changing a Prop’s Position or Orientation
You can change a prop’s position and orientation. You can change the orientation of multiple props at the same time without affecting their position. However, if you select multiple props and change position, they are all placed in the same position.
Procedure 44: Changing the Position or Orientation of a Prop
- Choose Settings > Terrain. The Terrain Settings dialog box opens.
- Select the Edit Existing Props page (Figure 70).
- In the list of props, select the prop whose position or orientation you want to change.
- To change position, type new values in the X, Y, or Z boxes, or use the spinner controls to change the position values.
- To change the orientation, type new values in the Yaw, Pitch, or Roll boxes, or use the spinner controls to change the orientation values
Changing a Prop’s Model Definition
You can change the model definition used to render a prop in the scene. For information about model definitions, please see “Model and Element Definitions“ on page 323. For an example of changing a prop’s model definition, please see “Test the Model Mapping“ on page 520.
Procedure 45: Changing the Model Definition of a Prop
- Choose Settings > Terrain. The Terrain Settings dialog box opens.
- Select the Edit Existing Props page (Figure 70).
- In the list of props, select the prop whose model definition you want to change.
- In the Model Definition drop-down list, select a model definition. The selected props are rendered using the new model definition.