Adding Images to a Terrain
Depending on your terrain source, you may have terrain polygonal data, but no texture data or feature data to provide a realistic 3D display. You can drape images (raster maps) over the terrain to provide a more pleasing display.
Procedure 33: Adding Raster Maps to a Terrain
-
Choose Settings > Terrain.
The Terrain Settings dialog box opens.
-
Select the Raster Maps page.
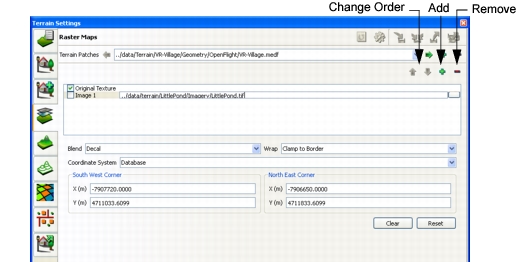
Figure 57: Raster Maps page
-
Click the Add icon (
 ) that is above the list of Raster Maps.
A line is added to the Raster Maps list (Figure 57).
-
Click the Browse button to the right of the new line.
The Image File dialog box opens.
-
Select the raster image that you want to add to the terrain.
-
Click OK.
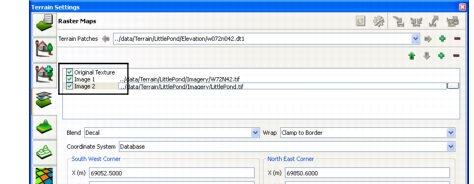
The image is listed in the Raster Maps window. To view it in the window, select the checkbox to the left of the entry (Figure 58).
Figure 58: Making an image visible
-
Optionally, specify the attributes of the image, as follows:
- Blend specifies how the image interacts with underlying images, as follows:
- Decal: covers the polygons with the image. Use it to apply an opaque texture or a texture with transparency.
- Modulate: color values of the image modify the intensity of the colors of the polygon.
- Blend: blends polygon and texture colors.
- Replace: similar to decal.
- Add: adds the pixel values of the source and base colors.
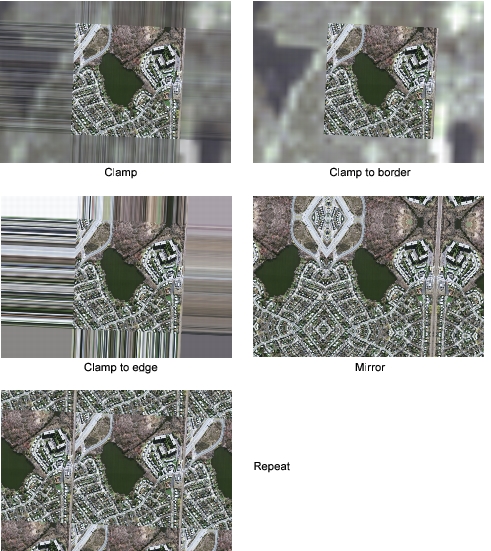
- Wrap specifies whether or not the image is repeated, and if so, how it is repeated, as follows, and as illustrated in Figure 59:
- Clamp: extends the border pixels of the image to the edge of the terrain or the next continuous image, blending them with the pixels of other images. It does not obscure underlying images.
- Clamp to Edge: extends the border pixels over the entire terrain, obscuring any other image.
- Clamp to Border: places the image once, at the specified coordinates.
- Repeat: tiles the image onto the terrain.
- Mirror: tiles the image onto the terrain, alternating between the true image and a mirror image.
- Coordinate System specifies the coordinate system to use to place the image. Most options are self-explanatory. The Texture coordinate system specifies UV (X,Y) coordinates for placing textures on the terrain.
- Location specifies the coordinates for the Southwest (SW) and Northeast (NE) corners of the image. If the image is a Geo TIFF, the coordinates are in the image file. If the image file does not have coordinates, 3D Network Visualizer stretches it to cover the terrain patch. If you do not want the image to cover the entire terrain, you can specify the coordinates.
- Blend specifies how the image interacts with underlying images, as follows:
Figure 59: Raster image wrap effects
Changing the Display Order of Raster Maps
Raster maps are displayed in the order in which they are listed in the Terrain Settings dialog box, Raster Maps page. If they overlay the same portion of the terrain, the topmost image is displayed. You can change the order in which image files are listed, thereby changing which one is displayed in 3D Network Visualizer.
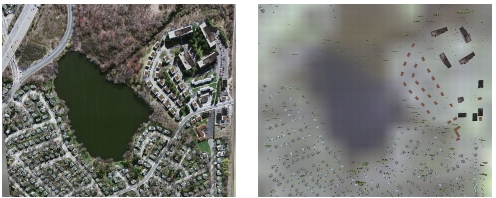
Figure 60 shows two views of the detailed portion of the LittlePond terrain, one with the default image order, and one with the order of raster images reversed.
Figure 60: Changing the raster map order
Procedure 34: Changing the Order of a Raster Map
-
Choose Settings > Terrain.
The Terrain Settings dialog box opens.
-
Select the Raster Maps page (Figure 57).
-
Select the raster image whose order you want to change.
-
Click the Up Arrow or Down Arrow to the right of the Raster Maps label.
The image moves in the list and the window changes as appropriate.