Connecting to Terrain Servers
3D Network Visualizer supports the osgEarth libraries for creating terrains from remote or local data sources (Figure 62). Terrain servers support streaming of elevation and image data and are, therefore, ideal for displaying terrains that have large amounts of data.
Figure 62: Geocentric terrain

You can manipulate the terrain from the keyboard and mouse and can save it as an MTF terrain for quick loading.
3D Network Visualizer includes several terrain server configurations for servers that are accessible over the internet, including a server hosted by VT MÄK, VR-TheWorld.earth, which connects to VR-TheWorld Online. It also includes server configurations that stream terrain files included with 3D Network Visualizer. These servers, Local World.earth and SanLuisObispo.earth, are examples of how you can use .earth files to load local data.
“Adding a Terrain Server“ on page 496 is a tutorial that shows how to create a terrain server that serves local data.
Note: When you view a geocentric terrain and move the observer more than 6 million meters or so from the earth’s surface, the view is forced to focus toward the center of the earth. The practical effect of this mode is that the left and right movement keys orbit the observer around the earth, rather than moving the entire earth to the left or right.
Note: Integration of osgEarth into 3D Network Visualizer allows you to connect to data sources. However, it does not provide a license to use any data sources. It is your responsibility to comply with the licensing provisions of any site to which you connect.
Procedure 36: Adding a Terrain Server
-
Choose New > Scene.
The current terrain closes.
-
Choose Settings > Terrain.
The Terrain Settings dialog box opens.
-
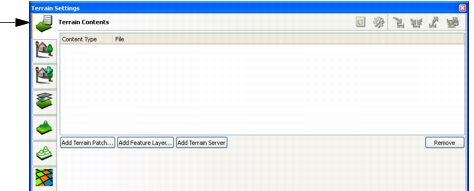
Select the Terrain Contents page (Figure 63).
Figure 63: Terrain Contents page
-
Click Add Terrain Server.
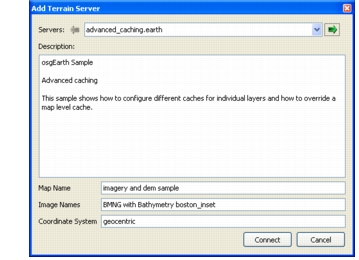
The Add Terrain Server dialog box opens (Figure 64). The dialog box contains information about the selected terrain server. It is not editable. (For information about editing terrain server configurations, please see Editing a Terrain Server Configuration.)
Figure 64: Add Terrain Server dialog box
-
Select a server from the Servers drop-down list.
-
Click Connect.
If the terrain data is available (remote sources might not always be accessible), it is displayed.
You can save a terrain server as part of a terrain or scene. For details, please see Saving a Terrain.
Adding Terrain Server Connections
You can add additional terrain servers to the list provided with 3D Network Visualizer. Terrain servers are configured in XML files according to the requirements of the osgEarth libraries. It is beyond the scope of this manual to fully describe the configuration process. However, the server configurations included with 3D Network Visualizer are examples of what you can do. We recommend that you add new servers by copying an existing configuration that is similar to what you want and then editing it to point to your data.
“Adding a Terrain Server“ on page 496 is a tutorial that shows how to create a terrain server that serves local data.
Procedure 37: Adding a Terrain Server
-
Choose Settings > Display.
The Display Settings dialog box opens.
-
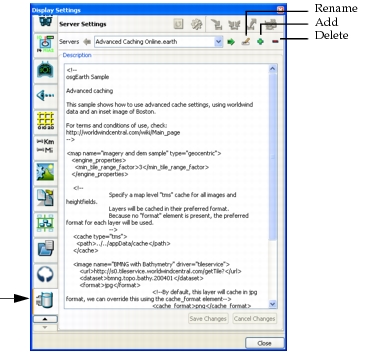
Select the Server Settings page (Figure 65).
The dialog box displays the contents of the configuration file for the selected server.
Figure 65: Server settings page
-
Select a terrain server configuration that is similar to the one that you want to add.
-
Click the Add icon (
 ). A new configuration file is added to the list. It copies the contents of the previously selected configuration and names the server in the format oldServerName_1.
-
Make whatever changes are necessary to configure your new server. This would usually mean changing the URLs that point to the data. A URL can be an internet URL, a path to a directory, or a path to a specific file.
-
Optionally, click the Rename icon (
 ) and rename the server.
-
Click Save Changes. New server files are saved to
./userData/servers.
Editing a Terrain Server Configuration
3D Network Visualizer provides a text editor interface that lets you edit the osgEarth terrain server configuration files. You can also edit them in any text editor. You are responsible for ensuring proper syntax.
Procedure 38: Editing a Terrain Server
- Choose Settings > Display. The Display Settings dialog box opens.
- Select the Server Settings page (Figure 65). The dialog box displays the contents of the configuration file for the selected server.
- In the Servers list, select the terrain server configuration that you want to edit.
- In the text window, edit the file.
- Click Save Changes.