HLA Mapping File Tutorial
Note: This tutorial uses the class mapping approach described in Chapter 3 “Preparing a Riverbed Federate Using a Mapping File” on page 21. For an example of using HLA by coding your own Federate Ambassador C++ class, refer to the
rpr_tutproject in<reldir>\sys\utilities\hla\example.
High-Level Architecture functionality lets you include a Modeler simulation as one of the federates in an HLA federation, thus to both affect and be affected by events in other federates. Running multiple concurrent simulations makes the overall simulation more realistic and can provide updated input to each simulation.
The federation in this tutorial has two federates: a Modeler federate (OPNET), which you will build, and an existing controller federate (controller_tutorial).
The OPNET federate contains two nodes representing planes. The movements of these planes are controlled by the controller federate.
The controller federate advances federation time, sends interactions that modify the bearing and ground speed of the planes in the OPNET federate, and receives interactions from the OPNET federate. This tutorial does not cover the development of the controller federate or two files used by it:
- The FOM file. This tutorial does not include a complete FOM file, only the corresponding
.fedfile. You do not have to prepare the FOM file. - The federation (
.fed) file. This file, namedHLA_Tutorial.fed, is provided for you in<reldir>\models\std\tutorial_req\module\hla.
In this tutorial, you will modify the following:
- The process model in the planes
- The process model in the HLA Interface node
This tutorial assumes you have experience using HLA and have the RTI executive installed.
The standard installation includes two HLA tutorial-related directories:
<reldir>\models\std\tutorial_req\module\hlahas files needed to complete this tutorial. Verify that this directory is included in your mod_dirs preference. If it is not, add it.<reldir>\models\tutorial_ref\module\hlacontains reference files that represent the model you will produce when you have completed this tutorial. These files are provided for reference only and are not needed to complete the tutorial.
Note: The RTI configurations and outputs are based on MÄK RTI 3.1.1 and DMSO RTI 1.3NGV6. MÄK RTI 2.0 or later should work as well, but the menus and outputs might be different. Contact technical support for information about other RTIs.
Note: When you use the HLA package, you cannot use any non-HLA esys modules in the simulation.
Prepare the Working Directory
In the remainder of this tutorial, <working_dir> is used to represent the first directory listed in the mod_dirs preference.
- In a typical Linux installation, this is
~/op_models. - In a typical Windows installation, this is
%HOME%\op_models.
Because this tutorial involves modifying existing models and creating new files, the first step is to prepare your working directory with copies of the necessary files.
Procedure 1: Preparing the Working Directory
-
Copy the files from the
<reldir>\models\std\tutorial_req\module\hladirectory into your working directory. -
Make sure the files are writable by issuing the following commands:
Linux
cd <working_dir>
chmod a+w *
Windows
cd <working_dir>
attrib -r *.*
Setup Procedures
Follow the instructions for the RTI you are using:
- MÄK RTI—use MÄK Setup
- DMSO RTI—use DMSO Setup
MÄK Setup
To match the settings for building with the DMSO RTI, you need to set up the following system variables.
Table 1: System Variables for MÄK Setup
| Variable | Location |
|---|---|
| RTI_HOME | Base directory where MÄK software is installed (C:\MAK by default on Windows) |
| RTI_BUILD_TYPE | Name of the RTI directory (for example, makRti3.1.1) |
Procedure 2: Setting the RTI in the Full DMSO Equivalent Mode
-
From the RTI installation directory, make a copy of the
rid.mtlfile, then open the originalrid.mtlfile. -
Find the line (
setqb RTI_forceFullCompliance 0) and change the “0” to “1”.Note: If this line does not exist in the file, add it at the beginning of the file.
-
Save the file and exit the text editor.
DMSO Setup
Riverbed and RTI rely on different versions of third-party libraries (ACE, TAO). Your environment must be set up to find the RTI versions.
Note: The Riverbed versions of the third-party libraries are needed only for importing topology configurations from VNE Server. If you are not importing topology configurations from VNE Server, you can remove these libraries from the path without affecting other Riverbed operations.
Windows
Add <rti_dir>\bin to the PATH system variable before <reldir>\sys\pc_intel_win32\bin
Linux
Add <rti_dir>/lib to the LD_LIBRARY_PATH shell variable before <reldir>/sys/pc_intel_linux/lib
Create the Network Model
In this tutorial, an example network contains two plane nodes whose movement is controlled by the bearing and ground speed attributes. An HLA interaction changes these values, and another HLA interaction acknowledges receipt.
Procedure 3: Creating the Network Model
-
Launch Modeler and make sure that Wireless functionality is available.
-
Create a new project called <your_initials>_HLA_Tutorial and a scenario called 2Planes.
-
Specify the following values in the Startup Wizard:
Table 2: Startup Wizard Settings for HLA Network Model
Item Value Initial Topology Create empty scenario Network Scale World Border Map World Model Family HLA_Tutorial -
Create the network model, as follows.
4.1 Place the HLA Interface node anywhere on the map (its location does not affect the simulation). Name it HLA Interface.
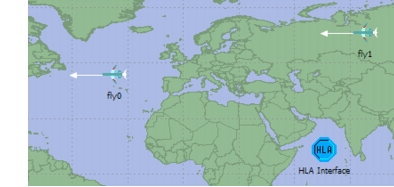
4.2 Place the two Plane nodes. Set the attributes as shown in the following table by right-clicking on a node and selecting Edit Attributes (Advanced).
Table 3: Plane Nodes
Name x position y position Trajectory bearing fly0 –31 44 VECTOR 270 fly1 82 63 VECTOR 270 The network model will look similar to the following figure:
-
Review the models:
5.1 Right-click on fly0 and select Edit Attributes (Advanced). Notice the bearing and ground speed attributes, which will change as a result of an HLA interaction received by the HLA Interface node and communicated to the plane nodes.
5.2 Review the hla13_cosim_compat process model. To do so, double-click on the HLA Interface node, then double-click on the hla13 esys module.
This self-contained model handles all interactions between the OPNET federate and the federation. It can be placed in any node model without any additional connections between the esys module executing it and other modules.
5.3 Close the Process and Node Editors.
-
Save the network model.
Configure the Simulation
The behavior of the hla13_cosim_compat process model is tailored using a set of simulation attributes. Now you must prepare an environment file with the attributes. You reference the file when you run a simulation.
Procedure 4: Configuring the Simulation
-
Using your editor of choice, open the environment file:
<working_dir>\HLA_Tutorial.ef.The file will appear as follows:
# Fill in with your working directory "HLA Class Mapping File" : "<Fill In Value>" # Predefined values "HLA Abort On Failure" : false "HLA Callback Set" : 511 "HLA Create Federation" : true "HLA Create Init Synchronization Point" : false "HLA Destroy Federation" : true "HLA Factory" : hla13_cosim_compat "HLA FED File Name" : "" "HLA Federate Name" : OPNET "HLA Federation Name" : HLA_Tutorial "HLA Init Synchronization Point" : "" "HLA Inter-event Tick" : false "HLA Join Attempts" : 10 "HLA Mak Time Advance Request" : 0.1 "HLA Standard" : "DOD 1.3" "HLA Time Constrained" : true "HLA Time Lookahead" : 0.1 "HLA Time Quantum" : 0.0 "HLA Time Regulating" : true "HLA Update Check Interval" : -1.0 "HLA Verbose" : false "HLA Verbosity Level" : 0 -
Replace <Fill In Value> (following the HLA Class Mapping File attribute) with the correct information for your system. This value should be one of the following:
Linux
<working_dir>/HLA_Tutorial.mapWindows
<working_dir>\HLA_Tutorial.map -
Save the edited file (with the same name, HLA_Tutorial.ef) in your working directory.
The attribute configuration in this environment file will have the following effects on the simulation:
- The OPNET federate will attempt to create the federation when it starts. If the federation already exists, nothing will happen.
- When the OPNET federate ends its simulation, it will attempt to destroy the federation. The attempt will fail if other federates are still members.
- The federation name is HLA_Tutorial.
- The name of the OPNET federate is OPNET.
- The lookahead for federation time purposes is 0.1 seconds.
- The hla13_cosim_compat process model will not perform periodic checks of modified attributes (checks are not necessary, because no attributes are used).
- The hla13_cosim_compat process model will use the mapping file
HLA_Tutorial.map. - The simulation will not abort if it encounters an error at the HLA interface.
Prepare the Initial Class Mapping File
Even though no mapping has been defined so far, a mapping file is still necessary for the hla_cosim process model to initialize correctly.
Procedure 5: Preparing the Initial Class Mapping File
-
Using your editor of choice, create a new file containing the following text.
(mapping version 2) -
Save the file in your working directory as HLA_Tutorial.map.
Start the Controller Federate
This tutorial includes a controller federate (named controller_tutorial) that you need only to compile and start. The controller federate generates interactions that cause the planes in the OPNET federate to change position and to generate acknowledgment interactions. Before you can start the controller federate, you must compile it.
HLA initialization, which includes creating and joining the federation, establishing time management, and delivering the initialization callback to the esys module, occurs immediately before the execution of the simulation event. If you are using the ODB, the HLA initialization event occurs after you execute the first odb> prompt.
Procedure 6: Starting the Controller Federate
-
Set up your environment to access the RTI executive (as described in Setup Procedures).
-
Start the RTI executive.
-
For a MÄK RTI:
Enter the following command:
Linux
Enter
rtiexecat the command prompt.You should see a message similar to:
% rtiexec
Loading Config File: <rti_dir>/rid.mtl
Using MAK Technologies’ RTI version 3.1.1-HLA1.3 for GNU C++ version 3.4.6 20060404 (Red Hat 3.4.6-3)
DtTcpSocket connecting to 127.0.0.1
Using TcpSocket with 50000 byte buffer (Client)
Using TcpSocket with 50000 byte buffer (Server)
TCP Forwarder: RTI Exec connection established.
Windows
From the Startup menu, choose Startup > Programs > Mak Technologies > MAK RTI <version> > RTI Rtiexec
-
For a DMSO RTI:
The following message appears:
The RTI Executive process no longer accepts input to interrogate
or control the federation executions. Instead a separate RTI
Console application provides this functionality. The RTI Console
was designed to improve usability and add the ability to be run
at multiple locations. Check the RTI Installation Guide
for further information concerning the RTI Console application.
Press Ctrl-C to generate the following:
rtiexec exit

Advertising launcher as RtiLauncher;<ip_address>;
rtiexec, process id = <pid>, endpoint = <ip_address>:<value>,
multicast discovery endpoint = <value>:<value>, initialization complete.
-
-
Open a new shell (Linux) or Riverbed Console (Windows) and move to
<working_dir>. -
Compile the controller as follows:
Note: If you have trouble compiling the controller, try setting the following environment variable and compile again.
setenv LD_LIBRARY_PATH $(RTI_HOME)/$(RTI_BUILD_TYPE)/lib:$LD_LIBRARY_PATHLinux
Enter the following command:
make controller_tutorialWindows
Enter the following command:
make_controllerYou will see compilation messages similar to the following (LInux output, MÄK):
% make controller_tutorial g++ -c -g -m32 -Wno-deprecated -DRTI_USES_STD_FSTREAM -DDT_USE_DLL -I<rti_dir>/include -o controller_tutorial.o controller_tutorial.cpp g++ -c -g -m32 -Wno-deprecated -DRTI_USES_STD_FSTREAM -DDT_USE_DLL -I. s_hla_stream.cpp -o s_hla_stream.o g++ -g -m32 -Wno-deprecated -o controller_tutorial controller_tutorial.o s_hla_stream.o -L<rti_dir>/lib -lRTI-NG -lfedtime -lpthread controller_tutorial.o(.text+0x1a5a): In function ‘process_events()’: <working_dir>/controller_tutorial.cpp:573: warning: the ‘gets’ function is dangerous and should not be used. -
Start the controller and the federation by entering this command:
Linux
./controller_tutorial HLA_TutorialWindows
.\controller_tutorial.exe HLA_Tutorial-
For MÄK, you should see a message similar to the following:
% ./controller_tutorial HLA_Tutorial
Loading Config File: <rti_dir>/rid.mtl
DtTcpSocket connecting to 127.0.0.1
Using TcpSocket with 50000 byte buffer (Client)
Using MAK Technologies’ RTI version 3.1.1-HLA1.3 for GNU C++ version 3.4.6 20060404 (Red Hat 3.4.6-3)
Attempting to join federation...
Reading Fed file: HLA_Tutorial.fed
Setting max UDP packet size to 15000 bytes
NetSocket ok for port 4000 to 229.7.7.7
Federation joined, attempting to enable time regulation...
Time regulation enabled, RTI time is 0
Attempting to constrain time advances...
Time advances constrained
[Time: 0] Enter command:
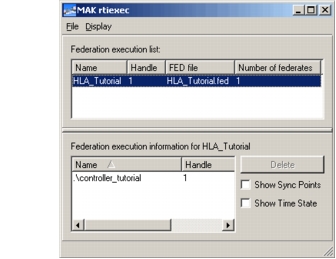
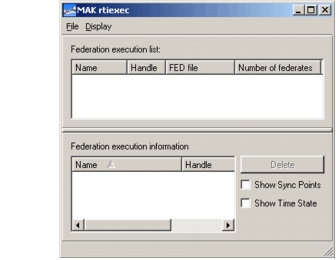
On Windows, if you have a MÄK Rtispy license and enable the graphical interface, the rtiexec would appear as in Figure 1.
Figure 1: For MÄK and Windows: Federate Joins HLA Tutorial
-
For DMSO, do the following:
The controller attempts to join the federation. If it is successful, a message similar to the following appears in the controller window:
Using RID file ‘<working_dir>/RTI.rid’.
Attempting to join federation...
"RtiVnMulticast.cpp", line 298: Query mcast sender sendbuf size returned 131072
"RtiVnMulticast.cpp", line 715: Query mcast receiver rcvbuf size returned 131072
Federation joined, attempting to enable time regulation...
Time regulation enabled, RTI time is 0
Attempting to constrain time advances...
Time advances constrained
[Time: 0] Enter command:
In the RTI executive window, a message similar to the following should appear:
federation HLA_Tutorial finished initialization with process id <pid> and endpoint <ip address>:<value>Federate ./controller_tutorial is JOINING federation HLA_Tutorial at <date & time>If there is no RTI graphical interface, you will see the following messages in the RTI console or shell:
Create: execution HLA_Tutorial created. Handle: 1. FED File: HLA_Tutorial.fed
Join: Federate controller_tut has joined HLA_Tutorial with handle 1.
-
Prepare the OPNET Federate
In this section, you compile and start the OPNET federate.
Procedure 7: Preparing the OPNET Federate
-
Open a new shell (Linux) or Console (Windows) and go into your working directory.
-
Set your environment to access the RTI executive.
Make sure that the RTI directories appear before the Riverbed settings.
Linux
<rti_dir>/libin the LD_LIBRARY_PATH shell variable before<reldir>/sys/pc_intel_linux/libWindows
<rti_dir>\bin(DMSO) or<rti_dir>\lib(MÄK) in the PATH system variable before<reldir>\sys\pc_intel_win32\bin -
Verify the following preference settings according to the platform you are using:
Linux
comp_flags_commonshould include-D_REENTRANTbind_shobj_progshould bebind_so_unixbind_shobj_flagsshould include-L<rti_dir>/libFor DMSO, the
comp_flags_c++_specificpreference should include-I<rti_dir>/include.For MÄK, the
comp_flags_c++_specificpreference should include-I<rti_dir>/include -DDT_USE_DLL -DRTI_USES_STD_FSTREAM.The
<rti_dir>in the settings above is the RTI directory as it appears in the controller build output (as shown in step 4. of Procedure 6).The bind settings ensure that the DMSO RTI support libraries for TAO and CORBA mask different releases in the release directories.
Windows
For DMSO, the
comp_flags_c++_specificpreference should include/I <rti_dir>\include.For MÄK, the
comp_flags_c++_specificpreference should include/I <rti_dir>\include /DDT_USE_DLL /DRTI_USES_STD_FSTREAM.For MÄK, the
bind_shobj_libspreference should include/LIBPATH:<rti_dir>\lib.Make sure that
<rti_dir>does not include any spaces. If there are spaces, determine the representation without spaces, which would include ~, such asc:\progra~1 for c:\Program Files. -
Start the OPNET federate. Specify the environment file and launch the OPNET Debugger (ODB) by entering the following command:
op_runsim -net_name <your_initials>_HLA_Tutorial-2Planes
 -kernel_type development -m32 -ef HLA_Tutorial -debug
The system compiles a number of external files with names of the form hla_cosim_…, as well as the hla_cosim and Plane process models. The ODB prompt appears after several messages, as shown in Figure 2. If the ODB prompt does not appear, you may need to set the LD_LIBRARY_PATH environment variable to include the Riverbed libraries. See Chapter 2 “Installation Support” on page 1.
Using the OPNET Debugger
In this section, you use the OPNET Debugger (ODB) and the RTI to move both the Riverbed and controller_tutorial federates forward in time. When the OPNET federate completes its initialization, it begins to receive interactions and send out its own.
Why use ODB? Why not just let the simulation run?
This tutorial uses ODB so you can step through the simulation events one by one. This allows you to see the interaction of the two federates. Also, because ODB lets you monitor the mapping process object by object, you can immediately pinpoint any problems that occur during this critical process.
Procedure 8: Starting the Modeler Simulation
-
Move the Modeler simulation forward to the first initialization event by typing next (or n).
-
For a MÄK RTI:
The controller might be blocking the join operation. To unblock it:
- Go to the shell where the controller is running.
- Press <return> to let the RTI support get some processing time.
- Return to the ODB console.
You should see the following messages:
odb> n
Loading Config File: <rti_dir>/rid.mtl
DtTcpSocket connecting to 127.0.0.1
Using TcpSocket with 50000 byte buffer (Client)
Using MAK Technologies’ RTI version 3.1.1-HLA1.3 for GNU C++ version 3.4.6 20060404 (Red Hat 3.4.6-3)
Reading Fed file: HLA_Tutorial.fed
Setting max UDP packet size to 15000 bytes
NetSocket ok for port 4000 to 229.7.7.7
In the rtiexec console or shell (if there is no graphical interface), you will see this:
Using TcpSocket with 50000 byte buffer (Server)
Create: execution HLA_Tutorial already exists.
Join: federate OPNET has joined HLA_Tutorial with handle 2.
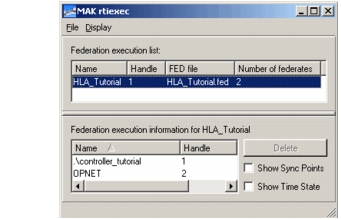
If you have a graphical interface, you will see this:
Figure 2: For Windows: Federate OPNET Joins HLA Tutorial
Simulationodb> n loading config file: C:\Mak\makRTI <version>\rid.mtl____________________________ (ODB 15.5.A: Event) ____________________________ * Time : 0.0 sec, [0s] * Event : execution ID (0), schedule ID (#4), type (remote intrpt), (Forced) * Source : Simulation Kernel * Data : code(123), ev_state(0x0012EBFC) > Module : top.HLA Interface.hla13 [Objid=4] (esys module)Note: The ev_state (0012EBFC) is run-specific and will be different from that shown.
-
For a DMSO RTI:
Type n at the prompt:
odb> nYou should see the following message:
Using RID file ‘<working_dir>/RTI.rid’.
"RtiVnMulticast.cpp", line 298: Query mcast sender sendbuf size returned 131072
"RtiVnMulticast.cpp", line 715: Query mcast receiver rcvbuf size returned 131072
In the RTI executive window, the following message will appear:
Federate OPNET is JOINING federation HLA_Tutorial at <date & time>
-
-
Type n again to move to the next Modeler simulation event.
The event banner for a begin simulation interrupt for fly0 appears. If you do not see the banner, do the following:
- Go to the shell where the controller is running.
- Press <return> to let the RTI support get some processing time.
- Return to the ODB console.
-
Type n several more times.
The first four steps initialize and execute a regular interrupt for each Modeler plane. On the fifth step, no progress is displayed in the controller window: Riverbed is blocked until the other federate advances time.
-
Advance time by typing t 1 in the controller window:
[Time: 0] Enter command: t 1
[Time: 1]
This allows Riverbed to advance to sim time 1:
____________________________ (ODB 14.0.A: Event) ____________________________ * Time : 1.0 sec, [1s] * Event : execution ID (5), schedule ID (#5), type (regular intrpt) * Source : Simulation Kernel * Data : none > Module : top.fly0.plane [Objid=9] (processor) -
Have the controller exit the federation by typing q in the controller federate command window.
[Time: 1] Enter command: qThe controller responds by displaying
Done with event loop, leaving the federationThe RTI executive responds in one of the following ways:
For MÄK, without a graphical interface:
Resign: federate 1 has resigned HLA_Tutorial
Destroy: execution HLA_Tutorial has federates joined
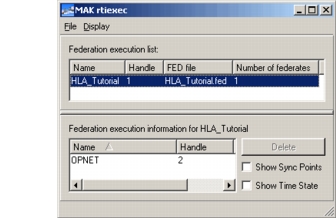
For MÄK, with a graphical interface:
Figure 3: For Windows: Controller Leaves Federation
For DMSO:
Federate ./controller_tutorial is RESIGNING federation HLA_Tutorial at <date & time> -
Quit ODB by typing q in the OPNET federate command window.
The fedex process terminates (because the last federate just terminated and requested the end of the federation). You should see a message in the RTI executive window indicating that the federation is terminated:
For MÄK, without a graphical interface:
Resign: Federate 2 has resigned HLA_Tutorial
Destroy: execution HLA_Tutorial destroyed
For MÄK, with a graphical interface:
Figure 4: For Windows: Federation Terminates
For DMSO:
Federate OPNET is RESIGNING federation HLA_Tutorial at <date & time>

Removed federation HLA_Tutorial at <date & time>

fedex shutting down.
Review the Current Plane Process Model
In this section, you review the current Plane process model, so you understand its structure. In the next section, you modify this model to receive interactions.
Procedure 9: Reviewing the Plane Process Model
-
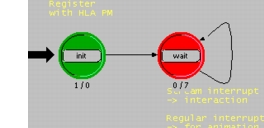
Review the Plane process model. In the Modeler window, choose File > Open, select Process Model in the "Files of type" menu (Windows) or Filters menu (Linux), and select the Plane process model.
The Plane process model appears.
-
Double-click on the top part of the init state.
The Enter Executives appear.
parent_id = op_topo_parent (op_id_self());This code initializes a state variable parent_id, which contains the ID of the parent node. The variable is used to set the bearing and ground speed attributes of the node.
-
Close the init state Enter Executives.
-
Open the wait state Exit Executives.
The Exit Executives appear.
if (op_intrpt_type () == OPC_INTRPT_REGULAR)
   {
   double dummy;
   /* just check position to have animation updated */
   op_ima_obj_pos_get (parent_id, &dummy, &dummy, &dummy, &dummy, &dummy, &dummy);
   }
In this state, the process model waits for events. The primary events of interest are incoming interactions. The state also receives regular interrupts every second, which the nodes use to update their positions in an animation display.
-
Review the state variables.
One state variable, parent_id, is the ID of the parent node.
Modify the Plane Process Model to Receive Interactions
Now you’re ready to make the changes that will allow planes in the OPNET federate to modify their bearing and ground speed based on interactions received from the controller federate. To do so you will
- Create a packet format that is used to store the content of the interaction.
- Define the mapping between the interaction class and the packet format in the mapping file.
- Modify the Plane process model so it requests delivery of interactions of that class.
Create the Plane_Order Packet Format
Why do I create a packet format?
You create a packet format because HLA interactions can be mapped in Riverbed to packets. The Riverbed packet is not a communications packet in the usual sense; it is just the entity representing the HLA interaction. HLA parameters are represented as Riverbed packet fields.
Procedure 10: Creating the Plane_Order Packet Format
-
Choose File > New, select Packet Format from the drop-down list, and click OK.
-
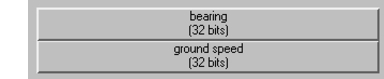
Create a packet format composed of two fields (bearing and ground speed), each of type floating point.
The completed packet should look like this:
-
Save the packet format as Plane_Order.
-
Close the Packet Format Editor.
Map Order to Plane_Order in the Class Mapping File
In this section, you will map the HLA interaction class Order to the packet format Plane_Order.
Procedure 11: Mapping Order to Plane_Order in the Class Mapping File
-
In your text editor of choice, open HLA_Tutorial.map.
-
Add the text shown below in bold.
(mapping version 2
   (interactions
       (class Order Plane_Order
           (parameter bearing bearing       double)
           (parameter speed  "ground speed" double)
       )
   )
)
This mapping indicates that the HLA interaction class Order, as defined in the
.fedfile, is mapped to the packet format Plane_Order. The interaction parameter “bearing” (of type double) is mapped to the packet field “bearing”. Similarly, the interaction parameter “speed” (of type double) is mapped to the packet field “ground speed”. -
Save the modified file.
Request Delivery of Order Interactions
The plane’s process model must request certain interaction classes from the RTI and deliver incoming interaction instances to the appropriate nodes. The HLA Kernel Procedure op_hla_interaction_pk_register() is used for these purposes.
Procedure 12: Requesting Delivery of Order Interactions
-
Activate the Process Editor by clicking in its window.
-
Choose Code Blocks > Header Block (or click the Edit Header Block toolbar button).
-
Add the text shown below in bold.
#include <string.h> #include <stdio.h> /* stream index where packets are delivered */ #define PLANE_ORDER_STREAM_INDEX 0 -
Save the Header Block.
-
Open the init Enter Executives.
-
Add the text shown below in bold:
parent_id = op_topo_parent (op_id_self());
/* register for interactions */
op_hla_interaction_pk_register (op_id_self(),"Plane_Order", PLANE_ORDER_STREAM_INDEX);
This request causes the hla_cosim process model to send packets named Plane_Order to Plane on the input stream PLANE_ORDER_STREAM_INDEX.
Now two kinds of events can be received by the Plane process model’s wait state:
- regular interrupts for animation updates
- stream interrupts indicating that an interaction has been delivered
-
Save the init enter execs.
-
Save (but do not close) the process model.
Process an Incoming Interaction
When it receives a stream interrupt on PLANE_ORDER_STREAM_INDEX, the Plane process model needs to extract the bearing and ground speed values, then update the attributes of the Plane node. In this section, you modify the wait Exit Executives of Plane so that this is accomplished.
Procedure 13: Processing an Incoming Interaction
-
Open the wait state Exit Executives.
-
Add the text shown below in bold.
if ((op_intrpt_type () == OPC_INTRPT_STRM) && (op_intrpt_strm () == PLANE_ORDER_STREAM_INDEX)) { Packet * pk; double speed, bearing; char gs [40]; /* extract information from packet */ pk = op_pk_get (PLANE_ORDER_STREAM_INDEX); op_pk_nfd_get_dbl (pk, "bearing", &bearing); op_pk_nfd_get_dbl (pk, "ground speed", &speed); op_pk_destroy (pk); /* update node attributes */ snprintf (gs, sizeof(gs), "%f kilometer/sec", speed); op_ima_obj_attr_set_dbl (parent_id, "bearing", bearing); op_ima_obj_attr_set_str (parent_id, "ground speed", gs); } else if (op_intrpt_type () == OPC_INTRPT_REGULAR) { double dummy; /* just check position to have animation updated */ op_ima_obj_pos_get (parent_id, &dummy, &dummy, &dummy, &dummy, &dummy, &dummy); } -
Save the Exit Executives.
-
Choose Compile > Compile Code (or click the Compile Process Model toolbar button) to compile the process model.
Generate Outgoing Data
After a Plane process model has received an order to change bearing or ground speed, it should generate an interaction that acknowledges receipt of the order. The interaction returns the plane’s ID and its location when it received the Plane_Order packet.
To generate the acknowledgment interactions, you need to
- Create a packet format that maps to the Order_Reply interaction class.
- Define the mapping between the interaction class and the packet format in the mapping file.
- Modify the Plane process model so it generates and sends (to the hla_cosim process model) an acknowledgment packet with the plane’s ID and location.
Create the Plane_Ack Packet Format
First, create a packet format that maps to the Order_Reply interaction class.
Procedure 14: Creating the Plane_Ack Packet Format
-
Choose File > New, select Packet Format in the drop-down list, and click OK.
-
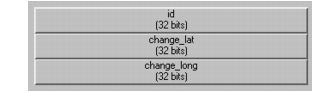
Create a packet format with three fields, as described in the following table.
Table 4: Plane_Ack Packet Format
Name Type id integer change_lat floating point change_long floating point The completed packet should look like this:
-
Save the packet format as Plane_Ack.
-
Close the Packet Format Editor.
Map Order_Reply to Plane_Ack in the Class Mapping File
Next, define the mapping between the interaction class and the packet format in the mapping file.
Procedure 15: Mapping Order_Reply to Plane_Ack in the Class Mapping File
-
In your text editor of choice, open HLA_Tutorial.map.
-
Add the text shown below in bold.
(mapping version 2
   (interactions
       (class Order Plane_Order
           (parameter bearing bearing double)
           (parameter speed  "ground speed" double)
       )
       (class Order_Reply Plane_Ack
           (parameter id id long)
           (parameter change_lat change_lat double)
           (parameter change_long change_long double)
       )
   )
)
This mapping indicates that the HLA interaction class Order_Reply, as defined in the
.fedfile, is mapped to the packet format Plane_Ack. The interaction parameter “id” (of type long) is mapped to the packet field “id”. Similarly, the interaction parameters “change_lat” and “change_long” (both of type double) are mapped to the packet fields “change_lat” and “change_long”. -
Save the modified file.
Generate and Send the Acknowledgment Interaction
Finally, the process model must be modified to send the Plane_Ack packet.
Procedure 16: Generating and Sending the Acknowledgement Interaction
-
In the Plane process model, open the wait state Exit Executives.
-
Add the text shown below in bold.
char_gs[40]; double latitude, longitude, dummy; /*extract information from packet*/ ... op_ima_obj_attr_set_str (parent_id, "ground speed", gs); /* Obtain current position */ op_ima_obj_pos_get (parent_id, &latitude, &longitude, &dummy, &dummy, &dummy, &dummy); /* Generate reply */ pk = op_pk_create_fmt ("Plane_Ack"); op_pk_nfd_set_int32 (pk, "id", parent_id); op_pk_nfd_set_dbl (pk, "change_lat", latitude); op_pk_nfd_set_dbl (pk, "change_long", longitude); op_hla_interaction_pk_send (pk, OPC_HLA_DELIVER_NOW); } else if (op_intrpt_type () == OPC_INTRPT_REGULAR) -
Save the Exit Executives.
-
Choose Compile > Compile Code (or click the Compile Process Model toolbar button) to compile the process model.
-
Save and close the Plane process model.
Prepare the Simulation
In this section, you will prepare the simulation.
Procedure 17: Preparing the Simulation
-
In a new window, start the RTI executive (if the previous one was stopped).
-
In a different window, move to the directory where the controller is located (probably your working directory). Restart the controller by typing this command:
Linux
./controller_tutorial HLA_TutorialWindows
.\controller_tutorial.exe HLA_Tutorial -
In the OPNET federate window, start the Modeler federate. Specify the environment file and launch the OPNET Debugger (ODB) by typing one of the following commands:
op_runsim -net_name <your_initials>_HLA_Tutorial-2Planes
-kernel_type development -m32 -ef HLA_Tutorial -debug
The ODB prompt appears.
Start the Simulation
In this section, you see the results of your modifications: the OPNET federate subscribes to the class Order, and planes receive Plane_Order packets.
Procedure 18: Starting the Simulation
-
Type n twice.
Note: For MÄK, remember to go to the controller window and press <return> to allow OPNET to join the federation.
OPNET joins the federation. The following message appears in the ODB window:
* Event  :  execution ID (<1>), schedule ID (#<0>), type (begin sim intrpt)
> Module :  top.fly0.Plane [objid=9](processor)
The preceding event banner indicates that initialization of the HLA Interface model is complete and initialization of the first Plane process model is beginning.
If the simulation unexpectedly terminates (you will see a message such as “federate resigning from federation”), your mapping file may be wrong. Review the
.mapfile to verify the changes given in Map Order to Plane_Order in the Class Mapping File and Map Order_Reply to Plane_Ack in the Class Mapping File. -
To verify that the expected mappings have been set up, use the
proldiagcommand to view hla_interactions, by typing the following at the ODB prompt:proldiag 0 hla_interactionsA list of the defined interaction mappings is displayed. These duplicate the mappings you entered in the class mapping file.
*** 2 Interaction class mappings defined [1] Mapping between HLA interaction class "Order" and OPNET packet format "Plane_Order" Interaction class RTI Handle: 1 2 Parameters HLA OPNET Type RTI Handle [1] bearing "bearing" double 0 [2] speed "ground speed" double 1 OPNET federate neither publishes nor subscribes to this class No recipient of incoming interactions of this class [2] Mapping between HLA interaction class "Order_Reply" and OPNET packet format "Plane_Ack" Interaction class RTI Handle: 2 3 Parameters HLA OPNET Type RTI Handle [1] id "id" long 2 [2] change_lat "change_lat" double 0 [3] change_long "change_long" double 1 OPNET federate neither publishes nor subscribes to this class No recipient of incoming interactions of this class -
Type n until you see a regular interrupt event. The event banner should resemble the following:
* Event : execution ID (<3>), schedule ID (#<1>), type (regular intrpt) > Module : top.fly0.plane [objid=9](processor) -
Type n two more times in the OPNET federate command window.
Note that no ODB prompt appears at this point.
-
Type time n in the controller federate command window, where n is the next consecutive number. It the current time is 0, for example, you would type time 1.
Now the mapping between the HLA class Order and the Riverbed packet format Plane_Order is complete.
-
The ODB
proldiagcommand withhla_interactionswill show the effect of this mapping. Type this command at the ODB prompt:proldiag 0 hla_interactionsThe following response appears. The actual object IDs may differ, depending on the order in which you created the nodes in the network:
*** 2 Interaction class mappings defined
[1] Mapping between HLA interaction class "Order" and OPNET packet format 	"Plane_Order"
.
.
.
OPNET federate subscribes to this class
   2 recipients of incoming interactions of this class:
   Objid   Stream index
       9       0
      10       0
This response indicates that:
- The OPNET federate subscribes to the HLA interaction class Order.
- The plane nodes (“2 recipients”) will receive Riverbed packets Plane_Order. These packets are the Riverbed representations of the HLA interaction Order.
Control Plane Movement in the OPNET Federate
In this section, you will see the results of the added class mappings. Planes in the OPNET federate modify their bearing and ground speed based on the Plane_Order interactions they receive, and the OPNET federate sends an interaction, Plane_Ack, that acknowledges receipt of the Plane_Order interaction.
Procedure 19: Controlling Plane Movement in the OPNET Federate
-
In the OPNET federate command window, type the following commands to let the simulation continue to time 3:
odb> tstop 3 Added breakpoint #0: stop at time = (3.0 sec [3s]) odb> cont -
Change the bearing and ground speed of the planes in the OPNET federate by entering the
flycommand in the controller federate command window. Type the following command (shown in bold):[Time: 1] Enter command: fly 2 90 200This command generates a Plane_Order interaction that will be delivered at time 2. The bearing will change to 90 degrees and the ground speed to 200 km/sec.
-
Let the OPNET federate advance to time 2 by typing the following command (shown in bold):
[Time: 1] Enter command: time 2If the following message appears, ignore it:
Module (4), (top.HLA Interface.hla13) From procedure: hla13_cosim_compat [listen exit execs] HLA Interface: hla_cosim process model info type "Interaction_Control" not handled by default model -
Now the interaction is received by the OPNET federate. At time 2 plus the look-ahead (time 2.1), the planes should send a Plane_Ack interaction back. To verify that this occurred, make the federation time advance by typing the following command (shown in bold):
[Time: 2] Enter command: time 3Now that time has advanced, the controller reports that the incoming interaction (the Plane_Ack interaction) was received and that the Plane nodes changed their movements. The response in the controller federate command window looks similar to this:
Incoming interaction at time 2.1 Node 2 has changed movement at 44, -31 Incoming interaction at time 2.1 Node 3 has changed movement at 63, 82 [Time: 3] Enter command: -
The controller reported that the changes to the planes’ bearing and ground speed have occurred. As a result, the planes’ x position and y position attributes have also changed.
Note: There is a delay (the “lookahead”) between the generation of the change position and the reception of that information by the controller. As a result, when the position information appears in the controller, the nodes have already moved farther. Thus, printing the node’s attributes with ODB will not result in the same values.
-
You can now terminate the simulations:
6.1 Have the controller exit the federation by typing q in the controller federate command window.
6.2 Quit ODB by typing q in the OPNET federate command window.
6.3 Close any remaining windows.
Summary
This completes this introductory HLA tutorial. In this tutorial you learned to
- Use HLA-specific attributes to configure a simulation
- Prepare a class mapping file
- Create packets that deliver interactions to the OPNET federate
- Prepare a class mapping file that maps HLA interaction classes and parameters to Riverbed packet formats and fields
- Modify process models to receive packets that represent incoming interactions
- Modify process models to generate packets that represent outgoing interactions