Sending Traffic Through LSPs
Before you can send traffic on an LSP, you need to configure the traffic mappings that associate traffic with a particular LSP. The model supports two ways of associating traffic with an LSP: static mappings and IGP shortcuts.
Static Mapping
With static mappings you create forwarding equivalence classes (FECs) and traffic trunks, which are used to define different types of traffic.
Note: A traffic trunk is an aggregate of traffic flows that are forwarded along a common path and share a common Quality of Service (QoS) requirement.
Procedure 81: Creating FECs
-
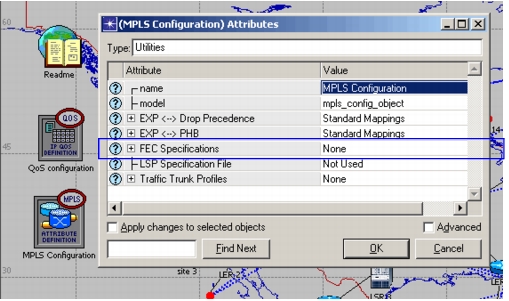
Place an MPLS configuration object in the project workspace and open its Attributes dialog box.
-
Double-click on the value for FEC Specifications.
Result: The FEC Specifications Table appears.
-
Change the Rows value to the number of FECs you want to create.
-
For each FEC, assign a name, then double-click in the Details column to describe the FEC.
End of Procedure 81
To work correctly, the model requires that you set up at least one default traffic trunk. Additional trunks can be used to handle prioritized flows.
Procedure 82: Creating a Traffic Trunk
-
Place an MPLS configuration object in the project workspace and open its Attributes dialog box.
-
Double-click on the value for Traffic Trunk Profiles.
Result: The Traffic Trunk Profiles Table appears.
-
Change the Rows value to 1.
-
Specify a name for the trunk.
-
Configure the Trunk Details attribute.
End of Procedure 82
After you create the LSPs, FECs, and traffic trunks, you can create the static mappings or TE bindings that govern which packets are sent to which LSPs. You do this in the LER’s MPLS > MPLS Parameters > Traffic Mapping Configuration attribute.
Note: Static mapping is supported for discrete event simulation only.
Procedure 83: Creating Static Mappings
-
Open the LER’s Traffic Mapping Configuration attribute dialog box (MPLS > MPLS Parameters > Traffic Mapping Configuration).
-
Add a row to the table.
-
Click in the “Interface In” column and specify which interfaces the binding applies to in the Interface Binding Specification table. To select an interface, click in the Apply Binding column for that interface to toggle the value to “Yes.”
Result: The interface(s) you selected appear in the Traffic Mapping Configuration dialog box. Note that the interface number for higher layers corresponds to the router’s loopback interface.
-
Select a FEC for the binding from the FEC pull-down menu.
-
Select a traffic trunk for the binding from the Traffic Trunk pull-down menu.
-
Click in the LSP column to specify the primary and backup LSPs.
End of Procedure 83
Static and Policy-Based Routes
Any static or policy route can have its next-hop set to be an LSP, including point-to-multipoint LSPs. With static routes, traffic going towards a specific destination can be pushed through the specified LSP. With policy routing, not only the destination address but also other fields of the IP header (e.g., ToS, protocol, etc.) can be used to direct traffic through a specific LSP.
Procedure 84: Setting an LSP as a Next-Hop in the Static Routes Table
-
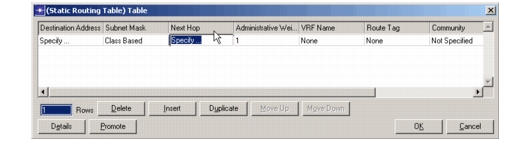
Open the Static Routing Tables for the router in the attribute dialog box (IP > IP Routing Parameters > Static Routing Tables).
-
Add a row to the table.
-
Specify the LSP name in the Next-Hop column.
End of Procedure 84
Procedure 85: Setting an LSP as a Next-Hop for Policy Routes
-
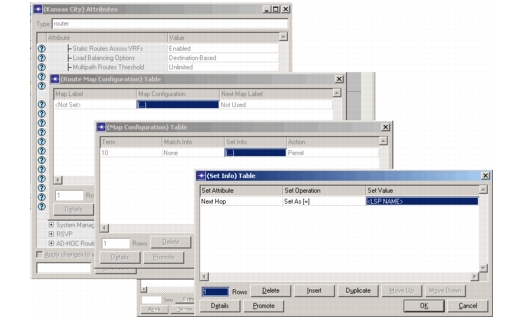
Open the Route Map Configuration for the router in the attribute dialog box (IP > IP Routing Parameters > Route Map Configuration).
-
Select Map Configuration > Set Info.
-
Choose Next Hop in the Set Attribute column and the LSP name in the Set Value column.
End of Procedure 85
IGP Shortcuts
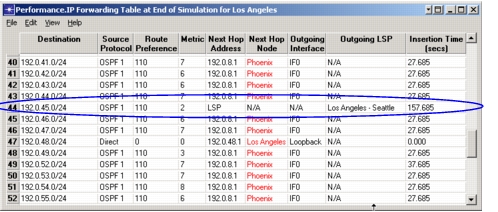
You can use IGP shortcuts instead of static mappings in an MPLS network. When you use IGP shortcuts, the network regards the LSP as a single link. To enable IGP shortcuts for a link, set the Announce IGP Shortcuts attribute on the LSP to Enabled.
Note: IGP shortcuts behave in the same way as CISCO's autoroute announce feature.
Figure 391: IGP Shortcuts in a Routing Table
Class-Based Tunnel Selection
Using Cisco Class-Based Tunnel Selection (CBTS), you can dynamically route and forward traffic to specific TE tunnels (LSPs) based on class of service. The TE tunnels you specify can be regular TE tunnels or DiffServ-aware tunnels.
LSPs need to be configured with the class of service (EXP values) they can carry.
Support for Juniper Class of Service Based Forwarding (CBF) is also implemented. CBF enables you to control next-hop selection based on the packet’s class of service.
Note: CBTS and CBF are supported by Flow Analysis only.