Analyzing the Effects of Server Virtualization
Analyzing the Effects of Using Virtual Servers
You can use IT Guru Systems Planner to model virtualized servers and analyze how they affect the performance of the physical system that hosts them. Virtual servers are characterized in the same way that physical servers are characterized in the SCE. You can use the Virtual Machine QuickPredict feature to put a server characterization of the machines you want to virtualize (the virtualized servers) onto a physical host.
Virtual Machine Quick Predict lets you:
- Add one or more virtual machines to a physical host
- Study the capacity requirements for virtualizations
- Predict the overhead due to virtualization
- Analyze the effects of:
- Changing the configuration of the physical host
- Changed and increased workloads on the virtual machines
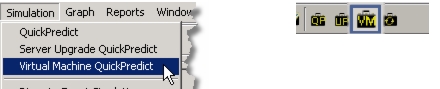
Virtual Machine QuickPredict is a faster alternative to discrete event simulation for predicting server CPU performance. You can access this feature from the new Simulation menu or from a toolbar button.
Figure 36: Launching Virtual Machine QuickPredict
The workflow for Virtual Machine QuickPredict can be summarized as follows:
- Characterize the servers that will be virtualized
- Configure virtual machines using server characterization files
- Select physical host
- Analyze virtualization
- Perform what-if scenarios
- Create and view reports
You can use the following procedure to run a Virtual Machine QuickPredict.
Procedure 26: Running a Virtual Machine QuickPredict
-
Open the server characterization file for the servers you want to virtualize.
-
Select Simulation > Virtual Machine QuickPredict (you can also click on the Virtual Machine QuickPredict toolbar button).
-
If additional information is needed about the measured system, the Import Properties dialog box appears.
3.1 Update the values in the Import Properties dialog box to match the machine that generated the imported server data. When you are done, make sure that the Default Job Class is not set to “Target System = Measured System.”
3.2 Click OK.
For more information, see Import Properties.
-
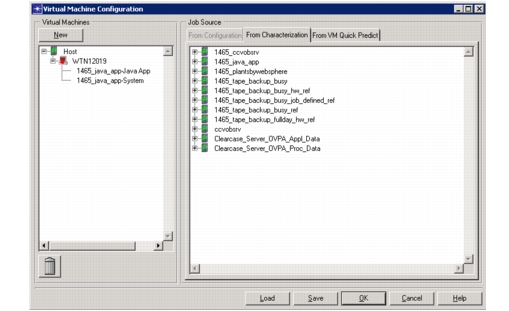
In the Virtual Machine Configuration dialog box, set up all of the virtual machines that you want to run on a single host.
- To virtualize existing jobs or individual workloads, drag-and-drop them from the Job Source pane on the right to the Virtual Machine pane on the left.
- To create new virtual machines, click the New button under Virtual Machines. To add a job or workload to this new machine, drag-and-drop it onto the new machine’s icon in the treeview.
- If you want to remove a workload or job from a virtual machine, select it in the virtual machine treeview and click the trash icon. You can also delete a workload or job by dragging it to the trash icon.
Figure 37: Adding and Configuring Virtual Machines on a Host Machine
Click OK.
The Physical Host Selection dialog box appears.
-
Select a physical server that will host the virtual machines you just configured. You can use the Find feature in the dialog box to quickly locate a server in the list. Specify the CPU count, cores per CPU, threads per core, and CPU speed for the physical server that will host the virtual machines.
The VM Quick Predict dialog box appears and indicates CPU performance information for the virtualization environment your configured.
-
Analyze the information presented by VM QuickPredict. Depending on the results, you can change the virtualization or start experimenting with what-if scenarios.
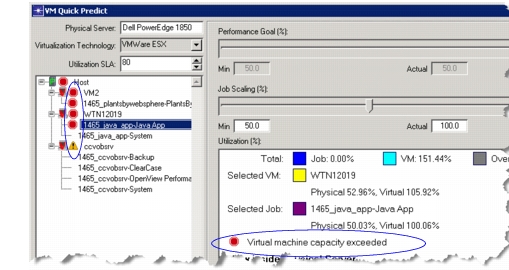
If there are errors, you will see warning messages like the one shown in the following figure. For such errors, you can:
- Reconfigure the physical host. To do this, click the Configure Server… button.
- Reconfigure the virtualized machines. To do this, click the Configure VM… button.
Figure 38: Errors Displayed in VM QuickPredict
-
Save this virtual machine scenario by clicking the Save button and providing a name for the scenario.
-
Perform what-if analyses. You can experiment with changing the job scaling of individual jobs. To do this, select the job you want to scale and use the Job Scaling slider to increase or decrease the load.
-
Print reports. To create reports that provide detailed information on the virtualization environment and on the CPU utilization levels of the virtual machines, click the Report button and provide a name for the report.
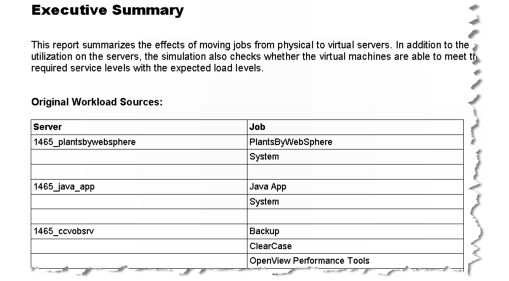
Figure 39: Executive Summary from a VM QuickPredict Report