Understanding Job Properties
The Job Properties dialog box (select Jobs > Properties from the main menu) shows the settings and values of attributes that affect the behavior of your model.
You select the properties on a per-job basis; Server Characterization Editor calculates suggested values automatically according to the settings and the data allocated to that job. You can override the suggested value of any attribute.
Figure 29: Job Properties Dialog Box
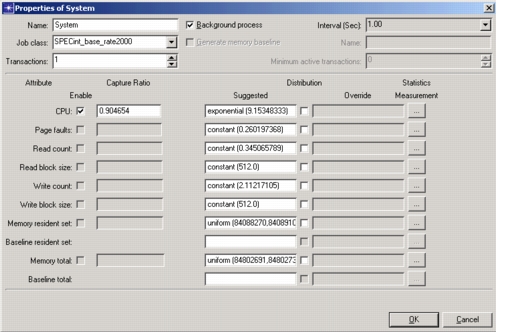
Job Attributes
The following table lists the attributes in the Job Properties dialog box.
Table 8: Attribute Definitions
| Attribute | Description |
|---|---|
| CPU | A distribution that describes the CPU requirements of this job |
| Page Faults | A distribution that describes the page fault count of this job |
| Read Count | A distribution that describes the number of disk read operations performed by this job |
| Read Block Size | A distribution that describes the size of disk read operations performed by this job |
| Write Count | A distribution that describes the number of disk write operations performed by this job |
| Write Count Size | A distribution that describes the size of disk write operations performed by this job |
| Memory Resident Set | The amount of physical memory consumed by a job. This does not include any memory that resides in swap. |
| Baseline Resident Set | (Available in a future release) |
| Memory Total | All memory used by a job, including resident memory (the Resident Set Size) and swap memory. |
| Baseline Total | (Available in a future release) |
There are three parameters that you can set that affect how Server Characterization Editor arrives at the suggested values it sets for the attributes. They are
Background Process
You can select one of two modes of operation for each job:
- Normal Process (default)
- Background Process
If you do not select the Background Process checkbox, Server Characterization Editor calculates the workload per transaction; use this mode if you want to evaluate the effect of a job that executes multiple times.
If you select the Background Process checkbox, Server Characterization Editor calculates the workload per unit of time. Use this mode if you want the workload to be consistent throughout the model execution.
Figure 30: Detail of the Background Process Settings

In Background Process mode, the Interval (Sec) entry becomes enabled; you can use the drop-down menu to change from the default of one second (1.00) per interval to one-tenth (0.10) or one-hundredth (0.01) second per interval.
Figure 31: CPU Background Option Dialog Box
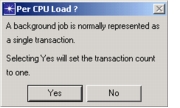
When you select Background Process mode, the Per CPU Load? dialog box appears. If you click Yes, Server Characterization Editor automatically sets the Transaction count so that the background processing is distributed equally on the CPUs in your model.
Transactions
The Transactions text box enables you to scale the workload of each job on the server to the correct per-user value. When you define a job, the default number of Transactions is 1.
Figure 32: Transactions Text Box

This means that the total resource utilization is consumed by the specified job. However, if the total utilization was based on the activity of several users, each user was responsible for only part of the total. By entering the number of users in the Transactions text box, you can scale the utilization to a per-user value. This provides a more accurate result in your model.
You can assign the number of Transactions to a job in the Job Properties dialog box or in the main window of Server Characterization Editor. The Transactions text box appears in both places. You can type a number in the text box or click on the up and down arrows next to the text box to display the number you want.
Capture Ratio
Server Characterization Editor calculates the Capture Ratio by comparing globally-measured statistics with per-process/thread statistics. When global measures are available, the sum of the per-process/thread value is divided by the global value. The result is normally near 1.0, but not larger than 1.0.
For example, if the sum of the processes is 87 percent, but the CPU was 90 percent busy, the capture ratio is 0.967 (0.87 divided by 0.90). When you enable the Capture Ratio checkbox, Server Characterization Editor applies the value of the Capture Ratio to each job so that the statistics will add up to the globally-measured value.
For many reasons, there can be discrepancies between global statistics and per-process statistics; discrepancies often result if the data collector compares unlike values. For example, there can be a discrepancy if the global measurement is based on physical reads from a disk, but the per-process measurement is based on reads that were drawn from a cache and, therefore, did not require access to the physical disk. There can also be a discrepancy if data is not seen by the data collector—for example, if a process was created and expired in less than one sampling interval.
Overriding a Suggested Value
You can override the suggested value of an attribute by selecting the Distribution checkbox next to the Override text box. When the Override Distribution For CPU Utilization dialog box appears, select a new Distribution Name from the pull-down menu. Server Characterization Editor uses the value you selected in modeling the job.
Note: Server Characterization Editor exports only one value for each attribute. If you override the suggested value, only the override value is included in the export file.
Figure 33: Attribute Override Dialog Box
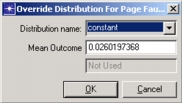
The following detail shows how the attribute entry appears.
Figure 34: Example: Attribute Override

Job Classes
This is a list of standard benchmarks supported by the server. The predefined server configurations include the CPU2000 benchmarks published at http://www.spec.org. For multi-processor systems, the rate values have been divided by the number of processors to provide a ‘per-processor’ rating.
Note: You can also add your own benchmark here, but it is not verified that your server will support that benchmark.
Figure 35: Job Classes Drop-Down Menu
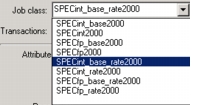
The following table lists the job classes that you can apply to your jobs.
Table 9: Job Class Definitions
| Job Class | Description |
|---|---|
| SPECint_base2000 | The amount of time required to run a single instance of the integer benchmarks. This uses the standard compiler optimization settings. |
| SPECint2000 | The amount of time required to run a single instance of the integer benchmarks. This is aggressively optimized to maximize performance. |
| SPECint_base_rate2000 | The number of integer benchmarks that can be executed per hour. This can involve multiple instances running concurrently on multi-CPU computers. This uses the standard compiler optimization settings. |
| SPECint_rate2000 | The number of integer benchmarks that can be executed per hour. This can involve multiple instances running concurrently on multi-CPU computers. This is aggressively optimized to maximize performance. |
| SPECfp_base2000 | The amount of time required to run a single instance of the floating point benchmarks. This uses the standard compiler optimization settings. |
| SPECfp2000 | The amount of time required to run a single instance of the floating point benchmarks. This is aggressively optimized to maximize performance. |
A good benchmark choice is normally SPECint_base_rate2000 for non-numerical programs and SPECfp_base_rate2000 for numerical programs.