Configuring the Display of Elevation Lines
Terrain Modeling Module (TMM) lets you use different colors to display different elevations in a map background. You can also control whether all or only part of the elevation information in a map file is displayed (to reduce visual clutter in the map background) and specify what color the elevation labels should be.
You can configure the elevation map display for the current model or, when importing terrain data, save settings in the map file for use when it is displayed.
Procedure 11: Configuring Display Settings for an Elevation Map
-
Choose Topology > Terrain > Edit Map Display Settings. (This feature is also available by clicking the Display Settings… button in the Import Elevation Lines dialog box.)
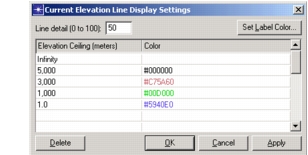
The Current Elevation Line Display Settings dialog box opens.
-
To set the level of detail to be displayed, enter a value for the Line Detail.
This setting indicates the percentage of the available elevation lines to display. Depending on zoom level and terrain slope, you may need to adjust this value to avoid having the displayed elevation lines appear too sparse or too dense.
-
To change the color of elevation labels, click the Label Color… button and choose a color from the Color Browser.
-
Set the elevation ceilings and colors as follows:
- To change the color of elevation lines—Click the color for a ceiling and choose a new color from the Color Browser. The color shown for an elevation ceiling is used to display all elevation lines from that ceiling value to the next lower ceiling.
- To add an elevation ceiling—Click in a blank row, enter the new ceiling value, and choose a color for it.
- To remove an elevation ceiling—Select it and click the Delete button.
-
Click OK when you have made all changes.