Generating an Elevation Map File
Terrain data must be imported as elevation map files before it can be displayed. When importing terrain data, you can choose how much data to include in the elevation map file. This allows you to keep the file size as small as possible while getting the level of detail needed for your work. It also lets you create different elevation map files for different modeling needs.
Procedure 10: Importing Terrain Data Into an Elevation Map File
-
In the Select Elevation Maps dialog box, click the Import button.
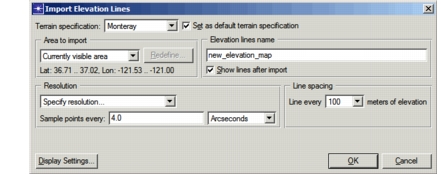
The Import Elevation Lines dialog box opens.
-
Select the terrain specification from which to create an elevation map. If you need to create a new specification with the desired elevation data, see Creating a Terrain Specification.
-
Specify the area to import, line spacing, and resolution. To minimize the size of the elevation map file, chose the smallest area, largest line spacing, and largest resolution your model permits.
Note: If the selected terrain specification contains data sources with different resolutions, you must specify the resolution manually.
-
Specify a name for the elevation map file.
-
TMM will automatically display the elevation lines in the current scenario when the import is complete. To prevent this, unselect the Show Lines After Import checkbox.
-
To configure the way in which elevation lines will be displayed, click the Display Settings… button. These settings are saved in the map file along with the elevation line data. (See Configuring the Display of Elevation Lines for details.)
-
Click OK to create the elevation map file.
TMM imports the requested terrain data into a new elevation map (.el) file, then returns to the Select Elevation Lines dialog box.
Note: This operation may take a minute or more if the elevation map file contains a lot of data.