Creating a Terrain Specification
Terrain Modeling Module (TMM) uses terrain data files when calculating path loss and as a source when importing data into elevation map (.el) files. When performing these operations, TMM needs to know where to find the terrain data files and what format they use. This information is stored in a terrain specification. Each specification contains information about one or more sources of terrain data. Terrain specifications are stored as an XML file with the file suffix .terrain.xml.
To create a terrain specification, choose Topology > Terrain > Manage Terrain Specifications… from the Modeler menu bar. This opens a dialog box that lets you create new terrain specifications and edit existing ones.
Figure 3: Manage Terrain Specifications Dialog Box
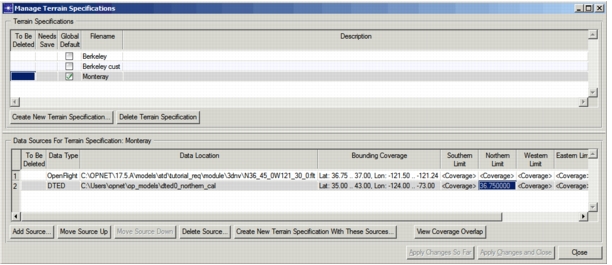
A terrain specification can have multiple data sources, with any mix of formats. The same data source can appear multiple times, and any source can have user-specified coverage limits or (depending on the format) custom settings. For example, in Figure 3, the DTED source in line 2 contains terrain data up to 43°N latitude (as shown in the Coverage column). However, because a Northern Limit of 36.75° has been specified, the data between 36.75° and 43° will not be used.
Note: If a data source field shows
<PENDING READ>, right-click in that field to obtain and display the information.
If a terrain specification contains multiple data sources, Modeler will access each source in the order listed until it obtains a needed elevation.
Procedure 2: Creating a Terrain Specification
-
Choose Topology > Terrain > Manage Terrain Specifications…
The Manage Terrain Specifications dialog box opens.
-
Click the Create New Terrain Specification… button, enter a name for the specification, and click OK.
-
If you want this terrain specification to be the default for simulations, select the Global Default checkbox next to the name of the specification.
-
Add a terrain source:
4.1 Click the Add Source… button.
The Terrain Source Data Chooser dialog box opens. **Figure 4: Terrain Source Data Chooser** 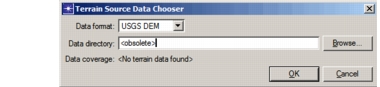4.2 From the Data Format pull-down menu, select the format of the terrain data.
This menu lists all available formats. You can add formats to the list, as described in [Creating Your Own Terrain Handler](tmm-13-op-80-20.md).4.3 Depending on the terrain type, you must specify the either a file name or data directory containing the terrain data. Type the path name or click the Browse… button to choose a file or directory.
If terrain data of the specified type is found, the geographic limits of that terrain data are displayed in the “Data coverage” field.

> **Note:** If you change the files in a specified terrain data directory, you must choose Topology > Terrain > Rebuild Terrain Data Catalog for the changes to be recognized.
4.4 Click OK.
The terrain source is added to the Data Sources list.4.5 If desired, specify coverage limits and custom settings for the terrain source. See Specifying Coverage Limits for a Terrain Specification and Specifying Custom Settings for a Terrain Specification for details.
4.6 Click the Apply Changes So Far button to save this terrain source.
-
If desired, repeat step 4 to add additional sources of terrain data.
-
When you have specified all terrain sources, click the Apply Changes and Close button.
Specifying Coverage Limits for a Terrain Specification
The geographic area covered by a terrain data source is a rectangular region bounded by the furthest northern, southern, eastern, and western data points in the source. These limits are shown in the Manage Terrain Specifications dialog box in the Coverage field for each source.
Figure 5: Coverage Limits in Manage Terrain Specifications Dialog Box

By default, the geographic area covered by a terrain specification is the combined areas of all included data sources. You can adjust the coverage area of a terrain specification by specifying limits for one or more of the included data sources, as described in the following procedure.
Procedure 3: Specifying Coverage Limits for a Terrain Source
-
If the Coverage field for the data source shows
<PENDING READ>, right-click in that field and select Obtain Source Coverage…The Coverage field displays the current coverage of the data source.
-
Enter the desired coverage limits in the corresponding fields. For example, to set the northern border of the coverage rectangle, enter a latitude value in the Northern Limit field.
Note: By default, all limit fields display
<Coverage>, meaning that the current limit is that shown in the Coverage field. -
When you have entered all desired limits, click one of the Apply Changes… buttons to save them.
Specifying Custom Settings for a Terrain Specification
Custom settings are format-specific preferences that let you configure a terrain handler in different ways, such as adapting to variations in data formats. These settings are shown in the Manage Terrain Specifications dialog box in the Custom Settings field for each source.
Figure 6: Custom Settings in Manage Terrain Specifications Dialog Box

If the Custom Settings field is blank, the data source either has no settings or is using a default value. See "Terrain Handler Preferences" on page 43 for information about the custom settings of built-in terrain handlers. To edit the custom settings for a data source, use the following procedure.
Procedure 4: Specifying Custom Settings for a Terrain Source
-
Right-click in the Custom Settings field and select Edit settings…
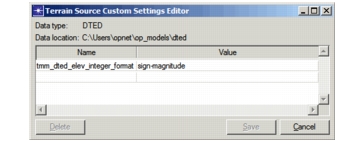
The Terrain Source Custom Settings Editor opens.
Figure 7: Terrain Source Custom Settings Editor
-
Edit the fields as needed.
-
Click Save.
-
Click Cancel to close the dialog box.