Moving the Observer from the Keyboard in the 3D Projection
3D Network Visualizer maps the observer movement functions to the keyboard using key maps that support the most typical ways that users want to move through the 3D world, either in absolute mode or attached to an entity.
Note: References to movement key combinations use the key mappings provided with 3D Network Visualizer. If you change these key mappings, the instructions may no longer be valid.
As described in Moving the Observer, the observer typically moves with respect to the terrain in level observer coordinates or observer coordinates. The corresponding key maps are Level Observer Frame and Observer Frame.
Figure 39 illustrates the positional movement keys. Figure 40 illustrates the keypad layout for changing orientation and movement speed. For a complete list of movement functions and their keyboard and mouse mappings, please see the “3D Network Visualizer Quick Reference Card“ or “The Key Mapping Editor“ on page 532.
Note: To use the keypad for navigation, NumLock must be on.
Figure 39: Primary movement keys, observer coordinates (3D)
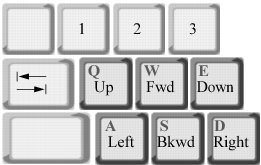
Figure 40: Keypad layout, heading, pitch, and roll (3D)
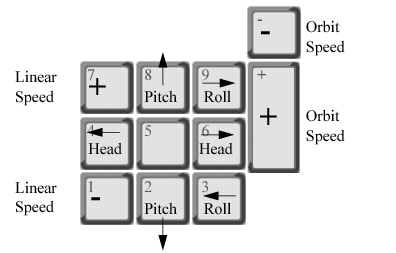
Note: If your keyboard does not have a keypad, as on most laptops, the Laptop key map lets you use the arrow keys to control the left, right, up, and down movement mapped to 4, 6, 8, and 2 on keypads.
To move the observer, press a key combination and hold it for as long as you want the observer to keep moving.
Note: You can press more than one key at a time to combine movement functions. For example, pressing the move forward and move left keys at the same time moves the observer diagonally left and forward.
Navigation Options
This section lists the different ways that you can move the observer using the keyboard. For a complete list of movement functions and their keyboard and mouse mappings, please see the “3D Network Visualizer Quick Reference Card“. You can:
- Move forward and backward (observer, level observer, entity, level entity, and attached context coordinates)
- Move up and down (observer, level observer, entity, level entity, and attached context coordinates)
- Move left and right (observer, level observer, entity, level entity, and attached context coordinates)
- Rotate (heading) left and right (observer and level observer coordinates)
- Rotate (pitch) up and down (observer and level observer coordinates)
- Rotate (roll) left and right (observer and level observer coordinates)
- Orbit left and right
- Orbit up and down
- Look (move camera) left and right
- Look (move camera) up and down
- Tilt (move camera) left and right
- Reset the observer to the default position and orientation for the attached mode
- Reset the camera to the default position and orientation.
For details about orbiting, please see Orbiting. For details about moving the camera, please see Moving the Camera.
Note: When you view a geocentric terrain and zoom out more than 6 million meters, the view is forced to focus toward the center of the earth. The practical effect of this mode is that the left and right movement keys orbit the eyepoint around the earth, rather than moving the entire earth to the left or right.
Orbiting
You can orbit the observer (revolve left, right, up, and down) around an attached object or the point on the terrain that is at the center of the window. (If the center of the screen is in the sky, orbit does not work.) When you orbit, the observer’s heading continuously changes so that it is always facing the point or object around which it orbits. You can change the camera to look at something other than the orbit point while you are orbiting.
Procedure 47: Orbiting Around an Object
- Attach the observer to the object.
- Press the right or left arrow keys.
Procedure 48: Orbiting Around a Point
- If you are attached to an entity, detach (press
z). - Press the right or left arrow keys.
Moving the Camera
By default, the observer always looks in the same direction as its heading. However, just as the turret on a tank can swivel and fire in directions other than its body’s heading, the observer can look in a direction other than its heading. The ability to look around is enabled in the camera. You can move the observer’s camera up, down, left, right, tilt left, and tilt right. (The default key mappings are Ctrl + <keypad number>, where <keypad number> is 2, 3, 4, 6, 8, or 9.)
Note: To use the keypad for navigation,
NumLockmust be on.
Note: You can tell that the camera is moving, but the heading is not by observing the compass. If you change the heading, the view of the terrain changes and the compass moves. If you move the camera, but keep the heading static, the view of the terrain changes, but the compass does not move.
To move the camera, press the keys mapped to the camera movement functions.