Performing an Import with DCI
When you have completed your preparations for an import, you can continue with an import, as described in Procedure 1.
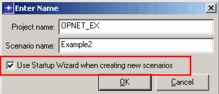
Note: Be sure to check the box to “Use Startup Wizard when creating new scenarios” when creating a new project or scenario, as shown in Figure 9.
Figure 9: Enable Startup Wizard
Procedure 1: Importing a Topology from Device Configuration Files
-
Open the Import Device Configurations dialog box. You can open this dialog box in one of two ways:
-
To import into a new scenario, choose Import From Device Configurations in the Initial Topology window of the Startup Wizard.
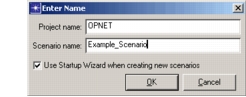
Note: Be sure to check Use Startup Wizard when creating new scenarios, or the Startup Wizard will not appear.
Figure 10: Enable Startup Wizard
-
To import into an existing scenario, choose Topology > Import Topology > From Device Configurations…
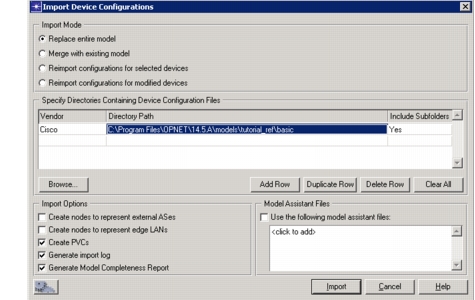
Either action opens the Import Device Configurations dialog box, shown in the following figure.
Figure 11: Import Device Configurations Dialog Box
-
-
Select one of the following import modes.
-
Replace Entire Model—Use this option when creating a new project or scenario, or when you want to overwrite the existing topology.
-
Merge with Existing Model—Use this option to add devices to the existing topology. If some of the devices are already in the topology, these devices are replaced (that is, reimported) using the configuration files of this import. DCI matches the devices based on the hostname of the node.
-
Reimport Configurations for Selected Devices—Use this option to update the configuration files of a few devices in the existing topology. The devices must already be selected in the workspace. If the devices you want to update are not currently selected, cancel this operation, select the devices, and start over.
In this mode, you do not need to specify the location of the configuration files in step 3., DCI uses the file specified in the Import Information attribute on the device. During the first import, DCI creates a new directory and copies the config files into that directory. Upon subsequent imports, the new directory is referenced.
-
Reimport Configuration for Modified Devices—When you select this option, DCI will reimport configuration files for any devices that have been modified since the last import, based on comparison of the timestamp of the last import and the current time.
-
-
For each directory from which you want to import, use the following steps to specify where the configuration files are located.
3.1 Click the Add Row button.
3.2 Select the appropriate vendor(s) in the new row, using the drop-down menu. Choices include Cisco, Juniper, or Cisco and Juniper.
3.3 Enter the directory path in which the files are located.
Note: Alternately, you can browse and select in a directory chooser using the Browse button.
3.4 Select Yes or No in the Include Subfolders column.
3.5 To specify additional directories or to remove information
- To add more directories, select Duplicate Row or Add Row.
- To remove a row, select Delete Row.
- To remove all directory information, select Clear All.
-
Select import options. The options are described in the following table.
Table 5: eXpress Data Import Options
Import Option Description Create nodes to represent external ASes. Reads external BGP peering, and if there is no external partner, NetPlanner creates another AS to connect to.
When this option is checked, eXpress Data Import creates the external AS to represent external peers that have not been imported. The external AS nodes are inferred from information about the eBGP peers on the border routers. These external AS node can then be set up to advertise during simulation the routes that are present in the BGP RIB-in of the border nodes. Do this by using the menu option Protocols > BGP > Import EBGP RIB-in Information… The utility parses the RIB-in files for each border node, breaks them into multiple files one for each eBGP speaker the node peers with, and associates them with neighbor configuration on the AS external node.
Select the “Only consider traffic flow prefixes” checkbox to consider only exact matches to destination address prefixes.Create nodes to represent edge LANs. Creates LAN nodes at the edge of the network topology. LANs are created on device edges if an IP interface is active but not connected to another device in the import. Create PVCs Reads static PVC mapping from configuration and builds the mesh accordingly. If there are no static maps, DCI will create a full mesh of PVCs across all interfaces in the same IP subnet. When this option is not selected, DCI does not create PVCs during the import—even when static mapping is in the imported device configuration.
Note: This option is new for release 11.0. Previous releases had option “Create Full Mesh PVCs,” which did not read static mapping for PVCs.Generate Import Log Creates a log that lists the commands that were skipped (not considered) during the import. The log also contains diagnostic messages generated by the import. -
Select or deselect the “Use the following model assistant files” checkbox. If this box is deselected, DCI will not consider any model assistant files specified in step 6.. DCI will still use CDP information, however, to infer Layer-2 connectivity and router-switch coupling. If this box is selected (default), DCI will consider the model assistant files specified by the user in step 6..
-
Specify one or more model assistant files. These files can be model assistant files, which have a .ma extension, or import assistance files from releases prior to 10.0, which have a .ia extension. See “Model Assistant“ for more information about model assistant files.
Note: As of release 11.0, you may select or deselect a checkbox that tells DCI whether to consider model assistant files when performing an import. By default the box is selected.
-
If you have an Automation license, and want to save your import settings to an automation file, click the Save Settings for Automation button and specify a name for the automation file.
-
Click Import.
NetPlanner generates a network topology and configures routing and switching attributes on the nodes according to the information in the configuration files. If additional information is needed to complete the import, a dialog box appears prompting you to open the Import Assistant. See Using the Interface Assistant for more information.
The configuration files do not always contain all of the information that can be included in a network model. Although you can manually specify additional information after the import, NetPlanner has two assistants that can automate the process.
-
Import Assistant—When the configuration files do not have some of the information that DCI needs to complete the topology, the Import Assistant appears after the import.
For more information, see Using the Interface Assistant.
-
Model Assistant—Unlike the Import Assistant, which prompts you for required information, Model Assistant files let you specify additional information about one, several, or all of the objects in a network.
For more information, see Using Model Assistant Files with Imported Topologies.