CA eHealth Baseline Loads: Preparing for an Import
NetPlanner can import link loads from CA eHealth. The following table lists the steps to perform before you import CA eHealth data. You can import baseline loads from CA eHealth directly as well as from eHealth data files.
After you complete the required steps, proceed to "Importing Baseline Traffic Loads".
**Note—**This section describes how to generate NetPlanner-compatible data files in CA eHealth version 5.0 (on Solaris) and version 5.6 (on Windows). Procedures might differ for other versions of eHealth. To determine whether your version is supported by NetPlanner, go to http://www.opnet.com/support, follow the link for NetPlanner, and view the system requirements.
Table 7: CA eHealth Baseline Loads: Pre-Import Checklist
| Step | When Required | Reference |
|---|---|---|
| Create one or more object groups | This step is required if you want to collect on a subset of objects and do not have an object group defined. If you want to collect data on all objects, this step is optional. | Creating CeH Object Groups |
| Create a CA alias file | Required if you have objects in your network that are not referenced by a CeH alias file. | Creating a CeH Alias File |
| Configure eHealth Server settings (when importing directly from eHealth) | You can import directly from eHealth if the computer on which NetPlanner is installed can communicate with the eHealth computer using telnet and ftp. In this case, you must specify the login and data sources in the Import Background Loads dialog box | "Login and Data Sources for Direct CA eHealth-Network Imports" on page 53 |
| Create data files (when importing from files) | If you cannot communicate with the eHealth computer using telnet and ftp, you must create data files manually as described in this section. In this case, you must: - Create data files - Move data files to the computer on which NetPlanner is installed |
Creating CeH Data Files |
| Specify node and/or interface aliases | Once per scenario. Required for nodes or links that meet both these conditions: - Were created manually - Are referenced by the imported data |
"Alias Formats and Requirements" on page 19 |
Creating CeH Object Groups
You must do this task if both of these conditions are true:
- You want to collect data for some (not all) objects in your network
- You have not yet created an object group, or you want to group a new set of objects
An object group is a collection of CA objects for which you want to collect data. If you have objects of interest collected in groups, you can specify group names when you create alias and data files. This limits file sizes and speeds up data-collection and import times, because CA excludes irrelevant data.
Procedure 6: Creating an Object Group in CA eHealth
-
Log in to the eHealth system.
-
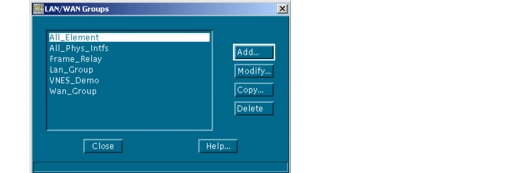
From the main CA eHealth window, choose Reports > Edit Groups > LanWan Groups.
The LAN/WAN Groups dialog box opens.
-
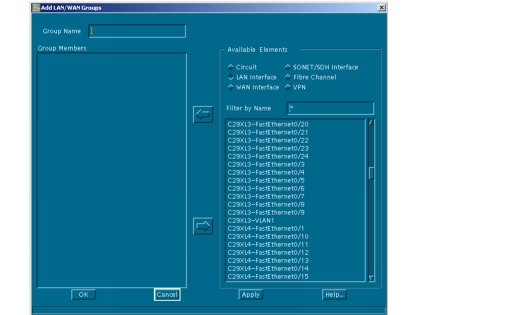
Click Add.
The Add LAN/WAN Groups dialog box opens.
-
To add an interface to the group:
4.1 Under Available Elements, click LAN Interface or WAN Interface.
The interface list shows all polled interfaces of the specified type. 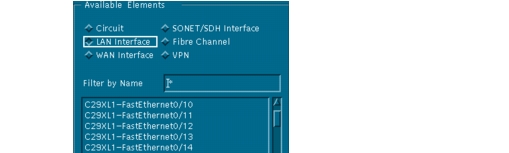4.2 To add an interface to the group, select it in the list and click the left-arrow button.
The interface appears in the Group Members list.  -
When the group includes all interfaces for which you want to collect data, enter a name in the Group Name field.
-
Click OK to close the Modify LAN/WAN Groups dialog box, then click Close to close the LAN/WAN Groups dialog box.
Creating a CeH Alias File
You must do this task if:
- You have not yet created an alias file
- You have an alias file, but it does not include objects of interest
You must generate a file that contains the CeH aliases of all objects for which you want to import data. A CeH alias is a name assigned by CeH, which can be different from the name obtained while querying the device using SNMP. You must include this file (along with the CA data files) the first time you import from CA into NetPlanner.
An ideal alias file contains only aliases for objects of interest. There are a number of arguments that allow you to limit the contents of the alias file. For example, you can define a group for a subset of objects and then output the aliases for this group; for more information, see Procedure 6 Creating an Object Group in CA eHealth.
Make sure that you export all aliases for the objects of interest. If the network is large, this command might take some time to complete. If you specify arguments that limit the output set of aliases, you can reduce the execution time for this command.
The "nhExportConfig" command is used to generate alias files. Use the command "nhExportConfig –help" and study the various options available. Refer to CNH documentation for more information about this command.
The alias file should have an extension *.dco. When you specify the output filename as the argument, make sure that you append the extension. Otherwise, you can modify the filename to include the extension after it has been generated.
Note: The alias file is the key to the link-load data that is imported into NetPlanner. If you import load data for an object for which there is no alias, NetPlanner will not import that data.
Procedure 7: Creating an eHealth Alias File
-
Log in to the eHealth system.
-
Generate the config (.dco) file by typing the following command:
nhExportConfig -dciOut <file_name>.dcoNote: You might want to include additional command-line arguments to limit the number of objects included in the alias file.
-
If CA and NetPlanner are running on different computers, copy the .dco file to your NetPlanner computer.
Creating CeH Data Files
This step is optional. By default, generates data files automatically whenever you do an import.
The "nhExportData" command is used to generate a file that contains load data. By default, this command exports all traffic generated by the polled objects. Therefore, this file might be very large depending on the number of objects and the poll rate. You can reduce the length of this file by eliminating objects for which you do not want to export traffic. You can create a group that contains only the objects of interest and specify this group as an argument (for more information, see Procedure 6.) Use the "nhExportData –help" command to obtain a list of the arguments and refer to the CNH documentation for instructions on using them.
By default, CA exports all traffic generated by all polled objects. Because this can result in very large data files, it is good practice to collect data for objects of interest only.
If the files are large, you can distribute traffic information into multiple files by distributing devices into different groups. You can import multiple traffic files in a single operation within NetPlanner.
The data file should have an extension *.dci. When you specify the output filename as the argument, be sure to append the extension. Otherwise, modify the filename to include the extension after it has been generated.
Procedure 8: Creating an eHealth Data File
-
Log in to the eHealth system.
-
Generate the data files that contain the utilization data for the objects of interest. These are standard-format eHealth data (.dci) files. You can generate a data file for a single eHealth object, a group of objects, or all polled objects using the
nhExportDatacommand. Enter thenhExportData -helpcommand to obtain a list of the available arguments and refer to the CNH documentation for information about their use.**Caution—**A data file for all polled objects might be very large depending on the number of objects and the poll rate. For this reason, it is good practice to create data files only for objects of interest.
You can generate a data file for a single object or group of objects by entering the following command:
nhExportData -subjName <name> -fromDate mm/dd/yyyy -fromTime hh:mm:ss -toDate mm/dd/yyyy -toTime hh:mm:ss -subjType <subject_type> -techType <technology_type> -vars <variable> -outFile <file_name>.dciwhere:
<name>is the name of a single element or group of objects for which to extract data. For more information about CA object groups, see Creating CeH Object Groups.<subject_type>is element if thesubjNameargument specifies one element, or group if thesubjNameargument specifies a group of elements<technology_type>is lanWan for links and server for servers<variable>can be one of the following:- bitsIn or bitsOut for links
- bandwidthIn or bandwidthOut for links (CeH version 5.6 on Windows)
- bandwidthIn, bandwidthOut, or "bandwidthIn,bandwidthOut" for links (CeH version 5.0.2 on Solaris)
For more information about other fields, type
nhExportData -help. -
If CA and NetPlanner are running on different computers, copy the .dco file to your NetPlanner computer.
-
After you create data files, go to "Importing Baseline Traffic Loads".