InfoVista Link Loads: Preparing for an Import
NetPlanner can import link loads from InfoVista. The following table lists the steps to do before you import InfoVista data. After these steps, proceed to "Importing Baseline Traffic Loads".
Table 5: InfoVista Link Loads: Pre-Import Checklist
| Step | When Required | Reference |
|---|---|---|
| Install report template | Once. Do this step first. | Installing the NetPlanner Report Template |
| Define a new report | Once, after you install the template. | Defining an InfoVista Report |
| Create data files | As needed. This step is required only if the computer on which NetPlanner is installed cannot communicate with the InfoVista computer using telnet and ftp. | Creating InfoVista Data Files Manually |
| Specify aliases | Once per scenario. Required for nodes or links that meet both these conditions: - Were created manually - Are referenced by the imported data |
"Working with Aliases" |
Installing the NetPlanner Report Template
You must do this task once, before you define a report template and generate reports. This step is required to ensure that InfoVista generates reports in the correct format.
Procedure 3: Installing the NetPlanner Report Template in InfoVista
-
If InfoVista and NetPlanner are installed on different computers, copy one of the following NetPlanner files to a directory on the InfoVista computer:
For InfoVista 3.1 and later:
<install_dir>/<release>/sys/etc/xdi_infovista_template.xmlFor InfoVista 2.x:
<install_dir>/<release>/sys/etc/xdi_infovista_template.ivl -
In InfoVista, choose File > Install VistaViews.
A directory browser opens and prompts you to select the VistaView source directory.
-
Select the directory where the template file is located. (If you have NetPlanner and InfoVista installed on the same computer, this file is located in
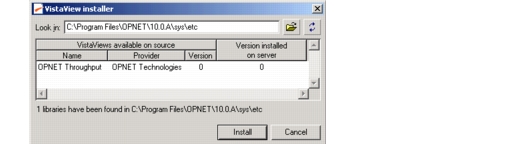
<install_dir>/<release>/sys/etc.)The "VistaView Installer" window opens.
Figure 1: "VistaView installer" Window
-
Select the VistaView named "OPNET Throughput" and click Install.
Defining an InfoVista Report
You must do this task once, after you install the template (as described in the following procedure). This report specifies the interfaces and links for which you want to collect data.
Procedure 4: Defining a New InfoVista Report
-
Ensure that the instances for SNMP include all the interfaces or IP addresses you want to poll:
1.1 In the main InfoVista window, click the General tab.
1.2 Expand the treeview so the following category is expanded:
Vistas > SnmpNode > Instances
1.3 If this category is missing any instances, Right-click on the "Instances" branch and choose Add Instance. Then enter the instance name and click OK.

1.4 Repeat step 1.3. for each instance you want to add.
-
Choose Reports > Running.
The Found Reports Running dialog box appears.
-
Choose Edit > Add Report.
The
"<report_name> Report"dialog box appears. -
Enter a report name in the Name field.
-
Apply the template:
5.1 In the
"<report_name> Report"dialog box, click the button next to the "Report Template" field:
The Choose Report Templates dialog box appears.
5.2 Search on the string "*" (one asterisk) to find all available templates.

5.3 Select the "Opnet Traffic/Throughput" report template and click Add.
The Choose Report Templates dialog box closes.
-
Add one or more instances to the report:
6.1 In the (unnamed) (Report) dialog box, click on the button next to the Instances field.
The "Instances of <report_name>" dialog box appears.
6.2 Choose Edit > Add.
The "Choose Instances to add" dialog box appears.
6.3 Search on the string
*(one asterisk) to find all available instances.6.4 Select the instance you want to add to the report, then click Add.
The "Choose instances to add" dialog box closes and the instance is added to the report.
6.5 Repeat steps step 6.1. through step 6.5. for each instance you want to add.
6.6 After you add all instances, click OK in the "Instances of <report_name>" dialog box.
-
In the
"<report_name> (Report)"dialog box, verify that the State field is set to Running, then click OK
Creating InfoVista Data Files Manually
Required only if the computer on which NetPlanner is installed cannot communicate with the InfoVista computer using telnet and ftp. Before you generate a report, you must complete Procedure 3 and Procedure 4.
Procedure 5: Generating an InfoVista Data File
-
Make sure that you have collectors installed on all hosts for which you want to capture data. For more information, see the InfoVista documentation.
-
If the template is not installed, do Procedure 3 Installing the NetPlanner Report Template in InfoVista.
-
If there is no report (based on the template) defined, do Procedure 4 Defining a New InfoVista Report.
-
Generate an InfoVista report:
4.1 Choose Reports > Running.
The Found Reports Running dialog box opens.
4.2 Double-click on the report you want to generate.
The
"<report_name> Report"widow opens and shows the data collected. -
Export your report data to one or more text files:
5.1 In the Report window, choose Report > Export.
5.2 Choose Data (text) format. This is the data file that you will import into NetPlanner.
-
After you create data files, go to "Importing Baseline Traffic Loads".