Configuring DHCPv6
Many IPv6 networks use Dynamic Host Control Protocol (DHCP) servers to assign addresses or prefixes to clients, versus manually or automatically assigning IPv6 addresses.
There are two steps to configuring DHCPv6 in your IPv6 network model:
- Configuring the server
- Configuring the clients
These steps are covered in the following procedures.
Note: Riverbed Modeler supports one DHCPv6 server per physical link. A client acts immediately upon receiving the first DHCP message and discards messages from other servers on the link.
Determine which nodes in the network model will act as DHCPv6 servers and whether they will assign addresses, prefixes, or both. For each DHCPv6 server, perform the following procedure.
Procedure 63: Configuring the DHCPv6 Server
-
Right-click on the server node and select Edit Attributes.
-
Expand the DHCP compound attribute.
-
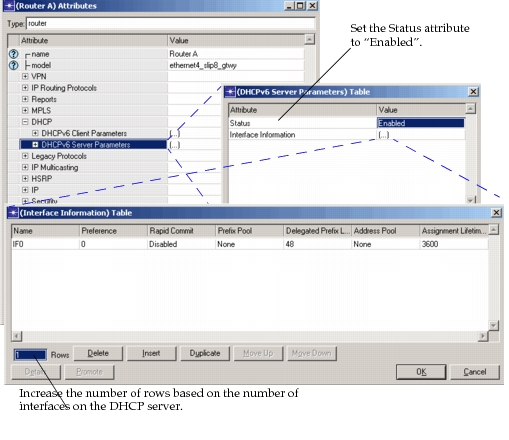
Click on the DHCP Server compound attribute.
Figure 288: DHCPv6 Server Attributes
-
Set the Status attribute to “Enabled”.
-
Configure the DHCPv6 Interface Information.
5.1 Add a row in the Interface Information table for each interface on the DHCP server.
5.2 Select the name of the interface from the drop-down menu under the Name attribute.
5.3 (Optional) Set the Preference attribute to a value other 0 (default), if you want to include the Preference DHCP Option.
5.4 (Optional) Set the Rapid Commit attribute to Enabled, if this interface will support the Rapid Commit handshake.
5.5 If this interface will delegate prefixes, set the following attributes:
- Set the Prefix Pool attribute to a valid prefix and mask.

- Set the Delegated Prefix Length attribute to a value at least 1 larger than the mask given in the Prefix Pool attribute.
5.6 Set a valid prefix and mask in the Address Pool attribute, if this interface will assign addresses.
5.7 (Optional) Change the default lifetime of an assignment by changing the value of the Assignment Lifetime attribute.
End of Procedure 63
Determine which nodes in the network model will use DHCPv6 and whether each will request a prefix or an address. For each DHCPv6 client, perform the following procedure.
Procedure 64: Configuring the DHCPv6 Client
-
Right-click on the client node and select Edit Attributes.
-
Configure each interface that will use DHCPv6 to request a prefix or address:
Figure 289: Configure the DHCP Node Interfaces
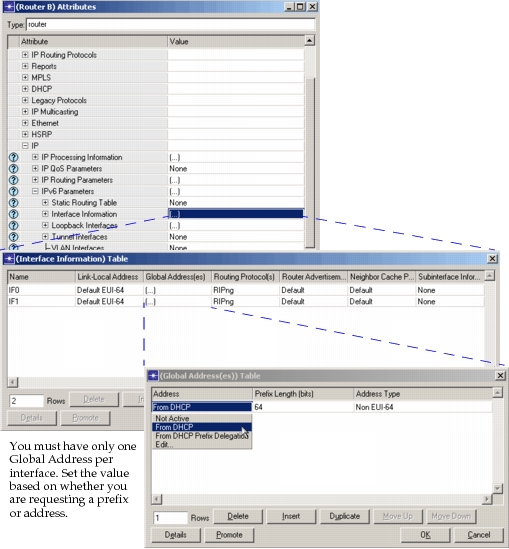
2.1 Select IP > IPv6 Parameters > Interface Information > Global Addresses > Address and set the value to “From DHCP” for each interface that will be requesting an address,
2.2 Select IP > IPv6 Parameters > Interface Information > Global Addresses > Address and set the value to “From DHCP prefix delegation” if this interface will be requesting a prefix.
Note: For DHCP to function on an interface, there must be only one Global Address row on this interface.
-
Configure the Node DHCP attributes:
Figure 290: Configure the DHCPv6 Client
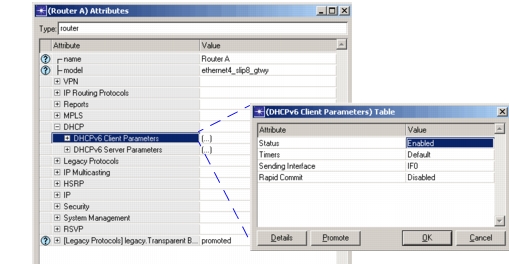
3.1 Select DHCP > DHCPv6 Client Parameters.
3.2 Set the Status attribute to “Enabled”.
3.3 (Optional) Set the message timer values in the Timers table to desired values.
**Figure 291: Set the DHCPv6 Client Timers** 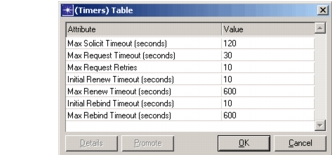3.4 If the node is a router, select the interface to be used for sending DHCP messages from the Sending Interface attribute drop-down menu.
3.5 (Optional) Set the Rapid Commit attribute to “Enabled” if this client should attempt to use the Rapid Commit handshake.
End of Procedure 64