Creating and Editing Schemas
The elements that make up a scene have parameters that help define them, for example a model filename. The set of parameters for a particular scene element is a schema. 3D Network Visualizer uses schemas to validate element definitions. You can create, copy, and delete schemas. For any schema, you can add and delete parameters and edit parameter values.
Note: Changes to schemas are saved automatically. For more information, please see “Managing 3D Network Visualizer Settings“ on page 126.
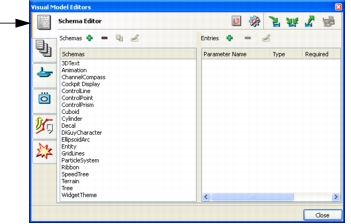
3D Network Visualizer includes model definition schemas. Model definition schemas define the elements that can be displayed in a scene. The model definition schemas provided with 3D Network Visualizer are:
- 3DText
- Animation
- Channel Compass
- Cockpit Display
- ControlLine
- ControlPoint
- ControlPrism
- Cuboid
- Cylinder
- Decal
- DiGuyCharacter
- EllipsoidArc
- Entity
- GridLines
- ParticleSystem
- Ribbon
- SpeedTree
- Terrain
- Tree
- WidgetTheme.
- Selection Visualizer.
Creating Schemas
Procedure 118: Creating a Schema
-
Choose Settings > Visual Model Editors. The Visual Model Editors dialog box opens.
-
Select the Schema Editor page (Figure 106).
Figure 106: Schema Editor page
-
Click the Add icon (
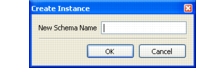
 ) next to the Schemas label. The Create Instance dialog box opens (Figure 107).
Figure 107: Create Instance dialog box
-
Type a name for the new schema.
-
Click OK.
-
Add parameters as described in Adding a Parameter to a Schema.
Deleting Schemas
Note: If a schema is used by a model definition, you cannot delete it. The Delete Schema icon will be unavailable.
Procedure 119: Deleting a Schema
- Choose Settings > Visual Model Editors. The Visual Model Editors dialog box opens.
- Select the Schema Editor page (Figure 106).
- In the Schemas list, select the schema you want to delete.
- Click the Delete icon (
 ) next to the Schemas label. You are prompted to confirm the deletion.
- Click Yes. The schema is removed from the list.
Copying Schemas
If you want a new schema that is a variant of an existing one, it can be easier to copy the existing schema and edit it, than it is to create a new schema and add all of the parameters.
Procedure 120: Copying a Schema
- Choose Settings > Visual Model Editors. The Visual Model Editors dialog box opens.
- Select the Schema Editor page (Figure 106).
- Select the schema that you want to copy.
- Click the Duplicate icon (
 ). The Duplicate Schema dialog box opens.
- Type a name for the copied version of the schema.
- Click OK.
- The new schema is added to the list.
- Edit the parameters as described in Editing a Schema Parameter.
Adding a Parameter to a Schema
Procedure 121: Adding a Parameter to a Schema
- Choose Settings > Visual Model Editors. The Visual Model Editors dialog box opens.
- Select the Schema Editor page (Figure 106).
- In the Schemas list, select the schema to which you want to add a parameter.
- Click the Add Parameter icon (
 ) next to the Entries label. A parameter called “key” is added to the parameter list.
- Double-click “key” to enter edit mode.
- Type a name for the parameter.
- If the parameter has a specific type, edit the value in the Type column.
- If the parameter is required, edit the value in the Required column.
- Optionally, add a description. The description provides context sensitive help on the element definitions pages.
Deleting a Parameter from a Schema
Note: If you delete a parameter from a schema, any element definitions that use the schema may become invalid. Invalid element definitions are shown in red in the list of definitions.
Procedure 122: Deleting a Parameter from a Schema
- Choose Settings > Visual Model Editors. The Visual Model Editors dialog box opens.
- Select the Schema Editor page (Figure 106).
- In the Schemas list, select the schema from which you want to delete a parameter.
- Select the parameter that you want to delete.
- Click the Delete icon (
 ) next to the Entries label.
Editing a Schema Parameter
Procedure 123: Editing a Parameter for a Schema
- Choose Settings > Visual Model Editors. The Visual Model Editors dialog box opens.
- Select the Schema Editor page (Figure 106).
- In the Schemas list, select the schema for which you want to edit a parameter.
- Click the parameter attribute that you want to edit. The attribute becomes editable.
- Type the new attribute value.