Importing SteelCentral AppResponse Traffic Files
SteelCentral AppResponse can generate traffic flow data from its monitored packet data to import into NetPlanner. You can then use the AppResponse flow data to create accurate end-to-end traffic flows in your NetPlanner network scenarios.
The steps below summarize the workflow for creating AppResponse traffic flows. For more detailed instructions, follow Procedure 1.
For more information about importing traffic directly from an AppResponse appliance, see "Importing Network Traffic from AppResponse".
Note: AppResponse Xpert command line interface (CLI) extensions must be downloaded from the AppResponse Update Center before exporting AppResponse traffic data. For more information, see Knowledge Base solution S21827 on the Riverbed Support site.
- Using a Secure Shell (SSH) client, log in to the AppResponse appliance and use CLI commands to export traffic files.
- After you generate the traffic files, use your web browser to download AppResponse traffic archive files to an accessible directory and extract to an NetPlanner Traffic archive directory.
- After saving to the traffic archive directory, you can use the Traffic menu in NetPlanner to import the traffic flows. Choose Traffic > Import Traffic Flows > From AppResponse.
Use the following procedure to export AppResponse traffic data for download and import to NetPlanner as traffic flows.
Procedure 1: Configuring AppResponse to Generate Traffic Data to Import to NetPlanner
-
Open an SSH client session to login to AppResponse appliance.
Note: You must have an administrator role on the AppResponse appliance.
-
At the login prompt, enter the username and password for the AppResponse appliance host.
-
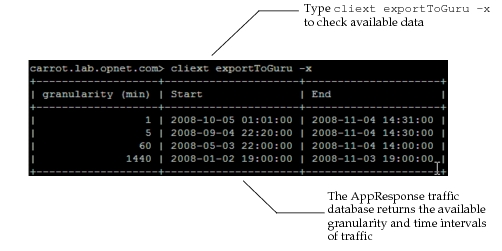
At the prompt, you can first use the export CLI command with the "-x" option to find out what traffic data is available, as shown in the following figure.
Figure 1: Check Available Data
-
After checking available data in the AppResponse database, use the CLI export command to generate the traffic data you want.
For example:
cliext exportToGuru -g 5 -s '2008-11-25 15:16:05' -e '2008-11-25 16:15:55' -t 1500creates a traffic archive of data with: granularity (-g) of 5 minutes; start time (-s) '2008-11-25 15:16:05'; end time (-e) '2008-11-25 15:16:55'; and excluding (-t) traffic less than 1500 bps.
or,
cliext exportToGuru -g 5 -i 'Yesterday' -t 1500 -a -lcreates a traffic archive of data with: granularity (-g) of 5 minutes; interval (-i) 'Yesterday'; excluding (-t) traffic less than 1500 bps; aggregate (-a) by IP-IP-App; and data from AppResponse (-l) only.
For a complete description of the CLI commands and options, see AppResponse CLI Export Command Reference.
-
When the script finishes, use a web browser to access the traffic archives:
For example:
http://<AppResponse_Xpert_Host_Address>:8080/Export/https://<AppResponse_Xpert_Host_Address>:8443/Export/ -
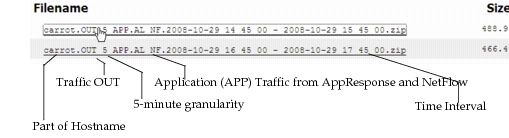
Select file archive to download to a directory accessible to NetPlanner, as shown in Figure 2.
Note: The filenames include information about the traffic data in the archive, as shown in the following figure
Figure 2: Directory Listing for Traffic Archives
-
Double-click and save the traffic archive zip file to a directory where you will extract the files from.
-
Extract the contents of the traffic archive zip file to the directory you want to use as a traffic archive directory for NetPlanner.
Note: You can specify the traffic archive directory after you open the Traffic Import dialog box, or you can specify the directory using the "traffic archive dir" preference.
-
Open the target NetPlanner project file for the network traffic you want to import.
-
Choose Traffic > Import Traffic Flows > From AppResponse Xpert.
For more information about this step, see "Importing Traffic Flows".
After importing traffic flows from AppResponse, you can open the Traffic Center and manage traffic flows.
For a complete list of AppResponse traffic CLI commands and usage information, see AppResponse CLI Export Command Reference.
For information about managing traffic flows, see "Step 3: Manage Traffic Data in the Traffic Center" in the "Importing Network Traffic" workflow.