Creating and Importing IP Traffic Flows from Arbor Peakflow
NetPlanner can import IP flows from Arbor Peakflow using the menu option Traffic > Import Traffic Flows > From Arbor Peakflow.... By preparing a configuration file and traffic samples from Arbor Peakflow, you can analyze your traffic matrices in the network model. You will input the collected files as shown in the figure below.
Figure 5: Import Traffic Flows from Arbor Peakflow
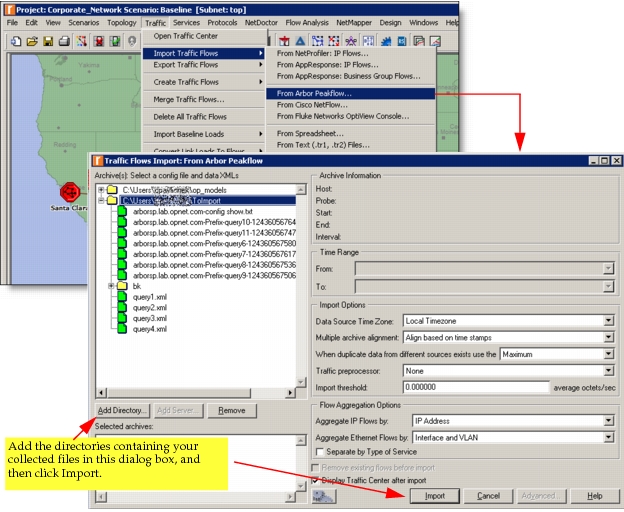
Note: At least one configuration file and one XML traffic sample are required for import.
The following table lists the steps to prepare the required files.
Table 6: Arbor Peakflow: Pre-Import Checklist
| Step | When Required | Reference |
|---|---|---|
| Create the configuration file | Once per scenario. Required for nodes or links that meet both these conditions: - Were created manually - Are referenced by the imported data |
Create the Configuration File |
| Create XML traffic sample files | You must have at least one traffic sample file. You can create these files in one of two ways. - Generate a report that produces the XML file(s) from the Arbor Peakflow web console - Use the SOAP API to run a query and generate the XML file(s) |
Generate a Traffic Sample from the Arbor Peakflow Web Console Generate a Traffic Sample from the SOAP API |
Create the Configuration File
To create the required configuration file, use the following procedure.
Procedure 3: Create a Configuration File from Arbor Peakflow
-
Telnet or SSH to your Arbor Peakflow host.
-
Issue the command "configuration show.'
-
Paste the output into a text file and place it into a directory accessible to NetPlanner.
Note: You will place all traffic samples into this directory, as well.
Generate a Traffic Sample from the Arbor Peakflow Web Console
One method for generating a traffic sample is to use the Reports menu on the Arbor Peakflow web console. (For an alternate method, see Generate a Traffic Sample from the SOAP API.) The procedure below describes the workflow and provides an example query.
Procedure 4: Generate a Traffic Sample from the Web Console
-
In the web console, go to Administration > Reports.
-
Click "Add Classic Report".
-
Add a query that gathers the traffic sample you want.
Figure 6: Creating the XML Report in the Web Console
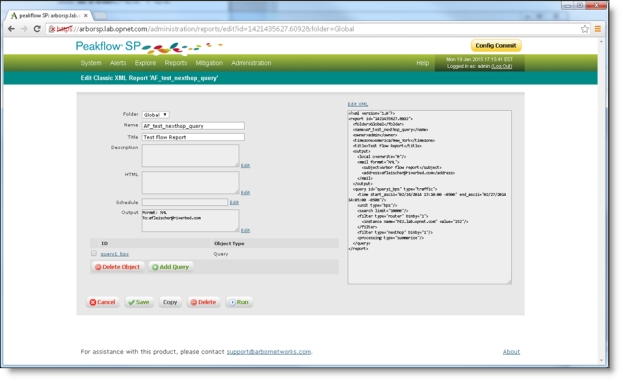
An example query is provided below.
<?xml version="1.0"?> <report id="1421435627.6092"> <folder>Global</folder> <name>AF_test_nexthop_query</name> <owner>admin</owner> <timezone>America/New_York</timezone> <title>Test Flow Report</title> <output> <local overwrite="0"/> <mail format="XML"> <subject>Arbor flow report</subject> <address>address@domain.com</address> </mail> </output> <query id="query1_bps" type="traffic"> <time start_ascii="02/16/2014 13:10:00 -0500" end_ascii="02/27/2014 14:05:00 -0500"/> <unit type="bps"/> <search limit="10000"/> <filter type="router" binby="1"> <instance name="router_name" value="152"/> </filter> <filter type="nexthop" binby="1"/> <processing type="summarize"/> </query> </report> -
Save the report and click Run.
An XML report is generated.
-
Navigate to the "Report Results" tab to obtain the resulting XML file.
-
Place a copy of the XML file into a directory accessible to NetPlanner.
Generate a Traffic Sample from the SOAP API
You can also generate a traffic sample by using the SOAP API.
Note: To use this method, you must have the soap_client.py file distributed by Arbor.
An example of the command is shown below.
soap_client.py -h sp.arbor.net -z foo -c getTrafficData -o query=@sample_query.xml -w data:sample_results.xml
Where:
-
sp.arbor.netis the hostname -
foois the zone secret phrase -
sample_query.xmlis the query file, which you will create in advanceNote: For an example query, see Procedure 4.
-
sample_results.xmlis the target XML file for the traffic sample