Configuring the Environment
Environment settings include clouds, visibility, and precipitation. You can save and import environment settings. When you save a scene, environment settings are saved as part of the scene. Environment settings support the standard 3D Network Visualizer settings behaviors, as described in “Managing 3D Network Visualizer Settings“ on page 126.
Setting Visibility (Fog)
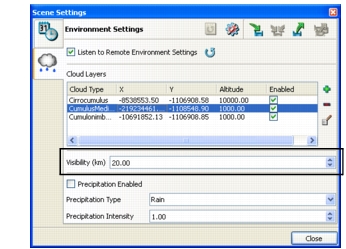
The visibility range setting determines the denseness of the fog effect, which determines how far you can see.
Procedure 30: Setting Visibility
-
Choose Settings > Scene.
The Scene Settings dialog box opens.
-
Select the Environment Settings page (Figure 28).
Figure 27: Environment Settings page
-
In the Visibility box, enter a range, in kilometers.
Enabling and Disabling the Display of Clouds
3D Network Visualizer supports display of multiple cloud layers, each of which has its own characteristics. You can add and remove cloud layers and can enable and disable the display of any of them.
Procedure 31: Enabling or Disabling the Display of a Cloud Layer
-
Choose Settings > Scene.
The Scene Settings dialog box opens.
-
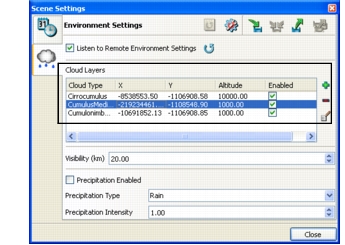
Select the Environment Settings page (Figure 28).
Figure 28: Environment Settings page
-
For each cloud type that you want to enable or disable, select or clear the cloud layer’s checkbox in the Enabled column of the Cloud Layers list.
Adding a Cloud Layer
3D Network Visualizer includes a set of cloud models that you can add to a scene. A cloud layer does not extend indefinitely. It is placed over a specific area of the terrain. You can configure the location, size, and density of a cloud layer.
Note: Increasing the size or density of a cloud layer can affect performance.
Note: Nimbostratus clouds are intended to be viewed from below the cloud layer. They do not look good from above.
Procedure 32: Adding a Cloud Layer to the Scene
-
Choose Settings > Scene.
The Scene Settings dialog box opens.
-
Select the Environment Settings page (Figure 28).
-
Click the Add icon (
 ) to the right of the list of cloud layers.
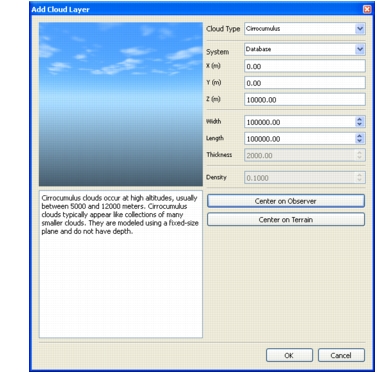
The Add Cloud Layer dialog box opens (Figure 29).
Figure 29: Add Cloud Layer dialog box
-
Select a cloud layer from the Cloud Type drop-down list.
The dialog box displays a description of the cloud type.
-
Optionally, change the parameters of the cloud type. (Some parameters do not apply to every cloud type.) Parameters are defined as follows:
- System. Specifies the coordinate system to use for specifying the location of the cloud layer.
- The X and Y coordinates represent the center of the cloud layer.
- The Z coordinate is the center for layers that have thickness. It is the Z value for layers that are planes.
- Width, length, and thickness let you specify the size of the cloud layer. Thickness is the vertical depth of the cloud layer, not the density of the clouds themselves. Some cloud types do not have a thickness.
- Density controls how much of the area of the cloud layer is filled with clouds.
-
Optionally, rather than specifying the cloud layer’s location by typing in coordinates, you can center the cloud layer on the observer or the terrain. You cannot center on the terrain on geocentric terrains.
-
Click OK.
The cloud layer is added to the Cloud Layers list.
Editing a Cloud Layer
After you create a cloud layer, you can change any of its parameters.
Procedure 33: Editing a Cloud Layer
-
Choose Settings > Scene.
The Scene Settings dialog box opens.
-
Select the Environment Settings page (Figure 28).
-
In the Cloud Layers list, select the cloud layer that you want to edit.
-
Click the Edit icon (
 ).
The Edit Cloud Layer dialog box opens. (It is identical to the Add Cloud Layer dialog box (Figure 29).)
-
Change the parameters as desired.
-
Click OK.
Deleting a Cloud Layer
Procedure 34: Deleting a Cloud Layer
-
Choose Settings > Scene.
The Scene Settings dialog box opens.
-
Select the Environment Settings page (Figure 28).
-
In the Cloud Layers list, select the cloud layer that you want to delete from the scene.
-
Click the Delete icon (
 ) to the right of the list.
The layer is removed from the list.
Configuring Precipitation
3D Network Visualizer supports display of rain and snow. You can configure the intensity of precipitation.
Enabling and Disabling Precipitation
Procedure 35: Enabling or Disabling Precipitation
-
Choose Settings > Scene.
The Scene Settings dialog box opens.
-
Select the Environment Settings page (Figure 28).
-
Select or clear the Precipitation Enabled checkbox.
Specifying Precipitation Type and Intensity
You can specify that precipitation be rain or snow. You can also specify how intense the precipitation is.
Procedure 36: Specifying Precipitation Type and Intensity
-
Choose Settings > Scene.
The Scene Settings dialog box opens.
-
Select the Environment Settings page (Figure 28).
-
On the Precipitation Type drop-down list, select the type of precipitation to display.
-
In the Precipitation Intensity box, specify the intensity. The range is 0.01 through 1.00, where 1.00 is the most intense.