Manage Licenses from the License Manager GUI
Once you have added your licenses to the license server, there are certain operations you may need to perform at a later time. For example:
- Deregistering a License
- Clearing a License File
- Changing the Maintenance Expiration for a License
- Changing the Expiration Date for a License
Deregistering a License
Typically, you will deregister licenses if the computer is about to be reformatted or decommissioned, or if you want to move the license permit to another license file. The Deregister License button does not appear if you have selected a license permit that is in use. You can also right-click on a license and deregister it from the pop-up menu, as shown in the following figure.
Figure 18: Deregister License from Pop-Up Menu
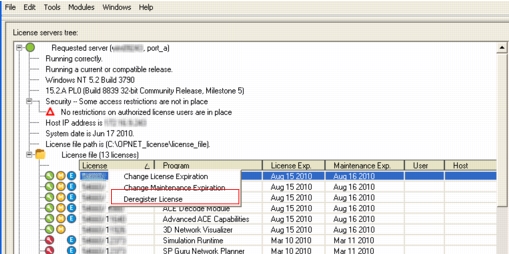
Deregister License from the License Manager GUI
To begin the deregistration process, start with Procedure 13 and continue to the procedure that applies to the deregistration method you will be using.
Procedure 13: Deregister Licenses from a License Server
- Open the License Manager GUI as described in Starting the License Manager GUI.
- Select the license server from which you want to deregister licenses in the treeview. (See License Manager Operations within GUI for more information on the treeview).
- In the License Manager, expand the license file by clicking on the "+" sign next to the "License file" folder icon. Make sure the license you want to deregister is available (green).
- Select the license you want to deregister by clicking on it (use control-click or click-drag to select multiple licenses). Then click the Deregister License button on the right side of the License Manager (or right-click on the license in the treeview and select Deregister License) to start the transaction.
- Select one of the methods for deregistering licenses (or click Cancel to exit this workflow):
- Express—Use Procedure 14
- Browser—Use Procedure 15
- Email—Use Procedure 16
- Offline—Use Procedure 16
- Go to the procedure indicated for a given method, if applicable.
Procedure 14: Deregister Licenses Using Express Method
-
Complete Procedure 13, selecting the Express method for deregistering licenses.
-
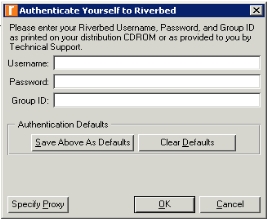
Authenticate yourself to the license server.
-
2.1 Enter your Riverbed support Username, Password, and Group ID in the appropriate fields.
Figure 19: Authenticate
-
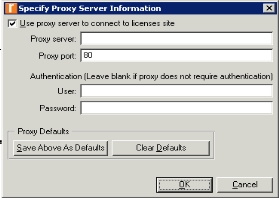
2.2 If your computer uses a proxy server, click on the Specify Proxy button and fill in the proxy server information.
Figure 20: Specify Proxy
-
2.3 Click OK to close the open dialog boxes.
Result: A progress bar indicates that the deregistration process is executing.
-
-
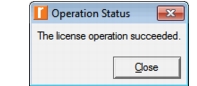
When the Deregister License operation is complete, the following dialog box appears. Click Close to exit license operations.
Figure 21: License Deregistration Success
-
Exit the License Manager, as described in Exiting the License Manager GUI.
Note: If the Express Method fails due to firewall restrictions or other problems, use the Browser method described in Procedure 15.
Procedure 15: Deregister Licenses Using Browser Method
-
Complete Procedure 13, selecting the Browser method for deregistering licenses.
Result: The License Manager launches your Web browser and points it to the licensing area of the support website.
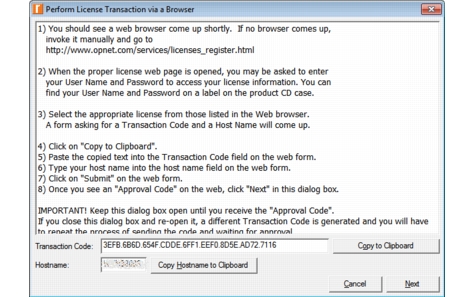
Result: License Manager launches a dialog box containing the Transaction Code and Hostname you will need in later steps.
Figure 22: Transaction Code and Hostname Dialog
-
If necessary, log in to the license website with your Riverbed support username and password. Click OK.
Note: If your browser fails to launch, start it manually and navigate to https://rpmapps.riverbed.com/cms/4dcgi/LICW4D_CL_Operations
-
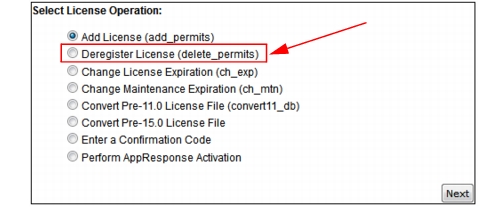
Select "Deregister License (delete_permits)" and click Next.
Figure 23: Deregister License—Browser Method
-
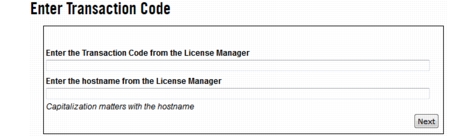
Enter the Transaction Code and Hostname from the License Manager (Figure 22). You can either paste the text or type it manually. Make sure there are no extra spaces before or after the code or hostname. Click Next.
Figure 24: Enter Transaction Code/Hostname
-
When the "Select Starting License" page appears, select the lowest license ID that you want to deregister from your computer. If you want to deregister only one license, select that license.
-
When the "Select Ending License" page appears, select the highest license ID that you want to deregister from your computer. If you want to deregister only one license, select that license.
Result: The confirmation page appears.
-
When the "License Registration Confirmation" page appears, check that the information is correct, then click Get Approval Code.
Result: The Approval Code appears.
-
In the License Manager, click Next and enter the Approval Code. This code can be very long, so make sure you copy the entire Approval Code. After you enter the Approval Code, click Next.
-
In the License Manager, a Confirmation Code is displayed. Copy this Confirmation Code and enter it where required in the browser window, as shown. Click Next.
Result: The licensing operation completes.
-
In the License Manager, click Done.
-
Exit the License Manager, as described in Exiting the License Manager GUI.
Procedure 16: Deregister Licenses Using the Email or Offline Method
-
Contact Technical Support to open a license registration case.
-
Complete Procedure 13, selecting either the Email or Offline method for deregistering licenses.
Result: The License Manager launches a dialog box containing the Transaction Code with license server hostname you will need in later steps.
-
Provide this information as follows:
- Email—Copy and paste the Transaction code into an email and send to your point of contact for your technical support case.
- Offline—Communicate the Transaction Code via phone or fax to your point of contact for your technical support case.
-
Click Next.
Result: A dialog box opens which prompts you for the Approval Code.
-
You will receive an Approval Code from Technical Support via email, phone, or fax. Enter this into the dialog box and click Next.
-
In the License Manager, a Confirmation Code is displayed. Copy this Confirmation Code to an email to send to your technical support point of contact or provide the code via phone or fax.
Result: Your license deregistration is complete.
Deregistering versus Clearing a License File
Should you use "Deregister License" or "Clear License File"? These two options sound very similar but each performs the same operation on a different scale.
-
Option 1—Deregister all licenses
If you want to deregister all of your licenses in a single operation, use Clear License File. This deregisters all licenses in the license file at once, regardless of their contract number range.
-
Option 2—Deregister one or more selected licenses
If you want to deregister a selected license use the Deregister License operation and select the license(s) to remove from your license file.
Clearing a License File
This operation deregisters all licenses from the license file in a single operation. The Clear License File button appears in the License Manager GUI only if no licenses in the file are in use. The choice also appears on the pop-up menu when you right-click on a server, if no licenses in the server's license file are in use. You should always contact Technical Support by e-mail, phone, or fax before performing this operation.
Changing the Maintenance Expiration for a License
The maintenance expiration controls which releases of the application you can run. Current maintenance allows you to use the latest release and entitles you to technical support and other services. The procedures in this section apply to scenarios in which you have the License Manager GUI available for license management. To begin the change maintenance expiration process, start with Procedure 17 and continue to the procedure that applies to the deregistration method you will be using.
Procedure 17: Change Maintenance Expiration for a License
- Open the License Manager GUI as described in Starting the License Manager GUI.
- Select the license server for which you want to modify licenses in the treeview. (See License Manager Operations within GUI for more information on the treeview.)
- In the License Manager, expand the license file by clicking on the "+" sign next to the "License file" folder icon. Make sure the license you want to modify is available (green).
- Select the license you want to modify by clicking on it (use control-click or click and drag to select multiple licenses). Then click on the Change Maintenance Expiration button on the right side of the License Manager (or right-click on the license in the treeview and select Change Maintenance Expiration) to start the transaction.
- Select one of the methods for modifying licenses (or click Cancel to exit this workflow):
- Express—Use Procedure 18
- Browser—Use Procedure 19
- Email—Use Procedure 20
- Offline—Use Procedure 20
- Go to the procedure indicated for a given method, if applicable.
Procedure 18: Change Maintenance Expiration Using the Express Method
-
Complete Procedure 17, selecting the Express method for modifying licenses.
-
Authenticate yourself to the license server.
-
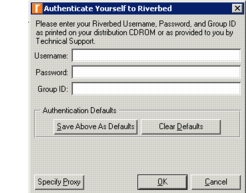
2.1 Enter your Riverbed support Username, Password, and Group ID in the appropriate fields.
Figure 25: Authenticate
-
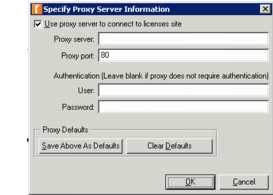
2.2 If your computer uses a proxy server, click on the Specify Proxy button and fill in the proxy server information.
Figure 26: Specify Proxy
-
2.3 Click OK to close the open dialog boxes.
Result: A progress bar indicates that the license operation is executing.
-
-
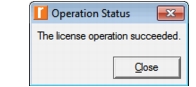
When the following dialog box appears, click OK to complete the operation and close the window.
Figure 27: Successful License Maintenance Change Operation
-
Exit the License Manager, as described in Exiting the License Manager GUI.
Note: If the Express method fails, try another method, such as the Browser method described in Procedure 19.
Procedure 19: Change Maintenance Expiration Using the Browser Method
-
Complete Procedure 17, selecting the Browser method for modifying licenses.
Result: The License Manager launches your Web browser and points it to the licensing area of the support website. If your browser fails to launch, start it manually and navigate to https://rpmapps.riverbed.com/cms/4dcgi/LICW4D_CL_Operations
Result: License Manager launches a dialog box containing the Transaction Code and Hostname you will need in later steps.
-
Enter your Riverbed support Username and Password, then click OK.
-
Select "Update Maintenance Expiration" and click Next.
Result: A dialog box appears in the License Manager GUI with your hostname and a transaction code. You need the transaction code for the next step.
-
Enter the Transaction Code and Hostname into the browser, and then click Next.
Note: You can either paste the text from the License Manager GUI or type it manually into the browser. Make sure there are no extra spaces before or after the code or hostname.
-
When the "Select Starting License" page appears, select the lowest license ID that you want to update. If you want to change the maintenance expiration date of only one license, select that license.
-
When the Select Ending License page appears, select the highest license ID that you want to update. If you want to change the maintenance expiration date of only one license, select that license.
Result: The confirmation page appears.
-
When the License Registration Confirmation page appears, check that the information is correct, and then click Get Approval Code.
Result: The Approval Code appears.
-
In the License Manager, click on the Next button, and enter the Approval Code. After you enter the Approval Code, click on the Next button.
Note: This code can be long, so make sure you copy the entire Approval Code.
Result: In the License Manager, the Confirmation Code appears.
-
Enter the Confirmation Code in the browser, and then click Next.
Note: The Confirmation Code was saved in the Session Log, which is available from the Help menu in the software, and can be retrieved later if necessary.
-
In the License Manager, click Done.
Result: The license is updated to its current authorized value.
Procedure 20: Change Maintenance Expiration Using the Email or Offline Method
-
Contact Technical Support to open a license registration case.
-
Complete Procedure 17, selecting either the Email or Offline method for changing maintenance expiration.
Result: The License Manager launches a dialog box containing the Transaction Code with license server hostname you will need in later steps.
-
Provide this information as follows:
- Email—Copy and paste the Transaction code into an email and send to your point of contact for your technical support case.
- Offline—Communicate the Transaction Code via phone or fax to your point of contact for your technical support case.
-
Click Next.
Result: A dialog box opens which prompts you for the Approval Code.
-
You will receive an Approval Code from Technical Support via email, phone, or fax. Enter this into the dialog box and click Next.
-
In the License Manager, a Confirmation Code is displayed. Copy this Confirmation Code to an email to send to your technical support point of contact or provide the code via phone or fax.
Result: Your change is complete.
Changing the Expiration Date for a License
The license expiration controls how long you can use the license. After a license expires, it no longer runs applications. The procedures in this section apply to scenarios in which you have the License Manager GUI available for license management. To begin the change expiration date process for licenses, start with Procedure 21 and continue to the procedure that applies to the method you will be using.
Procedure 21: Change License Expiration Date from License Manager
- Open the License Manager GUI as described in Starting the License Manager GUI.
- Select the license server on which you want to change license expiration date in the treeview. (See License Manager Operations within GUI for more information on the treeview.)
- In the License Manager, expand the license file by clicking on the "+" sign next to the "License file" folder icon. Make sure the license you want to select is available (green).
- Select the license you want to modify by clicking on it (use control-click or click-drag to select multiple licenses). Then click on the Change License Expiration button on the right side of the License Manager (or right-click on the license in the treeview and select Change License Expiration) to start the transaction.
- Select one of the methods for modifying license expiration (or click Cancel to exit this workflow):
- Express—Use Procedure 22
- Browser—Use Procedure 23
- Email—Use Procedure 24
- Offline—Use Procedure 24
- Go to the procedure indicated for a given method, if applicable.
Procedure 22: Change License Expiration Using Express Method
-
Complete Procedure 21, selecting the Express method for changing license expiration dates.
-
Authenticate yourself to the license server.
-
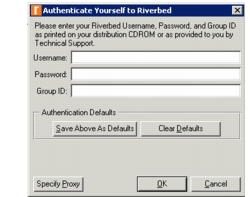
2.1 Enter your Riverbed support Username, Password, and Group ID in the appropriate fields.
Figure 28: Authenticate
-
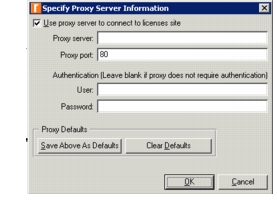
2.2 If your computer uses a proxy server, click on the Specify Proxy button and fill in the proxy server information.
Figure 29: Specify Proxy
-
2.3 Click OK to close the open dialog boxes.
Result: A progress bar indicates that the license operation is executing.
-
-
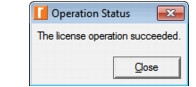
When the following dialog box appears, click OK to complete the operation and close the window.
Figure 30: Successful License Maintenance Change Operation
-
Exit the License Manager, as described in Exiting the License Manager GUI.
Note: If the Express Method fails due to firewall restrictions or other problems, use the Browser method described in Procedure 23.
Procedure 23: Change License Expiration Using Browser Method
-
Complete Procedure 21, selecting the Browser method for modifying licenses.
Result: The License Manager launches your Web browser and points it to the licensing area of the support website. If your browser fails to launch, start it manually and navigate to https://rpmapps.riverbed.com/cms/4dcgi/LICW4D_CL_Operations
Result: License Manager launches a dialog box containing the Transaction Code and Hostname you will need in later steps.
-
Log in with your Riverbed support Username and Password.
-
Select "Update License Expiration" and click Next.
-
Enter the Transaction Code and Hostname from License Manager. You can either paste the text or type it manually. Make sure there are no extra spaces before or after the code or hostname. Click Next.
-
When the "Select Starting License" page appears, select the lowest license ID that you want to modify. If you want to modify only one license, select that license.
-
When the "Select Ending License" page appears, select the highest license ID that you want to modify. If you want to modify only one license, select that license. The confirmation page appears.
-
When the "License Registration Confirmation" page appears, verify that the information is correct, then click Get Approval Code.
Result: The Approval Code appears.
-
In the License Manager, click Next and enter the Approval Code. This code can be very long, so make sure you copy the entire Approval Code. After you enter the Approval Code, click Next.
-
In the License Manager, a Confirmation Code is displayed. Copy this Confirmation Code and enter it where required in the browser window. Click Next.
Result: The licensing operation completes.
-
In the License Manager, click Done.
-
Exit the License Manager, as described in Exiting the License Manager GUI.
Procedure 24: Change License Expiration Using the Email or Offline Method
-
Contact Technical Support to open a license registration case.
-
Complete Procedure 21, selecting either the Email or Offline method for modifying licenses.
Result: The License Manager launches a dialog box containing the Transaction Code with license server hostname you will need in later steps.
-
Provide this information as follows:
- Email—Copy and paste the transaction code into an email and send to your point of contact for your technical support case.
- Offline—Communicate the transaction code via phone or fax to your point of contact for your technical support case.
-
Click Next.
Result: A dialog box opens which prompts you for the Approval Code.
-
You will receive an Approval Code from Technical Support via email, phone, or fax. Enter this into the dialog box and click Next.
-
In the License Manager, a Confirmation Code is displayed. Copy this Confirmation Code to an email to send to your technical support point of contact or provide the code via phone or fax.
Result: Your licensing operation is complete.