Add Licenses
This section discusses the ways to add licenses to a license server. For any of these procedures, note the following:
- The License Server service must be running on the computer to which you want to add the license
- You must also have permission to add licenses to the license server in question (see "Restricting License Server Administration" on page 78)
Note: The procedure in this section requires you to communicate with Riverbed Technical Support.
Add License from License Manager GUI
The License Manager GUI allows you to add licenses in one of two ways, as shown in the following figure:
- Add License button
- Add License on Server right-click menu
Figure 11: Add Licenses in License Manager GUI
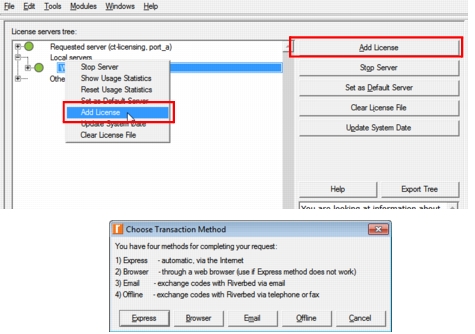
Either option allows you to add one or more licenses to a license server. From the dialog box that appears, you will also choose a transaction method. All of these licensing options are covered in the procedures that follow. Start with Procedure 9 and proceed to the procedure for the method you will use to add the licenses.
Procedure 9: Add Licenses to License Server
- Open the License Manager GUI as described in Starting the License Manager GUI.
- Select the license server to which you want to add licenses in the treeview. (See License Manager Operations within GUI for more information on the treeview).
- Click the Add License button or right-click on the license server in the treeview to start the transaction.
- Select one of the methods for adding licenses (or click Cancel to exit this workflow):
- Express—Use Procedure 10
- Browser—Use Procedure 11
- Email—Use Procedure 12
- Offline—Use Procedure 12
- Go to the procedure indicated for a given method, if applicable.
Procedure 10: Add Licenses Using Express Method
-
Complete Procedure 9, selecting the Express method for adding licenses.
-
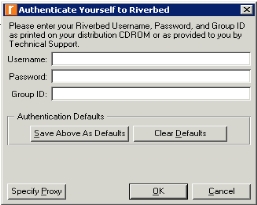
Authenticate yourself to the license server.
-
2.1 Enter your Riverbed Technical Support Username, Password, and Group ID in the appropriate fields.
Figure 12: Authenticate for Licensing
-
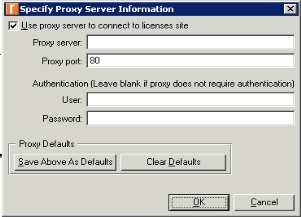
2.2 If your computer uses a proxy server, click on the Specify Proxy button and fill in the proxy server information.
Figure 13: Specify Proxy
-
2.3 Click OK to close the open dialog boxes.
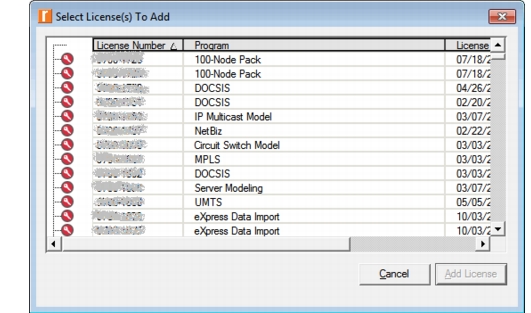
Result: A dialog box opens with a list of available licenses.
-
-
Select an available license by clicking on it. To select several licenses, use Ctrl-click or click and drag.
-
Click the Add License button.
Figure 14: Select Licenses
-
When the Add License operation is complete, the Select Product Modules dialog box might appear. This allows you to select the available modules you want to use. Select the modules of interest.
-
Exit the License Manager, as described in Exiting the License Manager GUI.
Note: If the Express Method fails due to firewall restrictions or other problems, use the Browser method described in Procedure 11.
Procedure 11: Add Licenses Using Browser Method
-
Complete Procedure 9, selecting the Browser method for adding licenses.
Result: The License Manager launches your Web browser and points it to the licensing area of the support website.
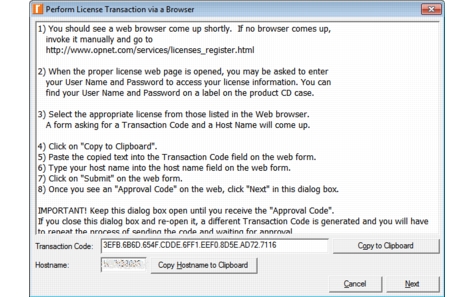
Result: License Manager launches a dialog box containing the Transaction Code and Hostname you will need in later steps.
Figure 15: Transaction Code and Hostname Dialog
-
If necessary, log in to the license website with your Riverbed support username and password. Click OK.
Note: If your browser fails to launch, start it manually and navigate to https://rpmapps.riverbed.com/cms/4dcgi/LICW4D_CL_Operations
-
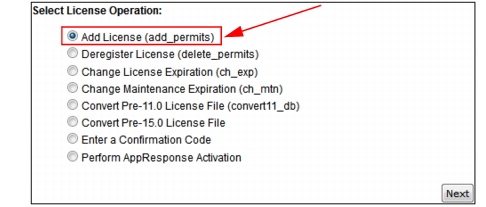
Select "Add License (add_permits)", then click Next.
Figure 16: Add License—Browser Method
-
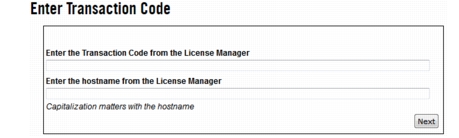
Enter the Transaction Code and Hostname from the License Manager (Figure 15). You can either paste the text or type it manually. Make sure there are no extra spaces before or after the code or hostname. Click Next.
Figure 17: Enter Transaction Code/Hostname
-
When the "Select Starting License" page appears, select the lowest license ID that you want to add to your computer. If you want to add only one license, select that license.
-
When the "Select Ending License" page appears, select the highest license ID that you want to add to your computer. If you want to add only one license, select that license.
Result: The confirmation page appears.
-
When the "License Registration Confirmation" page appears, check that the information is correct, then click Get Approval Code.
Result: The Approval Code appears.
-
In the License Manager, click Next and enter the Approval Code. This code can be very long, so make sure you copy the entire Approval Code. After you enter the Approval Code, click Next.
-
When the Add License operation is complete, the Select Product Modules dialog box may appear. This allows you to select the available modules you want to use. Select the modules of interest.
-
Exit the License Manager, as described in Exiting the License Manager GUI.
Procedure 12: Add Licenses Using the Email or Offline Method
-
Contact Technical Support to open a license registration case.
-
Complete Procedure 9, selecting either the Email or Offline method for adding licenses.
Result: The License Manager launches a dialog box containing the Transaction Code with license server hostname you will need in later steps.
-
Provide this information as follows:
- Email—Copy and paste the Transaction code into an email and send to your point of contact for your technical support case.
- Offline—Communicate the Transaction Code via phone or fax to your point of contact for your technical support case.
-
Click Next.
Result: A dialog box opens which prompts you for the Approval Code.
-
You will receive an Approval Code from Technical Support via email, phone, or fax. Enter this into the dialog box and click Next.
Result: Your license registration is complete.