Annotating a Logger File
An annotation is associated with a particular time or time range in a Logger file. Each annotation has a name, and you can associate text with it. Besides being a way to store information about the events in a Logger file, annotations allow you to quickly zoom in on a file or bound playback to a segment of a file. The Annotations View has a context sensitive menu from which you can execute the various annotation commands.
Adding an Annotation
Procedure 162: Annotating a Logger File
-
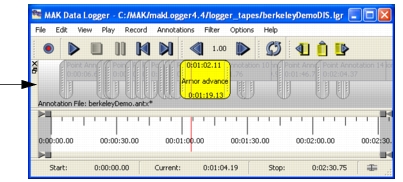
Choose View > Annotations. Annotations, if any, are displayed in the Logger data display area (Figure 143).
Figure 143: Annotations display
-
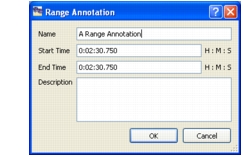
Choose Annotations > Create Annotation > annotation_type, where annotation_type type is Point Annotation, Range Annotation, or an instant annotation. (For details about inserting instant annotations, please see Adding an Instant Annotation.) The Point Annotation (or Range Annotation) dialog box opens.
Figure 144: Range Annotation dialog box
-
In the Name text box, type a name for the annotation. The name is displayed in the annotation view.
-
Optionally, change the timepoint. For a point annotation, the default time for the annotation is the current timepoint. For a range annotation, the default start time and end time for the annotation’s time range is the current timepoint. The time is specified in hour:minute:second.tenth_of_second format.
-
Optionally, in the Description box, enter any text that you want to accompany the annotation.
-
Click OK. The annotation is added to the display area (Figure 143).
Note: If you create an annotation while the Annotations View is hidden, the Annotations View is automatically displayed.
Adding an Instant Annotation
Instant annotations add an annotation at the current time point without requiring you to fill out a dialog box. The annotation time, for point annotations, or start time, for range annotations, is set to the time point. This allows you to quickly add annotations as you play or record a file without needing to stop the file. You would typically go back and edit the annotation at a later time.
Instant range annotations are inserted with identical start and end times.
- To add an instant annotation, choose Annotations > Create > Instant Point Annotation (or Instant Range Annotation), or press
\(backslash) or click the Add Point Annotation button ( ) to insert a point annotation or
[(left bracket) to insert a range annotation. - To set the end time for an instant range annotation, use the Update Annotation feature described in the next section or press the
]key at the point you want to end the annotation’s range.
Dynamically Resetting an Annotation’s Start or End Time (Update)
When you insert annotations while you are recording or playing a file, you may want to adjust their time point. If you insert a range annotation, you will want to set the end point. The Update Annotation command lets you change the start and end times of the currently selected annotation while the Logger is playing or recording.
When you update a range annotation, if the current time is earlier than the start time, the start time is reset. If the current time is later than the start time, the end time is reset.
Procedure 163: Updating an Annotation
- Create an annotation or select an annotation while the Logger is recording or playing a file.
- At the time point to which you want to update the annotation, choose Annotations > Update or press
](right bracket). The appropriate timepoint of the annotation is reset to the time at which you issued the update command. The timepoint can be updated to an earlier or later time.
Saving an Annotation File
You can save annotations to a file. Annotation files have the extension .antx.
Procedure 164: Saving Annotations to a File
- Create annotations as described in Adding an Annotation.
- Choose Annotations > Save. The Save Annotation File dialog box opens.
- Type a name for the annotation file.
- Click Save.
Opening an Annotation File
When you open an annotation file, any annotations currently displayed in the Logger window are removed and replaced with the annotations in the file you opened. If you load a file with Play on Load enabled and the file has an annotation file, the annotation file is loading automatically.
Note: You can open annotation files that have been saved in legacy format (
.ant) and the current format (.antx).
Procedure 165: Opening an Annotation File
- Choose Annotations > Open. The Open Annotation File dialog box opens.
- Select an annotation file.
- Click Open. The annotations in the file are displayed.
Importing an Annotation File
When you import an annotations file, the annotations are added to any annotations that are already displayed in the Logger window.
Procedure 166: Importing an Annotation File
- Choose Annotations > Import. The Open Annotation File dialog box opens.
- Select an annotation file.
- Click Open. The annotations in the file are imported.
Selecting an Annotation
To select an annotation, choose Annotations > Select > annotation, where annotation is one of the annotations in the list, or in the Annotations View, click the annotation.
Editing an Annotation
You can edit the properties of an annotation (name, text, and start and end times).
Procedure 167: Editing an Annotation
- Select the annotation and choose Annotations > Properties, or double-click the annotation. The Point Annotation or Range Annotation dialog box opens.
- Edit the properties as desired.
- Click OK.
Editing a Point Annotation Directly
To edit the time of a point annotation, drag it to a new time.
Editing a Range Annotation Directly
You can edit the start and end times of a range annotation by dragging its endpoints or dragging the entire annotation.
To edit a range annotation use either or both of the following methods:
- In the Annotations bar, click and hold the left mouse button on an end point of an annotation and drag it to a new time.
- In the Annotations bar, click and hold the left mouse button anyplace inside an annotation’s range and drag the entire annotation to a new location.
Converting an Annotation to the Other Annotation Type
You can convert point annotations to range annotations and range annotations to point annotations. The time point of a point annotation becomes the start time of the new range annotation. You can then change the end time as described in previous sections. The start point of a range annotation becomes the time point of a point annotation.
Procedure 168: Converting an Annotation to the Other Annotation Type
- Select the point annotation that you want to convert.
- Choose Annotations > Convert To > Range Annotation (or Point Annotation).
- If you converted a point annotation to a range annotation, specify the end point of the annotation, as described in Editing an Annotation.
Deleting an Annotation
Procedure 169: Deleting an Annotation
- Select the annotation you want to delete.
- Choose Annotations > Delete Annotation, or press the
Deletekey.
If you remove an annotation from a set of annotations that you have saved to a file, save the edited list with the File > Save command.
Moving the Timeline Cursor to the Start of an Annotation
You can move the timeline cursor to an annotation or the start time of a range annotation.
Procedure 170: Moving the Timeline Cursor to an Annotation
- Select the annotation.
- Choose Annotations > Jump to Start.
Moving the Timeline Cursor to the End of an Annotation
You can move the timeline cursor to the end time of a range annotation.
Procedure 171: Moving the Cursor to the End of an Annotation
- Select the annotation.
- Choose Annotations > Jump to End.
Jumping to the Next or Previous Annotation
You can quickly jump to the start of the next or previous annotation, if there is one.
- To jump to the previous annotation, choose Annotations > Jump to Next, or click the Jump to Next Annotation button (
 ).
- To jump to the previous annotation, choose Annotations > Jump to Previous, or click the Jump to Previous Annotation button (
 ).
Zooming the Timeline to an Annotation
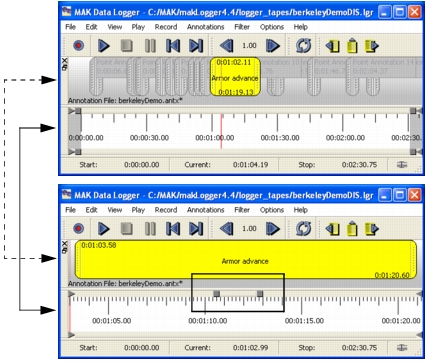
You can zoom the timeline view to an annotation. For example, in Figure 145, in the first view, the time line shows the entire length of the file and the zoom sliders are fully expanded. After zooming to the Armor Advance annotation, the zoom sliders show the location of the start and end points of the annotation along the zoom bar, the annotation takes up the entire data display, and the timeline is zoomed to the start and end points of the annotation.
Note: Zooming the timeline to an annotation does not change the location of the timeline cursor.
Figure 145: Zooming an annotation
Procedure 172: Zooming the Timeline to an Annotation
- Select the annotation.
- Choose Annotations > Zoom to Annotation.The Annotations bar and the time line zoom to fit the range of the annotation (Figure 145).
Bounding Playback to an Annotation
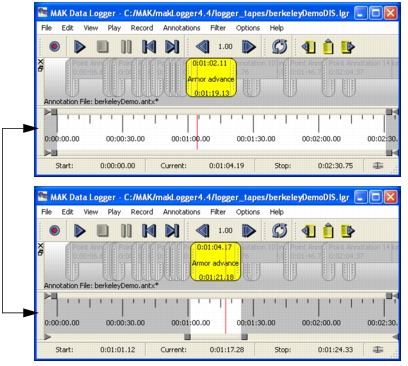
You can set the playback segment to the range of an annotation. For example, in Figure 146, in the first view, the playback handles are at the start and end of the file. After bounding to the annotation, the playback handles are at the start and end points of the annotation. For further comparison, notice that in Figure 145, the playback handles are not affected by zooming to the annotation. (They are not visible in the illustration because they are out of the range of the zoomed area.)
Figure 146: Bounding playback to an annotation
Procedure 173: Setting the Playback Segment to the Range of an Annotation
- Select the annotation.
- Choose Annotations > Bound to Annotation. The playback range changes to match the start and end points of the annotation (Figure 146).