Creating a Shared Code Process Model
You use the Process Editor to develop shared code in Modeler. The Startup Wizard for new process models provides templates for your code.
Procedure 1: Creating a New Shared Code Model
-
In Modeler, choose File > New…, select Process Model from the pull-down menu, and click OK.
The Process Editor Startup Wizard opens.
-
Select the Shared Code radio button and click Next.
-
Specify the shared code details:
- Enter the model name.
- Select the “Create blocking process model” checkbox if you plan to create blocking code; unselect the checkbox for non-blocking code. (See Blocking vs. Non-blocking Code for more information.)
- Select the “Support C++ code” if you plan to use C++.
-
Click Finish.
Two editor windows open, containing external source file and header file templates for the type of model you specified.
Blocking vs. Non-blocking Code
The decision to develop blocking versus non-blocking code depends on the needs of your model (what the code is going to do) and whether or not you are starting with pre-existing code. In general, you should use whichever mode your real code is going to use.
Non-blocking Code
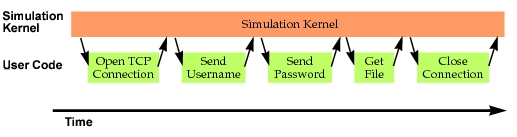
Non-blocking code is the typical approach in Riverbed simulations. It allows the Simulation Kernel have control of event scheduling and maintain simulation time. In this approach, models are broken into small pieces and control is returned to the Simulation Kernel between each task, that is, after the enter execs of a non-forced (red) state.
Figure 1 shows how this might be handled for an FTP session. The Simulation Kernel calls each task when the preceding action is complete. Because each task is independent, state information must be saved in state variables between calls.
Figure 1: Non-blocking Code Example
The Startup Wizard template for non-blocking code defines several functions in the external source file. Each function, for which you provide the functionality, is a callback that will be called by the Simulation Kernel at the appropriate time. For example, the packet arrival function will be called when a packet arrives.
Do not use blocking functions such as op_sleep() or op_select() in non-blocking code. Socket functions will operate in non-blocking mode (see the “Shared Code API” for details).
Blocking Code
Blocking code is common in real code (with some exceptions, such as GUI programs that use callbacks to respond to user events). Because it requires less refactoring, blocking code is a good choice when moving existing code to a shared code model.
Figure 2 shows how the FTP session shown earlier would be handled in blocking code.
Figure 2: Blocking Code Example
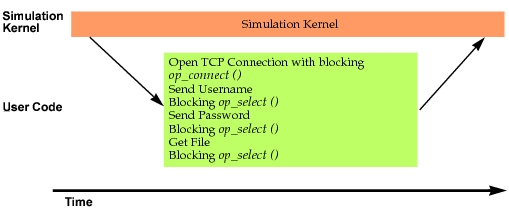
All tasks are put in a single function that runs through to completion. Mechanisms in the op_connect () and op_select () calls allow simulation time to advance without explicitly returning control to the Simulation Kernel. Local stack variables stay intact during the op_connect () and op_select () calls, so state variables are not needed.
Shared Code Initialization Attribute
Every shared code process model has a string attribute called “Initialization” that can be used for a set of command line arguments or a file location. Riverbed recommends that you use this attribute as a file location, because:
- It is easier to change the contents of a file than to update attributes in the project.
- This allows for using the same configuration files as the real code.
- You can use one file for multiple process models and they stay in sync.
When you add your process model to a node, you should promote the Initialization attribute by giving it a promotion name and promotion group.