Migrating Customizations from a Previous Release
Because of unique protocol requirements, you may have customized models or code in a previous release of Riverbed Modeler. Subsequent releases and updates to Riverbed Modeler may contain changes to code and models that may supersede your customizations. Since process or node models from one release may not work with another release, it is important to understand what has changed so that you may successfully migrate your customizations into the new release. This workflow prescribes a useful methodology that describes the procedure for migrating customizations from a previous release.
Note: This workflow applies to Riverbed Modeler users only.
To migrate over multiple releases, i.e., from version 10.5 to version 14.0, you may need to perform multiple migrations. This workflow describes how to migrate your customizations from release 12.0 or later to the 18.6 release. See also Migrating Customizations from a Previous Release—Prior to 12.0 for instructions on migrating customizations in earlier releases up to release 12.0.
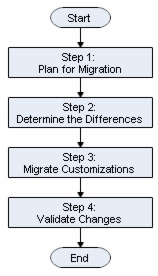
The following figure shows the workflow described in this document.
Figure 1: Customization Migration Workflow
Software Components: Migrating Customizations from a Previous Release
This workflow only requires the standard Riverbed Modeler software. No additional modules are required. However, if you are working with specialized models, you may require additional licenses for those particular models.
Prerequisites: Migrating Customizations from a Previous Release
This workflow assumes a certain amount of experience with Riverbed Modeler and with customizing the underlying code. To perform this workflow efficiently, you should already have an understanding of the customizations you have in your software.
Workflow Steps: Migrating Customizations from a Previous Release
The following is a guide to the procedures you must perform for the type of customization you have. In most of the scenarios described in Step 1, you may be able to skip Steps 2 and 3. If you have modified Riverbed-created models, however, you must continue with all steps.
- Step 1: Plan for Migration
- Step 2: Determine the Differences
- Step 3: Migrate Customizations
- Step 4: Validate Changes
Step 1: Plan for Migration
Note: Before beginning this workflow, be sure to read the Release Notes for the latest Riverbed Modeler release.
To migrate smoothly from one release of Riverbed Modeler to another, it is best to start with a solid plan. This includes assembling documentation of changes and customizations you have made, and then determining what projects, scenarios, traffic, models, or code you want to use in the newest release.
Topology and Traffic Data
If you created a project by importing a topology and/or traffic data, you can simply reimport this information into a new project in the updated Riverbed Modeler release.
Model Assistant Files
If you have a model assistant file that contains object location information, you can simply use it in the updated Riverbed Modeler release.
Be careful when using model assistant files that create objects, destroy objects, or change object attributes. Attribute names, structure, and functionality may have changed in the latest version of the Riverbed model library. Therefore, model assistant files that depend on the older attribute structure may not be applied correctly. You may also discover that you no longer need a model assistant file to achieve the same modeling goals.
Note: Read the Release Notes for information on special behavior or conversion required for model assistant files from previous releases.
Automatic Conversion
WARNING: If you have made changes to the underlying code, attributes, or models, automatic conversion is not sufficient to migrate the changes into the newest release.
Automatic Device Conversion
is a way in which Riverbed Modeler can take models you created in Device Creator from the last model library release and convert them to work with the new release. To use automatic conversion, open your project in the new release and follow the prompts on the dialog box that appears.
Note: Automatic conversion is designed to work between successive releases of Riverbed Modeler and may not work correctly if you skip versions (i.e., converting from version 10.5 PL0 with 29 January 2004 models to version 11.5 PL1 with 20 December 2005 models).
Automatic Attribute Conversion
is done automatically for you. For example, if the location of an attribute has moved since the last release, Riverbed Modeler will automatically map and transfer the values from your existing models to the proper location in the new release.
Automatic Preference Conversion
When you have no preferences file for 18.6 or are upgrading from release 12.0 or later, Riverbed Modeler will automatically search previously installed versions and migrate your customized preferences to the new release. The following dialog box will appear.
Figure 2: Automatic Preference Conversion
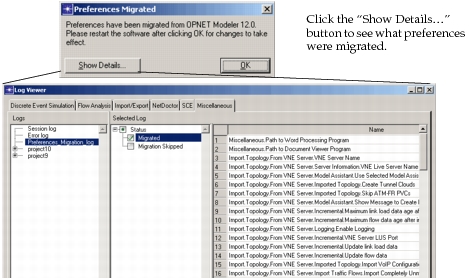
Some items are not migrated, including
mod_dirsproduct_options- Compilation and linking preferences
Custom Models
If your custom models do not interact with the Riverbed model library in any way—that is, you have not modified the underlying code or node models of Riverbed-created models—then conversion is simple: open your project in the new release.
If you have models that have customizations to the code underlying Riverbed-created models, continue to the next step in this workflow.
Purely custom models do not need to be migrated but still require a recompilation and validation of the compilation output (new warnings, etc.).
Step 2: Determine the Differences
Although reading the Release Notes for the latest version of Riverbed Modeler is a good place to start, the Release Notes do not describe line-by-line changes in attributes and models. To get a better understanding of what has changed and how you need to modify your own customizations, you must find the differences between file versions for each file you have modified.
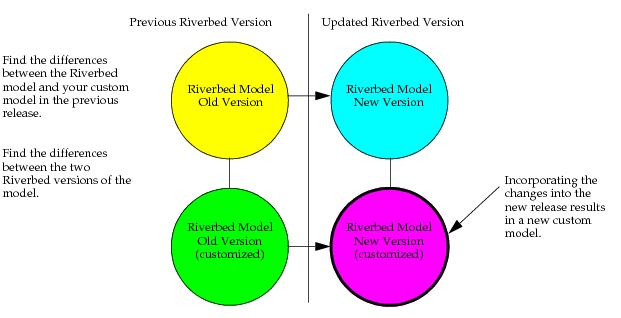
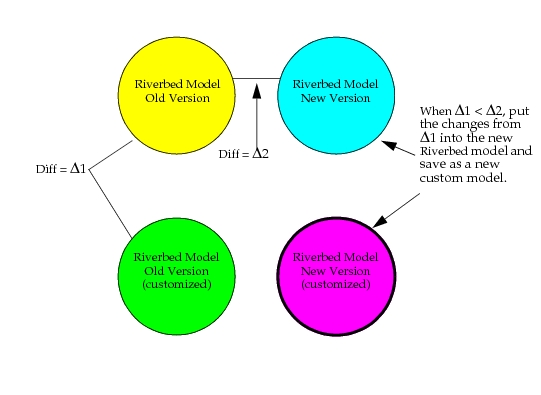
The following figure shows the models between which you must determine the differences. Both an older and newer version of the model exist. If you have modified a model in a previous release, you must migrate those changes to the new model. Therefore, you must find the difference between the model in the previous version and your custom model. Then you must find the difference between the models in the previous Riverbed Modeler release and in the new release.
Figure 3: Determining the Differences
Working from a list of the files you have modified in the previous release, perform the following procedures as appropriate.
You can compare model directories to determine which files have been modified, removed, or added since the previous version. Use the following procedure to compare directories.
Procedure 1: Compare Model Directories
-
Select File > Manage Model Files > Compare Model Directories…
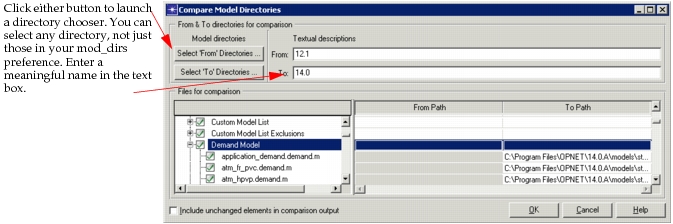
Result: The following dialog box appears.
Figure 4: Compare Model Directories Dialog Box
-
Click OK to compare the “From” and “To” directories.
-
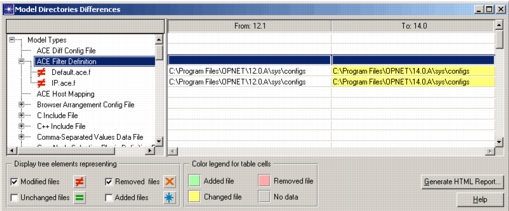
Review the results of the comparison.
Figure 5: Compare Model Directories Report
As of Release 14.0, you can do bulk conversions of the binary process and node model files to XML. This lets you easily check the files into a configuration management or versioning control tool as a new branch.
If you have the previous release checked in as a branch, you can do a diff between the old release and the new release. You can also do a diff between the older XML version for a file and the new XML version from this release. Selection and use of version control methods and systems are outside the scope of this workflow, but they are useful for controlling customizations of model files.
Note: This procedure is not applicable to process models that have specialized licenses. Licensed models do not allow you to generate XML or textual reports, but you can generate a model difference report (see Procedure 1), if you have the appropriate license. A
.pr.cwill only allow you to compare the source code, not attributes, statistics, or other items that are only stored in the.pr.m
If you want to modify a single or small set of node or process models, you do not need to convert the file(s). Open the model file in Riverbed Modeler and edit as normal. Both the binary and XML versions are modified and saved.
Note: This is not a required procedure, but it can simplify model migration, particularly when you already use a versioning system.
The following procedure describes the binary to XML conversion process.
Procedure 2: Convert Binary Files to XML
-
Start Riverbed Modeler.
-
Select File > Manage Model Files > Convert Binary Models to XML Form…
Result: A warning dialog box appears, telling you that this action will reserve the Riverbed Modeler license for your use for two hours.
-
Select Yes to proceed or No to cancel the conversion.
Note: You can choose to suppress the warning in future conversions by selecting the checkbox.
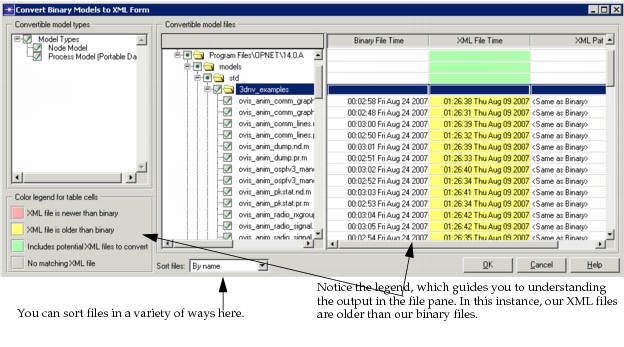
Result: The conversion dialog box appears, as shown in the following figure.
Figure 6: Conversion Dialog Box
-
Select model types or instances, in any of the three navigation panes, to convert.
Note: The files most likely to need conversion—files without a counterpart or files with an older counterpart—are selected by default, but you can change the selection as necessary.
-
Click OK to run the conversion.
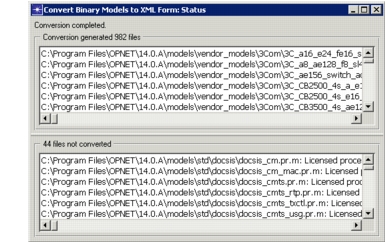
Result: A summary log appears, as shown below, which lists the models that were converted and the ones that were not. Two typical reasons for a failed conversion are either that the model is licensed or that an older version of the file being generated already exists with no permissions to overwrite it.
Figure 7: Conversion Results
-
Close the results log, when finished reviewing.
Note: You can copy the list of generated files to use as input to other tools (e.g., a list of files to check in a versioning systems).
If you have text files you want to compare (for example, a custom ex.c or .h file), these files are already suitable for comparison. Therefore, you do not have to generate a text report or XML code file. To find the differences between the files, use the following procedure.
Procedure 3: Find the Difference for Text Files
- Find the difference between the original model from the previous Riverbed Modeler release and your custom model from the previous Riverbed Modeler release by using the UNIX
diffcommand, Microsoft’s Windiff, or another file comparison utility. You can refer to this difference as Δ1. - Find the difference between the original model from the previous Riverbed Modeler release and the model from the new release. You can refer to this difference as Δ2.
- Do this for each file of these types for which you have created customizations.
If you have custom process, node, link, path, demand, wireless domain, packet format, or ICI models, or if you have derived node, link, path, demand, or wireless domain models, you must manually compare the models to find the differences. Use the following procedure to determine the differences.
Procedure 4: Find the Difference for a Custom or Derived Model
- Find the first difference.
- 1.1 Open the original link or demand model from the previous Riverbed Modeler release and your custom link or demand model from the previous Riverbed Modeler release.
- 1.2 Compare the two models and note the differences. You can refer to these differences as Δ1.
- Find the second difference.
- 2.1 Open the original link or demand model from the previous Riverbed Modeler release and the link or demand model from the new release.
- 2.2 Compare the two models and note the differences. You can refer to these differences as Δ2.
- Do this for each file of these types for which you have created customizations.
Step 3: Migrate Customizations
After you have determined the differences between your old models and the models in the new release, you can begin the migration process.
Note: The use of deltas between models does not apply to purely custom models. Simply migrate the models to the new release.
Procedure 5: Migrate Customizations
-
To save work, use the following decision path before making the changes.
- If Δ1 seems easier to migrate than Δ2, then bring Δ1 into the file in the newest Riverbed Modeler release, shown in the following figure.
- If Δ2 seems easier to migrate than Δ1, then bring Δ2 into the customized model.
Figure 8: Δ1 easier than Δ2 Scenario
Note: Although this procedure is meant to be a guide for decision-making and merging of code and model customizations, always consider modifications carefully, examining and merging the modifications into your new model.
- If Δ2 seems easier to migrate than Δ1, then bring Δ2 into the customized model, as shown in the following figure.
Figure 9: Δ2 easier than Δ1 Scenario
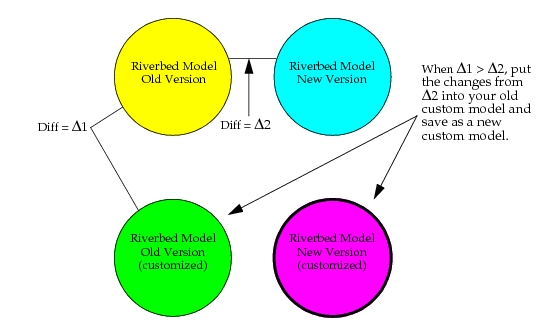
-
For each custom model, make the changes as decided upon in step 1.You can use a variety of diff and merge tools to compare and merge changes into the XML version of your model files.
-
Save your files.
Now that you have completed the comparison and merging of your customizations into the XML files, you can mass convert the XML files to binary in Riverbed Modeler, as described in the following procedure.
Note: Converting the XML files to binary is not a required procedure, but it can simplify model migration, particularly when you already use a versioning system.
Procedure 6: Convert XML Files to Binary
-
Select File > Manage Model Files > Convert XML Models to Binary Form…
Result: A warning dialog box appears, telling you that this action will reserve the Riverbed Modeler license for your use for two hours.
-
Select Yes to proceed.
Note: You can choose to suppress the warning in future conversions by selecting the checkbox.
Result: The conversion dialog box appears.
-
Select the model types, directories, or files you want to convert and click OK.
Result: A summary of the file conversion appears in a results log.
-
Close the results log, when finished reviewing. Note that you can copy and paste the list of files into any text editor.
-
Compile any files with code and review the results.
Step 4: Validate Changes
After migrating your customizations, validate the changes you have made by comparing the results from a discrete event simulation on the previous version of Riverbed Modeler and on the new version. Ensure that the results are similar and do not produce serious errors. Do this by running a set of simulations, and then compare the results, trends, averages, confidence intervals, and so on. Troubleshoot your changes as necessary to debug the code modifications.